Xemu is an Original Xbox Emulator.
Website: https://xemu.app/
GitHub: https://github.com/mborgerson/xemu
Compatibility List: https://xemu.app/#compatibility
Xemu Wiki: https://xemu.app/docs/download/
Quickstart Guide (Skip the HDD requirement, it is pre-included with EmuDeck): https://xemu.app/docs/required-files/
Xemu Table of Contents
Getting Started with Xemu
Xemu is a fairly straight-forward emulator to set up. Place your xiso formatted ROMs in Emulation/roms/xbox. Read the File Formats section to learn more about xiso formatted ROMs. Place your BIOS directly in Emulation/bios. Read the Configuration section to learn more about Xemu, the expected BIOS and naming conventions, and Xemu's folder locations.
To launch your ROMs in game mode, use Steam ROM Manager and use one of the following parsers to play your Xbox (OG) ROMs:
ES-DEMicrosoft XBox - XemuEmulators
Xemu Configuration
- Type of Emulator: Flatpak
- Config Location:
/home/deck/.var/app/app.xemu.xemu - ROM Location:
Emulation/roms/xbox - BIOS Location:
Emulation/bios- Do not create any additional folders in this folder for Xbox BIOS
- Required BIOS:
- MCPX Boot ROM Image:
mcpx_1.0.bin - Flash ROM Image:
Complex_4627v1.03.bin - These are EmuDeck's pre-configured file names, you must name the files exactly as written above. If you choose to provide a different Flash ROM Image, you can either rename the file or open Xemu and change the settings to point to the file directly.
- MCPX Boot ROM Image:
- Storage Location:
Emulation/storage/xemu - Saves:
Emulation/storage/xemu/xbox_hdd.qcow2- To access your saves, see How to Access Saves
Note: ~/.var is an invisible folder by default. In Dolphin (file manager), click the hamburger menu in the top right, click Show Hidden Files to see these folders.
Works With
- Steam ROM Manager
- ES-DE
Xemu Folder Locations
These file locations apply regardless of where you chose to install EmuDeck (to your internal SSD, to your SD Card, or elsewhere). Some emulator configuration files will be located on the internal SSD as listed below.
$HOME refers to your home folder. If you are on a Steam Deck, this folder will be named /home/deck (you will likely not see deck in the file path when navigating using the file manager).
Paths beginning with Emulation/.. correspond to your EmuDeck install location. If you installed on an SD Card, your path may be /run/media/mmcblk0p1/Emulation/roms/... If you installed on your internal SSD, your path may be /home/deck/Emulation/roms/..
Note: Folders with a . (.var, .local, .config, etc.) at the beginning are hidden by default. In Dolphin (file manager), click the hamburger menu in the top right, click Show Hidden Files to see these folders.
$HOME/.var/app/app.xemu.xemu
app.xemu.xemu/
├── cache
├── config
│   ├── glib-2.0
│   │   └── settings
│   ├── gtk-3.0
│   │   └── bookmarks
│   ├── ibus
│   │   └── bus
│   ├── pulse
│   │   └── cookie
│   └── user-dirs.dirs
└── data
    ├── recently-used.xbel
    └── xemu
        └── xemu
            ├── shader_cache_list
            ├── shaders
            ├── xemu.toml
            └── xemu.toml.bak
Emulation/storage/xemu
xbox_hdd.qcow2is a "pre-built 8G Xbox HDD image, free of any copyrighted content, and only contains a dummy dashboard" provided by Xemu- The "Hard Disk Image" is one of the required files mentioned in Xemu's setup documentation
- You may also choose to provide your own hard disk image. Other hard disk images may include additional features such as FTP
How to Update Xemu
How to Update Xemu
- Update through
Discover(Shopping bag icon) - Through the
Update your Emulators & Toolssection on theManage Emulatorspage in theEmuDeckapplication
How to Launch Xemu in Desktop Mode
How to Launch Xemu in Desktop Mode
- Launch
xemufrom the Applications Launcher (Steam Deck icon in the bottom left of the taskbar) - Launch the script from
Emulation/tools/launchers,xemu.sh - Launch the emulator from
Steamafter adding it via theEmulatorsparser inSteam ROM Manager
Xemu File Formats
- .iso (xiso formatted)
What is the xiso format?
From Xemu:
"xemu requires game discs to be in the form of xiso images. These are generally saved with a .iso extension, but are not the same as typical ISO images."
Put simply, xiso ROMs are ISOs stripped of their video partition.
Typically, you will start with an ISO ROM that has an .iso file extension. In order to use this ROM in Xemu, you will need to select one of the methods in the How to Convert ROMs to XISO Format section to convert it to the xiso ROM format.
Xemu Common Issues
"The guest has not initialized the display"
This is likely due to a mismatch of MCPX and BIOS images, or a corrupt MCPX boot ROM.
"Please insert an Xbox disc"
Try restarting Xemu. If you continue to get the message, your ISO may not be dumped in a compatible way. Try using extract-xiso to pack your ISO.
How to Convert ROMs to XISO Format
Xemu Tips and Tricks
How to Convert ROMs to XISO Format
List of Methods
- Method 1: Use the xiso Website (Steam Deck)
- Method 2: Use XDVDMulleter (Windows)
- Method 3: extract-iso (Windows)
- Method 4: extract-iso (Linux)
- Method 5: extract-iso (Mac)
- Method 6: dd
Method 1: Use the xiso Website (Steam Deck)
Instructions provided on website.
Link: https://xiso.antangelo.com/
Note:
- This website is still in beta
- If it does not work on Firefox, use Chrome or Edge instead
Method 2: Use XDVDMulleter (Windows)
Link: https://archive.org/details/xdvdmulleterv10.2beta


Method 3: extract-iso (Windows)
Link: https://github.com/XboxDev/extract-xiso
Instructions
- Go to the releases tab: https://github.com/XboxDev/extract-xiso/releases/tag/build-202204252159
- Download the release .ZIP
- Extract it somewhere on your computer
- Put the untrimmed Xbox .ISO in the same directory
- Rename the .ISO to something without spaces like
game-redump.iso(doesn't have to be this exact name) - Open command prompt on your computer
- Navigate to the directory containing the .EXE and your .ISO
- Run
extract-xiso -r game-redump.iso
Xemu's Tutorial: https://xemu.app/docs/disc-images/
Method 4: extract-iso (Linux)
Note: Cannot be built on the Steam Deck, but can be built elsewhere and copied. Then, it is usable on Steam Deck.
-
Enter these commands in your terminal
# Install dependencies # Example for Arch: sudo pacman -Syu --needed base-devel cmake # Clone Repo git clone https://github.com/XboxDev/extract-xiso.git # cd into directory cd extract-xiso # Create working directory mkdir build cd build # Build project cmake .. make -
Put the untrimmed Xbox .ISO in the same directory
- Rename the .ISO to something without spaces like
game-redump.iso(doesn't have to be this exact name) - Navigate to the directory containing your .ISO
- Run
extract-xiso -r game-redump.iso
Method 5: extract-iso (Mac)
- Open terminal
- In terminal type the following:
Xcode-select --install - Click allow on the Pop-up
- Navigate to
extract-xiso, cdthe/path/to/extract-xiso - Type
make - Then type the following:
sudo chmod +x extract-iso - Finally run the executable:
./extract-xiso name\of\game.iso
Method 6: dd (Linux)
Note: May not work on Steam Deck, needs testing.
Refer to Xemu's wiki for instructions, https://xemu.app/docs/disc-images/#about-redump-isos
How to Configure Multiplayer
Xemu comes with a nifty auto-map feature that makes setting up multiplayer a breeze. To set up multiplayer, you simply need to enable the additional ports.
- Open Xemu
- Open the
Inputsettings - For each controller you are using for Player 2, 3, and 4, click the respective tab
- You do not need to adjust any settings for Player 1
- In the drop-down menu
- Player 2:
Steam Virtual Gamepad 2 - Player 3:
Steam Virtual Gamepad 3 - Player 4:
Steam Virtual Gamepad 4
- Player 2:
- After you are finished enabling any additional players, exit out of Xemu and you may open your game either directly as a shortcut in Steam or through ES-DE
- (Optional) You may need to re-arrange the controller order in Game Mode for your controllers to function as expected. See How to Re-Arrange the Controller Order to learn how
How to Apply Zink
Preface
On the Steam Deck, some Xbox game graphics will not render properly. Applying Zink can fix these graphical issues.
However, Zink can also cause performance hits in certain games. Apply it on a per-game basis and keep in mind that if performance is degraded, it may be due to Zink.
You can read more about the issue here: https://github.com/xemu-project/xemu/issues/1279#issuecomment-1381015271.
Read one of the below sections to learn how to apply Zink to your Xbox games.
Practical Uses of Zink
- Fixes graphical issues
- Improves performance in some games (may worsen in others)
- Fixes black screen issues in some games
How to Apply Zink to ES-DE Games
- In Desktop Mode, open the
Emulation/roms/xboxfolder - Right click anywhere in the folder, click
Create New --> Text File - Match the name of the text file to the game you are applying Zink to and change the file extension to
.esprefix- For example:
- ROM Name:
Conker - Live & Reloaded.iso - New text file name:
Conker - Live & Reloaded.esprefix
- ROM Name:

- For example:
- Open the newly created text file in Kate or a text editor of your choice
- On a single line, write:
__GLX_VENDOR_LIBRARY_NAME=mesa MESA_LOADER_DRIVER_OVERRIDE=zink GALLIUM_DRIVER=zink- Example:
- Zink will now be applied to this specific game in ES-DE, repeat for each game you would like to apply Zink


How to Apply Zink to Pegasus Games
- In Desktop Mode, open the
Emulation/roms/xbox/romsfolder - Right click
metadata.txt, clickOpen with Kateor a text editor of your choice -
At the bottom of the text file, add a new section using the following format:
game: GAMENAME file: FILENAME launch: /PATH/TO/xemu.sh "{file.path}" __GLX_VENDOR_LIBRARY_NAME=mesa MESA_LOADER_DRIVER_OVERRIDE=zink GALLIUM_DRIVER=zink -
Replace GAMENAME with the name of the game
- For example:
Conker: Live & Reloaded
- For example:
- Replace FILENAME with the file name
- For example:
Conker: Live & Reloaded.iso
- For example:
- Edit
/PATH/TOwith the path toxemu.sh, the path forxemu.shwill be at the top of themetadata.txtfile, you may copy it here - Save and exit out of the file
- Zink will now be applied to this specific game in Pegasus, repeat for each game you would like to apply Zink
How to Apply Zink to Steam ROM Manager Shortcuts
- In Desktop Mode, open Steam
- Select an Xbox Game shortcut in Steam
- Click the
Gearicon - Click
Properties - In the
Launch Optionsbox, enter:__GLX_VENDOR_LIBRARY_NAME=mesa MESA_LOADER_DRIVER_OVERRIDE=zink GALLIUM_DRIVER=zink %command% - Zink will now be applied to this specific game's Steam shortcut, repeat for each game you would like to apply Zink


vs_position_always_invariant=true
For more information on what vs_position_always_invariant=true is, see https://gitlab.freedesktop.org/mesa/mesa/-/commit/9b577f2a887968483b88b629673d3f9904a179ff.
Setting vs_position_always_invariant=true for Xemu games can be considered an alternative option to the How to Apply Zink section. Zink may cause performance issues or graphical issues. If that is the case, you can try the steps in this section. However, applying vs_position_always_invariant=true may also cause its own set of performance or graphical issues.
Practical Uses of vs_position_always_invariant=true
- Fixes black screen issues
- Games with black screen issues (Not an exhaustive list)
- Burnout 3 and Phantom Dust
- Games with black screen issues (Not an exhaustive list)
Read one of the below sections to learn how to apply Zink to your Xbox games.
How to Apply vs_position_always_invariant=true to ES-DE Games
- In Desktop Mode, open the
Emulation/roms/xboxfolder - Right click anywhere in the folder, click
Create New --> Text File - Match the name of the text file to the game you are applying
vs_position_always_invariant=trueto and change the file extension to.esprefix- For example:
- ROM Name:
Conker - Live & Reloaded.iso - New text file name:
Conker - Live & Reloaded.esprefix
- ROM Name:
- For example:
- Open the newly created text file in Kate or a text editor of your choice
- On a single line, write:
vs_position_always_invariant=true
vs_position_always_invariant=truewill now be applied to this specific game in ES-DE, repeat for each game you would like to applyvs_position_always_invariant=true
How to Apply vs_position_always_invariant=true to Pegasus Games
- In Desktop Mode, open the
Emulation/roms/xbox/romsfolder - Right click
metadata.txt, clickOpen with Kateor a text editor of your choice -
At the bottom of the text file, add a new section using the following format:
game: GAMENAME file: FILENAME launch: /PATH/TO/xemu.sh "{file.path}" vs_position_always_invariant=true -
Replace GAMENAME with the name of the game
- For example:
Conker: Live & Reloaded
- For example:
- Replace FILENAME with the file name
- For example:
Conker: Live & Reloaded.iso
- For example:
- Edit
/PATH/TOwith the path toxemu.sh, the path forxemu.shwill be at the top of themetadata.txtfile, you may copy it here - Save and exit out of the file
vs_position_always_invariant=truewill now be applied to this specific game in Pegasus
How to Apply vs_position_always_invariant=true to Steam ROM Manager Shortcuts
- In Desktop Mode, open Steam
- Select an Xbox Game shortcut in Steam
- Click the
Gearicon - Click
Properties - In the
Launch Optionsbox, enter:vs_position_always_invariant=true %command% vs_position_always_invariant=truewill now be applied to this specific game's Steam shortcut, repeat for each game you would like to applyvs_position_always_invariant=true
How to Access Saves
Your save files are located here: Emulation/storage/xemu/xbox_hdd.qcow2
How to Access Saves
Download https://github.com/Ryzee119/LithiumX/releases, extract the zip file, and launch the ISO in Xemu.
Follow the instructions here: https://xemu.app/docs/ftp/, to access the saves in the xbox_hdd.qcow2 file.
How to Roll Back Xemu to an Older Version
If you do not have access to a mouse and keyboard for the below section, use L2 to right click and R2 to left click. Alternatively, remote into your Steam Deck using one of the methods found in the FAQ, How do I remotely control my Steam Deck?.
- In Desktop Mode, open
Konsole - To see a list of prior versions of the emulator, type:
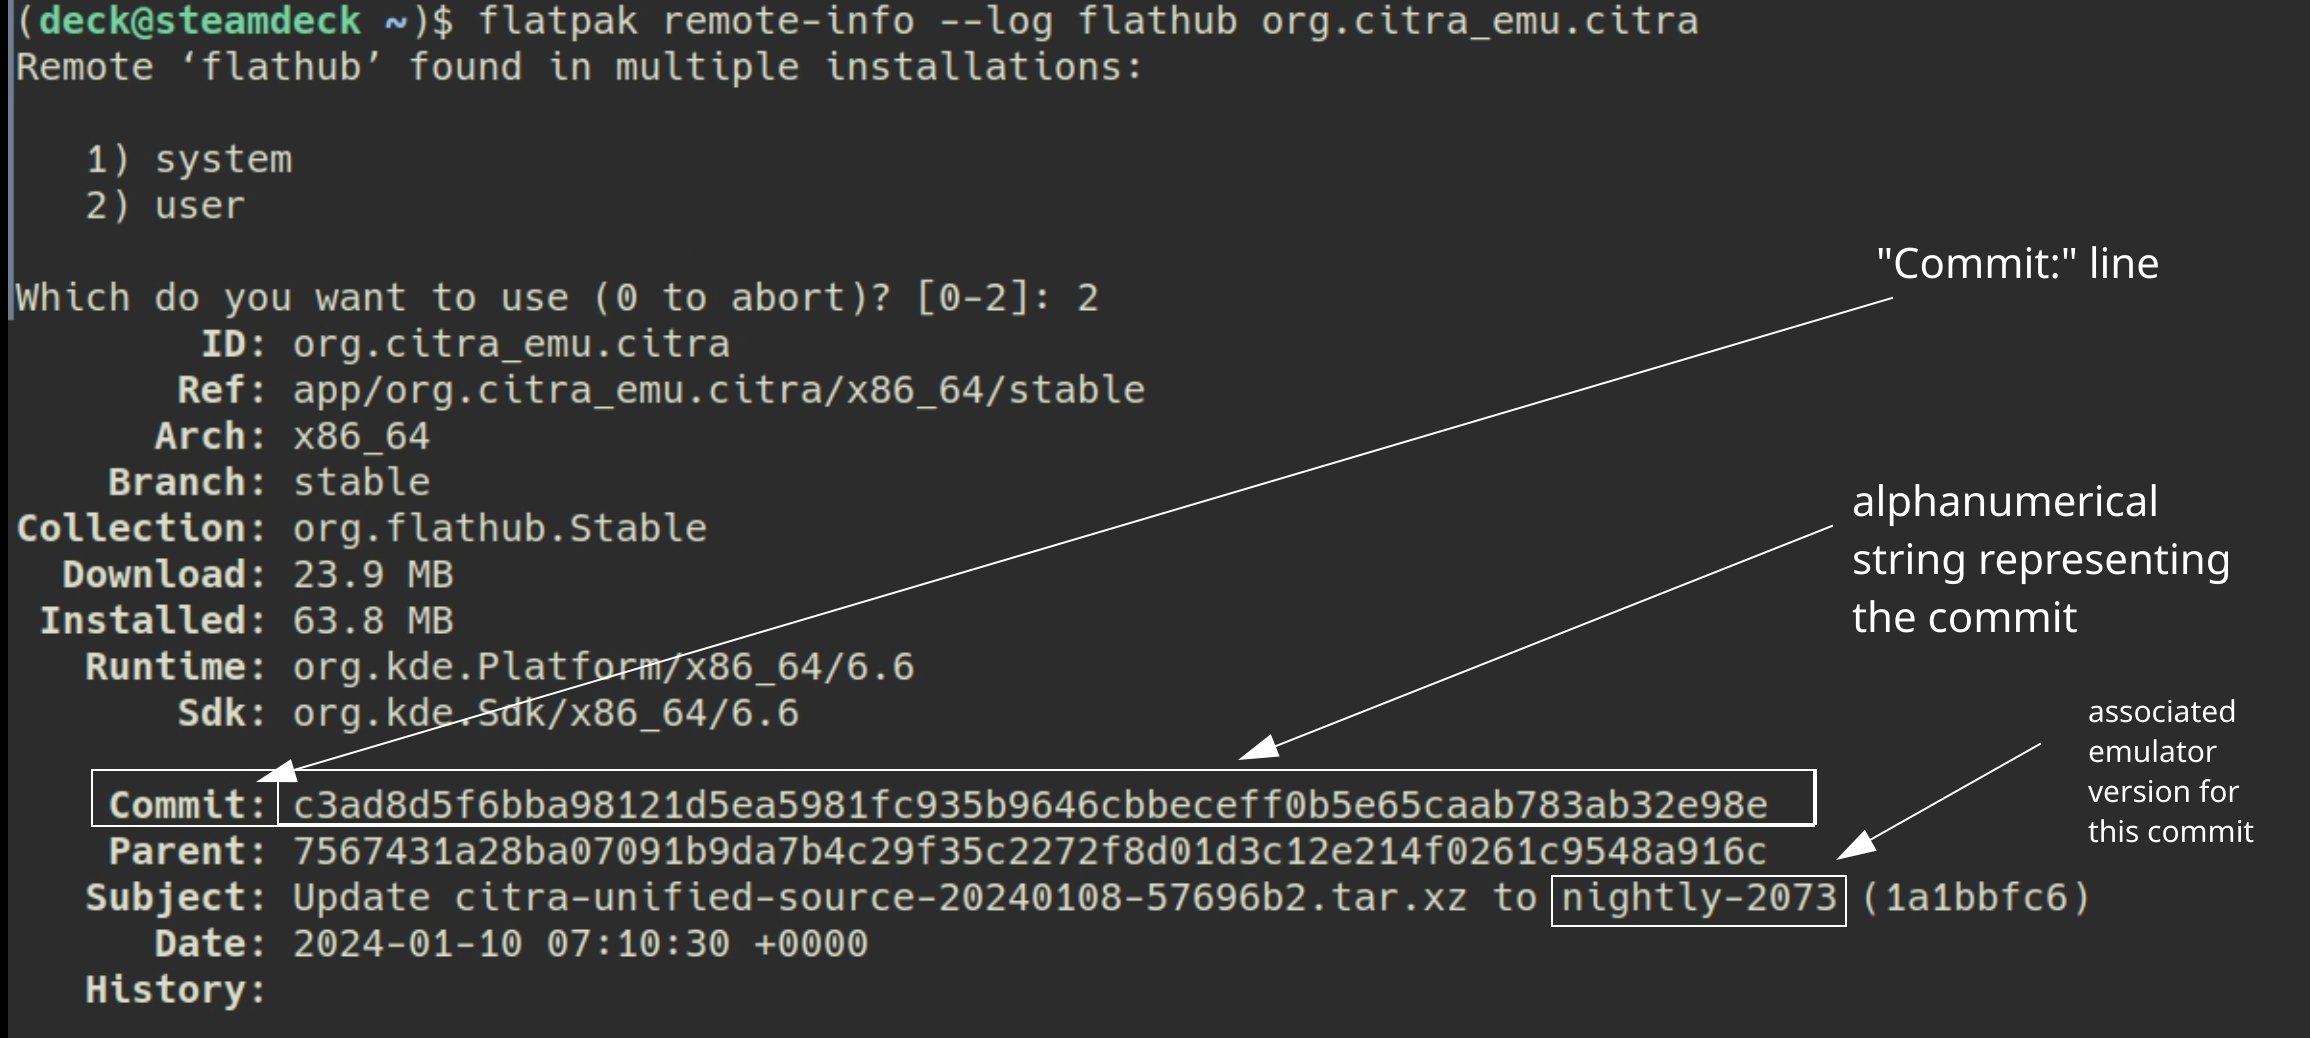
flatpak remote-info --log flathub app.xemu.xemu
- If Konsole prompts you to select
systemoruser, enter2to selectuser - Konsole will list a list of previous versions for the flatpak. The important line for each version is the
Commit:line. TheCommit:line will have a long accompanying alphanumeric string (the “commit” code). Copy the string for the version you want to downgrade to.- Using Citra as an example:
- Using Citra as an example:
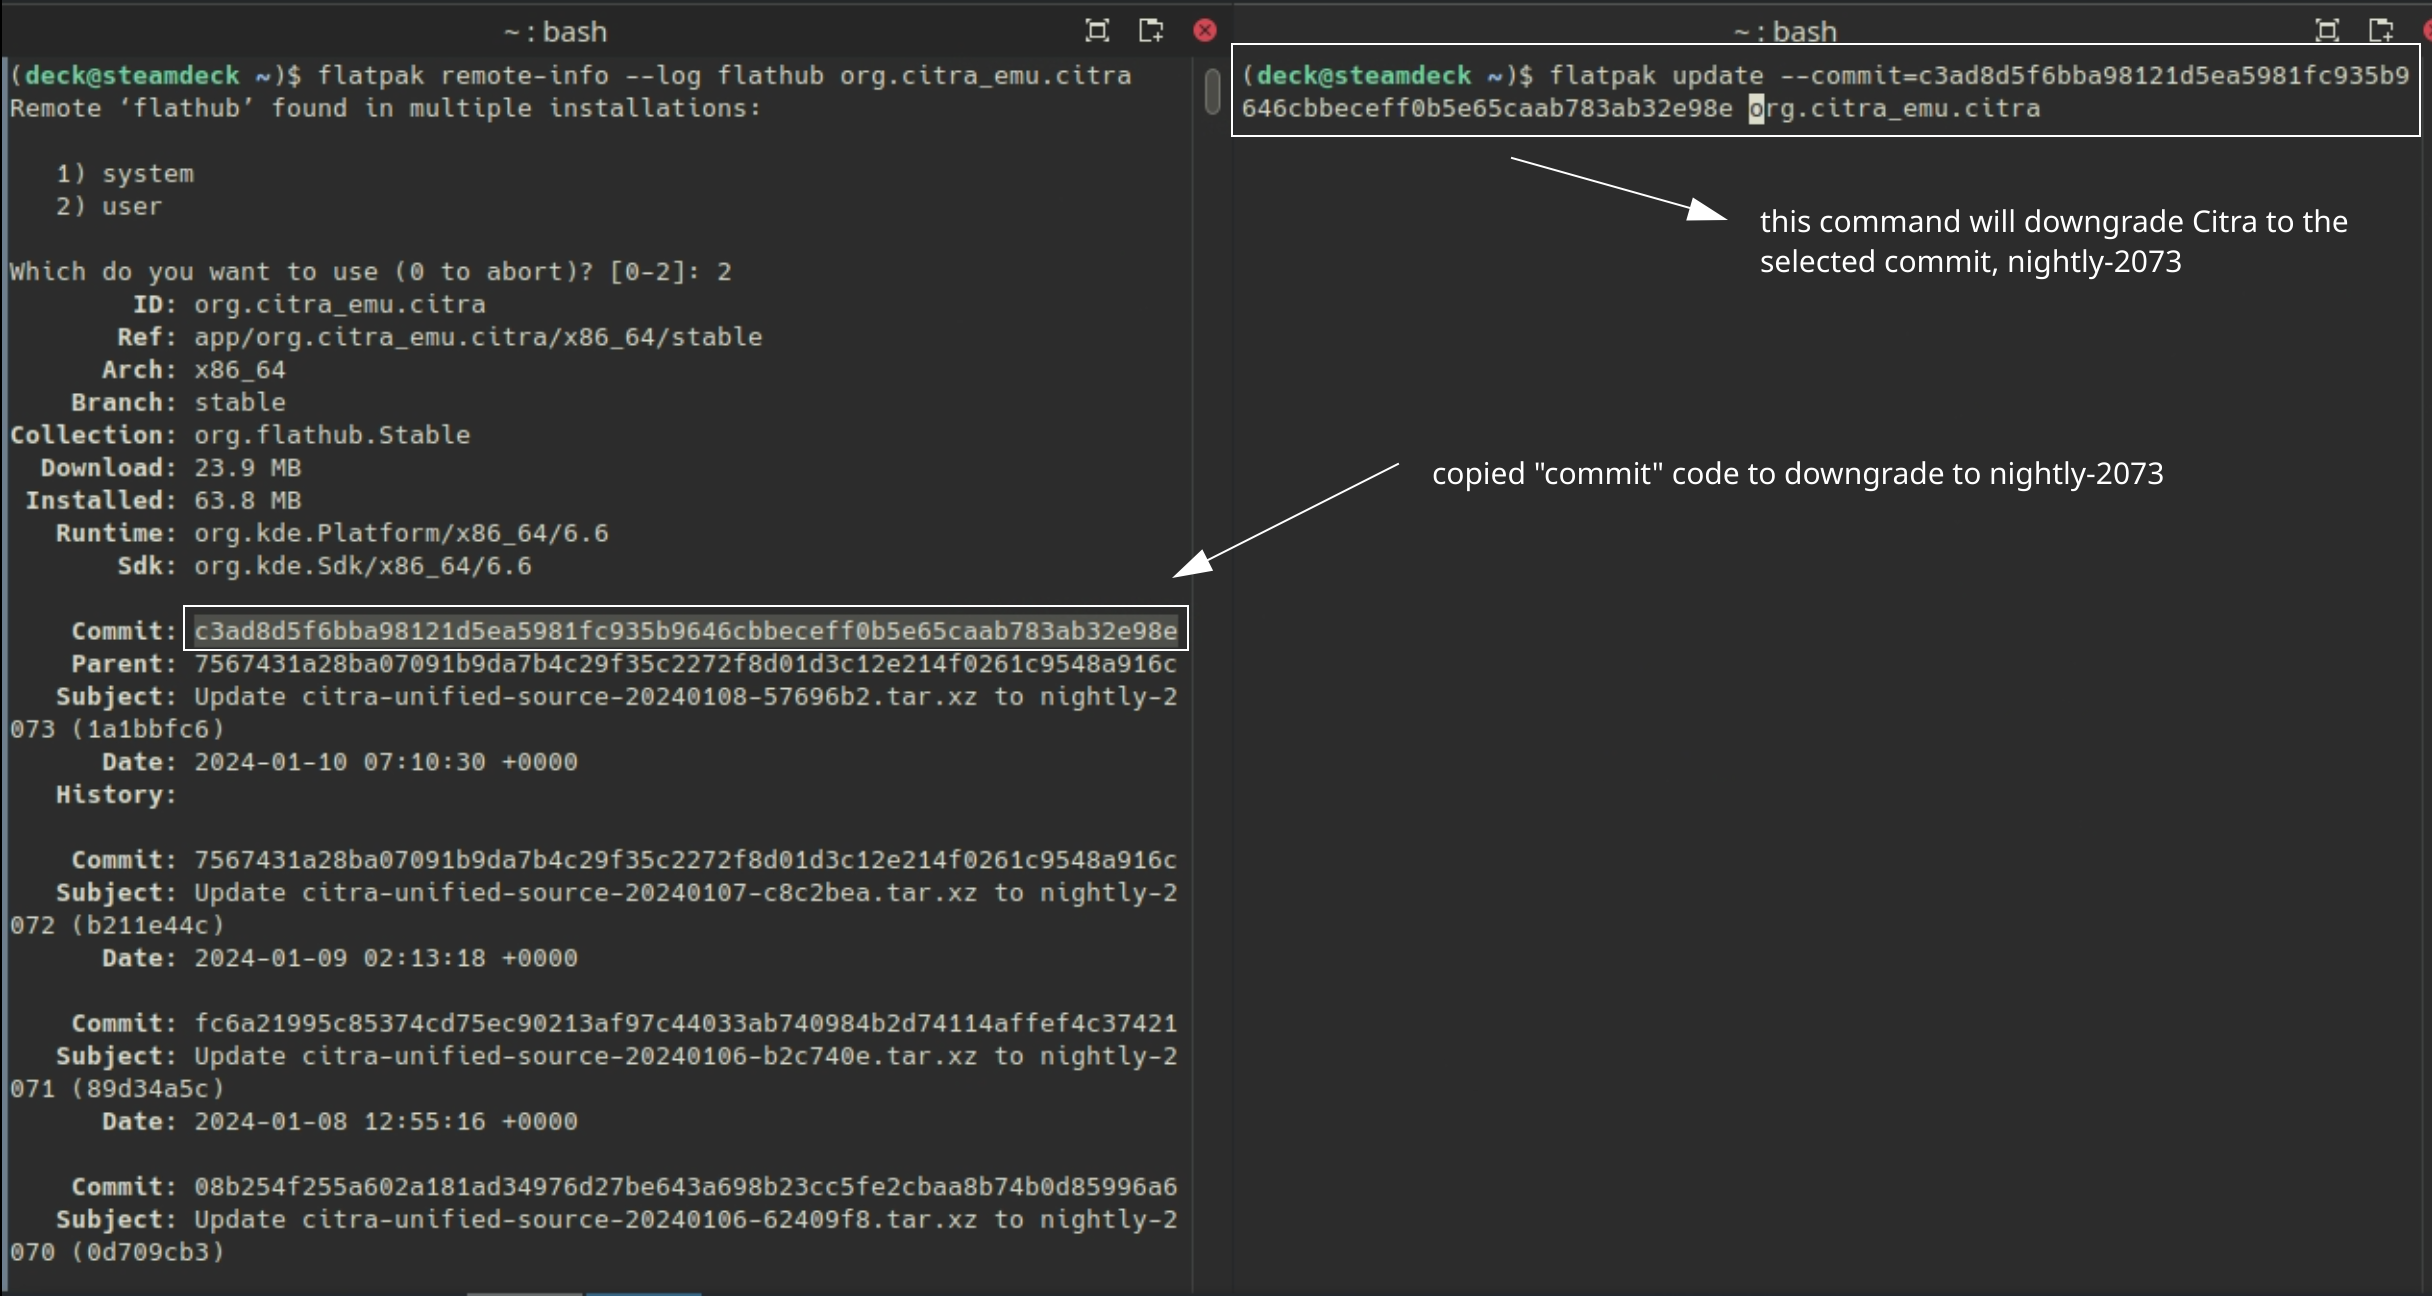
- To downgrade to the version you want:
flatpak update --commit=put_commit_code_here app.xemu.xemu- Replace
put_commit_code_herewith the actual code you located in Step 2.- Using Citra as an example:
- Using Citra as an example:
If the above steps did not work and you are getting an error message along the lines of Flatpak not installed, your Flatpak is likely installed at the system level instead. Select one of the below solutions:
Solution 1: Open the EmuDeck application, click the Manage Emulators page, select the emulator in question, and click Reinstall / Update.
Solution 2: Add sudo in front of the commands written in Step 2 and Step 5. In Step 2, write sudo flatpak remote-info --log flathub app.xemu.xemu and in Step 5, write sudo flatpak update --commit=put_commit_code_here app.xemu.xemu.
How to Configure Language Settings
In-Game
Download and set up XboxEepromEditor. For instructions, see How to Set Up XboxEepromEditor.
- Open XboxEepromEditor
- In the top left, click
File,Open - Click the
/and navigate to yourEmulation/storage/xemufolder- If your EmuDeck install is on an SD Card, your path will typically begin with
/run/media... - If your EmuDeck install is on your internal SSD, your path will typically begin with
/home/deck..
- If your EmuDeck install is on an SD Card, your path will typically begin with
- Select the
eeprom.binfile - Under the
Securitytab, select your preferred region- Some regions may have more language options than others
- Under the
Generaltab, select your preferred language - After you have made your changes, click
File, clickSave As - In the
File Namebox, typeeeprom.bin - Click the
/and navigate to yourEmulation/storage/xemufolder- If your EmuDeck install is on an SD Card, your path will typically begin with
/run/media... - If your EmuDeck install is on your internal SSD, your path will typically begin with
/home/deck..
- If your EmuDeck install is on an SD Card, your path will typically begin with
- Click
Saveand clickYeson theFile already exists, do you want to replace it?prompt - Your preferred language settings will now be applied in Xemu