RPCS3 is a Sony Playstation 3 Emulator.
Warning
Prior to the 2.2 update of EmuDeck, the Flatpak version of RPCS3 was installed. The Flatpak version is identical to the version you may install from the Discover store. With the 2.2 update, EmuDeck swapped over from the Flatpak to the AppImage. The primary reason for the swap to the AppImage was to use the official distribution of RPCS3 on Linux. The Flatpak/version you may download through Discover is maintained by the community and is an unofficial build.
If you are still using the Flatpak or are unsure which version you are using, you may swap over to the AppImage by opening the EmuDeck application, clicking the "Manage Emulators" tab, clicking RPCS3, and clicking both "Reinstall" and "Reset Configuration".
The AppImage works through Steam shortcuts created by Steam ROM Manager, ES-DE, and Pegasus. If you used Steam ROM Manager previously, you may need to re-add your PlayStation 3 games. If you created desktop files for ES-DE, you will need to recreate them so the AppImage is used instead. For instructions on ES-DE, see How to Configure RPCS3 to Work With ES-DE and Pegasus.
Any saves from the Flatpak version will be carried over when you reinstall and reset RPCS3 through the EmuDeck application.
Website: https://rpcs3.net/
Quickstart Guide: https://rpcs3.net/quickstart
GitHub: https://github.com/RPCS3/rpcs3
Compatibility List: https://rpcs3.net/compatibility
RPCS3 Wiki: https://wiki.rpcs3.net/index.php?title=Main_Page
RPCS3 Table of Contents
Getting Started with RPCS3
In order to play a game on RPCS3, you need to install the firmware through the RPCS3 UI. In desktop mode, open RPCS3, either in the application menu or through its shortcut in Emulation/tools/launchers/rpcs3.sh. In RPCS3, click File, click Install Firmware. Firmware is provided legally by Sony.
Follow RPCS3's Quickstart Guide for a step by step process on setting up RPCS3: https://rpcs3.net/quickstart
Read the Configuration section to learn more about RPCS3 and its folder locations.
To launch your ROMs in game mode, use Steam ROM Manager and use one of the following parsers to play your Playstation 3 ROMs:
ES-DE- To play PS3 games in ES-DE, see How to Configure RPCS3 to Work With ES-DE and Pegasus
Sony PlayStation 3 - RPCS3 (Extracted ISO/PSN)orSony PlayStation 3 - RPCS3 (Installed PKG)- Read the File Formats section to learn more about these various file formats
Emulators
Why did EmuDeck switch to the AppImage?
Prior to the 2.2 update of EmuDeck, the Flatpak version of RPCS3 was installed. The Flatpak version is identical to the version you may install from the Discover store. With the 2.2 update, EmuDeck swapped over from the Flatpak to the AppImage. The primary reason for the swap to the AppImage was to use the official distribution of RPCS3 on Linux. The Flatpak/version you may download through Discover is maintained by the community and is an unofficial build.
If you are still using the Flatpak or are unsure which version you are using, you may swap over to the AppImage by opening the EmuDeck application, clicking the "Manage Emulators" tab, clicking RPCS3, and clicking both "Reinstall" and "Reset Configuration".
The AppImage works through Steam shortcuts created by Steam ROM Manager, ES-DE, and Pegasus. If you used Steam ROM Manager previously, you may need to re-add your PlayStation 3 games. If you created desktop files for ES-DE, you will need to recreate them so the AppImage is used instead. For instructions on ES-DE, see How to Configure RPCS3 to Work With ES-DE and Pegasus.
Any saves from the Flatpak version will be carried over when you reinstall and reset RPCS3 through the EmuDeck application.
RPCS3 Configuration
- Type of Emulator: AppImage
- Config Location:
/home/deck/Applications/rpcs3.AppImage - Storage Location:
Emulation/storage/rpcs3/dev_hdd0 - ROM Location:
Emulation/roms/ps3 - Firmware: Install the firmware through RPCS3's GUI. Read the Quickstart Guide for a tutorial
-
Saves:
- Symlink:
Emulation/saves/rpcs3/saves - Target:
Emulation/storage/rpcs3/dev_hdd0/home/00000001/savedata
- Symlink:
-
Your game will not show in the RPCS3 UI until you add it manually through the
Add Gameoption underFilein the top left.
Works With
- Steam ROM Manager
- ES-DE
RPCS3 Folder Locations
These file locations apply regardless of where you chose to install EmuDeck (to your internal SSD, to your SD Card, or elsewhere). Some emulator configuration files will be located on the internal SSD as listed below.
The Basics
$HOME or ~ refer to your home directory. On a Steam Deck, the full path will be /home/deck. When navigating using the file manager, the file manager may not display the username visually in the full file path.
Emulation/.. refers to either your home/deck directory or SD Card/removable media depending on your installation location.
Directories with a . in front of their name, like /home/deck/.steam, are hidden by default. In Dolphin (a file manager), click the hamburger menu in the top right and toggle on Show Hidden Files. The setting may vary depending on which file manager you are using.
~/.config/rpcs3
rpcs3/
├── captures
├── config
├── custom.configs
├── dev_bdvd
├── dev_flash
├── dev_hdd1
├── dev_usb000
├── GuiConfigs
├── Icons
├── input_configs
├── patches
├── sounds
├── config.yml
├── config.yml.bak
├── evdev_positive_axis.yml
├── games.yml
├── players_history.yml
├── recording.yml
├── uuid
├── vfs.yml
└── vfs.yml.bak
Emulation/storage/rpcs3
How to Update RPCS3
- Through the
Update your Emulatorssection on theManage Emulatorspage in theEmuDeckapplication - Manual file replacement of
rpcs3.AppImage- Refer to How to Swap Out AppImages and Binaries for instructions
- Through RPCS3's built-in updater
- Desktop Mode:
- Search for RPCS3 in the
Applications Launcher(Steam Deck icon in the bottom left of the taskbar) and open it, RPCS3 will prompt for an update if one is available
- Search for RPCS3 in the
- Game Mode:
- Add RPCS3 to Steam by using the
Emulatorsparser in Steam ROM Manager. After adding it to Steam, you may open it in Game Mode, RPCS3 will prompt for an update if one is available
- Add RPCS3 to Steam by using the
- Desktop Mode:
- Through
binupdate.shinEmulation/tools/binupdate, double click to launch
How to Launch RPCS3 in Desktop Mode
- Launch
RPCS3 AppImagefrom the Applications Launcher (Steam Deck icon in the bottom left of the taskbar) - Launch the script from
Emulation/tools/launchers,rpcs3.sh - Launch the emulator from
Steamafter adding it via theEmulatorsparser inSteam ROM Manager
RPCS3 File Formats
Folder File Format
The folder file format is typically used for disc games.
Place RPCS3 game folders in Emulation/roms/ps3. The folder format typically looks like /PS3_GAME/USRDIR/eboot.bin.
For more information on the Folder Format, see RPCS3's Quickstart Guide. Read the Dumping Step-by-step section specifically.
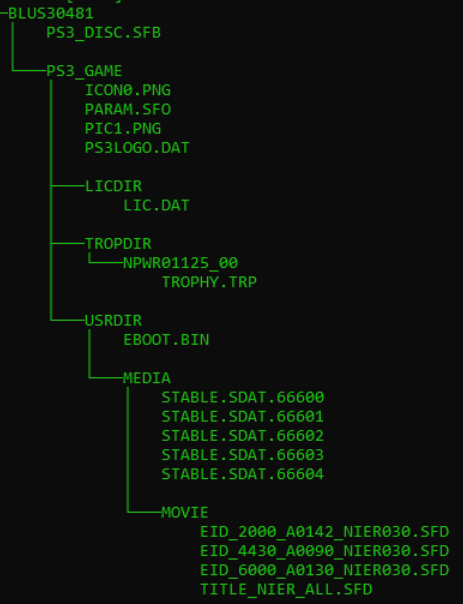
PKG and RAP File Format
The folder file format is typically used for store games.
Both .pkg and .rap are required for each respective game. Without the .rap file, an installed .pkg file will not launch properly.
Install .pkg and .rap files directly through the RPCS3 GUI. .pkg and .rap files are installed to Emulation/storage/rpcs3/dev_hdd0/game/.
Do note that you can drag and drop .pkg and .rap files to the RPCS3 GUI.
ISO File Format
A file ending with the file extension, .iso cannot be played through RPCS3. In order to use a file ending with the file extension, .iso, you must first decrypt the .iso file (using a matching IRD file). After decrypting the .iso file, you may then use a file archiver like 7-Zip or WinRAR to extract the file into a working game folder.
Do keep in mind that this method is not recommended by RPCS3. Make sure to read RPCS3's Quickstart Guide to learn how to properly dump your games in order to have a working and usable ROM.
Steam ROM Manager Parsers
- Folder Format: Use the
Sony PlayStation 3 - RPCS3 (Extracted ISO/PSN)parser- Typically used for disc games
- PKG Format: Use the
Sony PlayStation 3 - RPCS3 (Installed PKG)parser- Typically used for store games
- PKG games are installed to the HHD in
Emulation/storage/rpcs3/dev_hdd0/game/
RPCS3 Hotkeys
N/A
How to Manage Updates
Read https://wiki.rpcs3.net/index.php?title=Help:Installing_Game_Updates for a tutorial on how to download and manage PS3 updates.
The Linux version of the software mentioned in the above article can be found here: https://github.com/RainbowCookie32/rusty-psn/releases/.
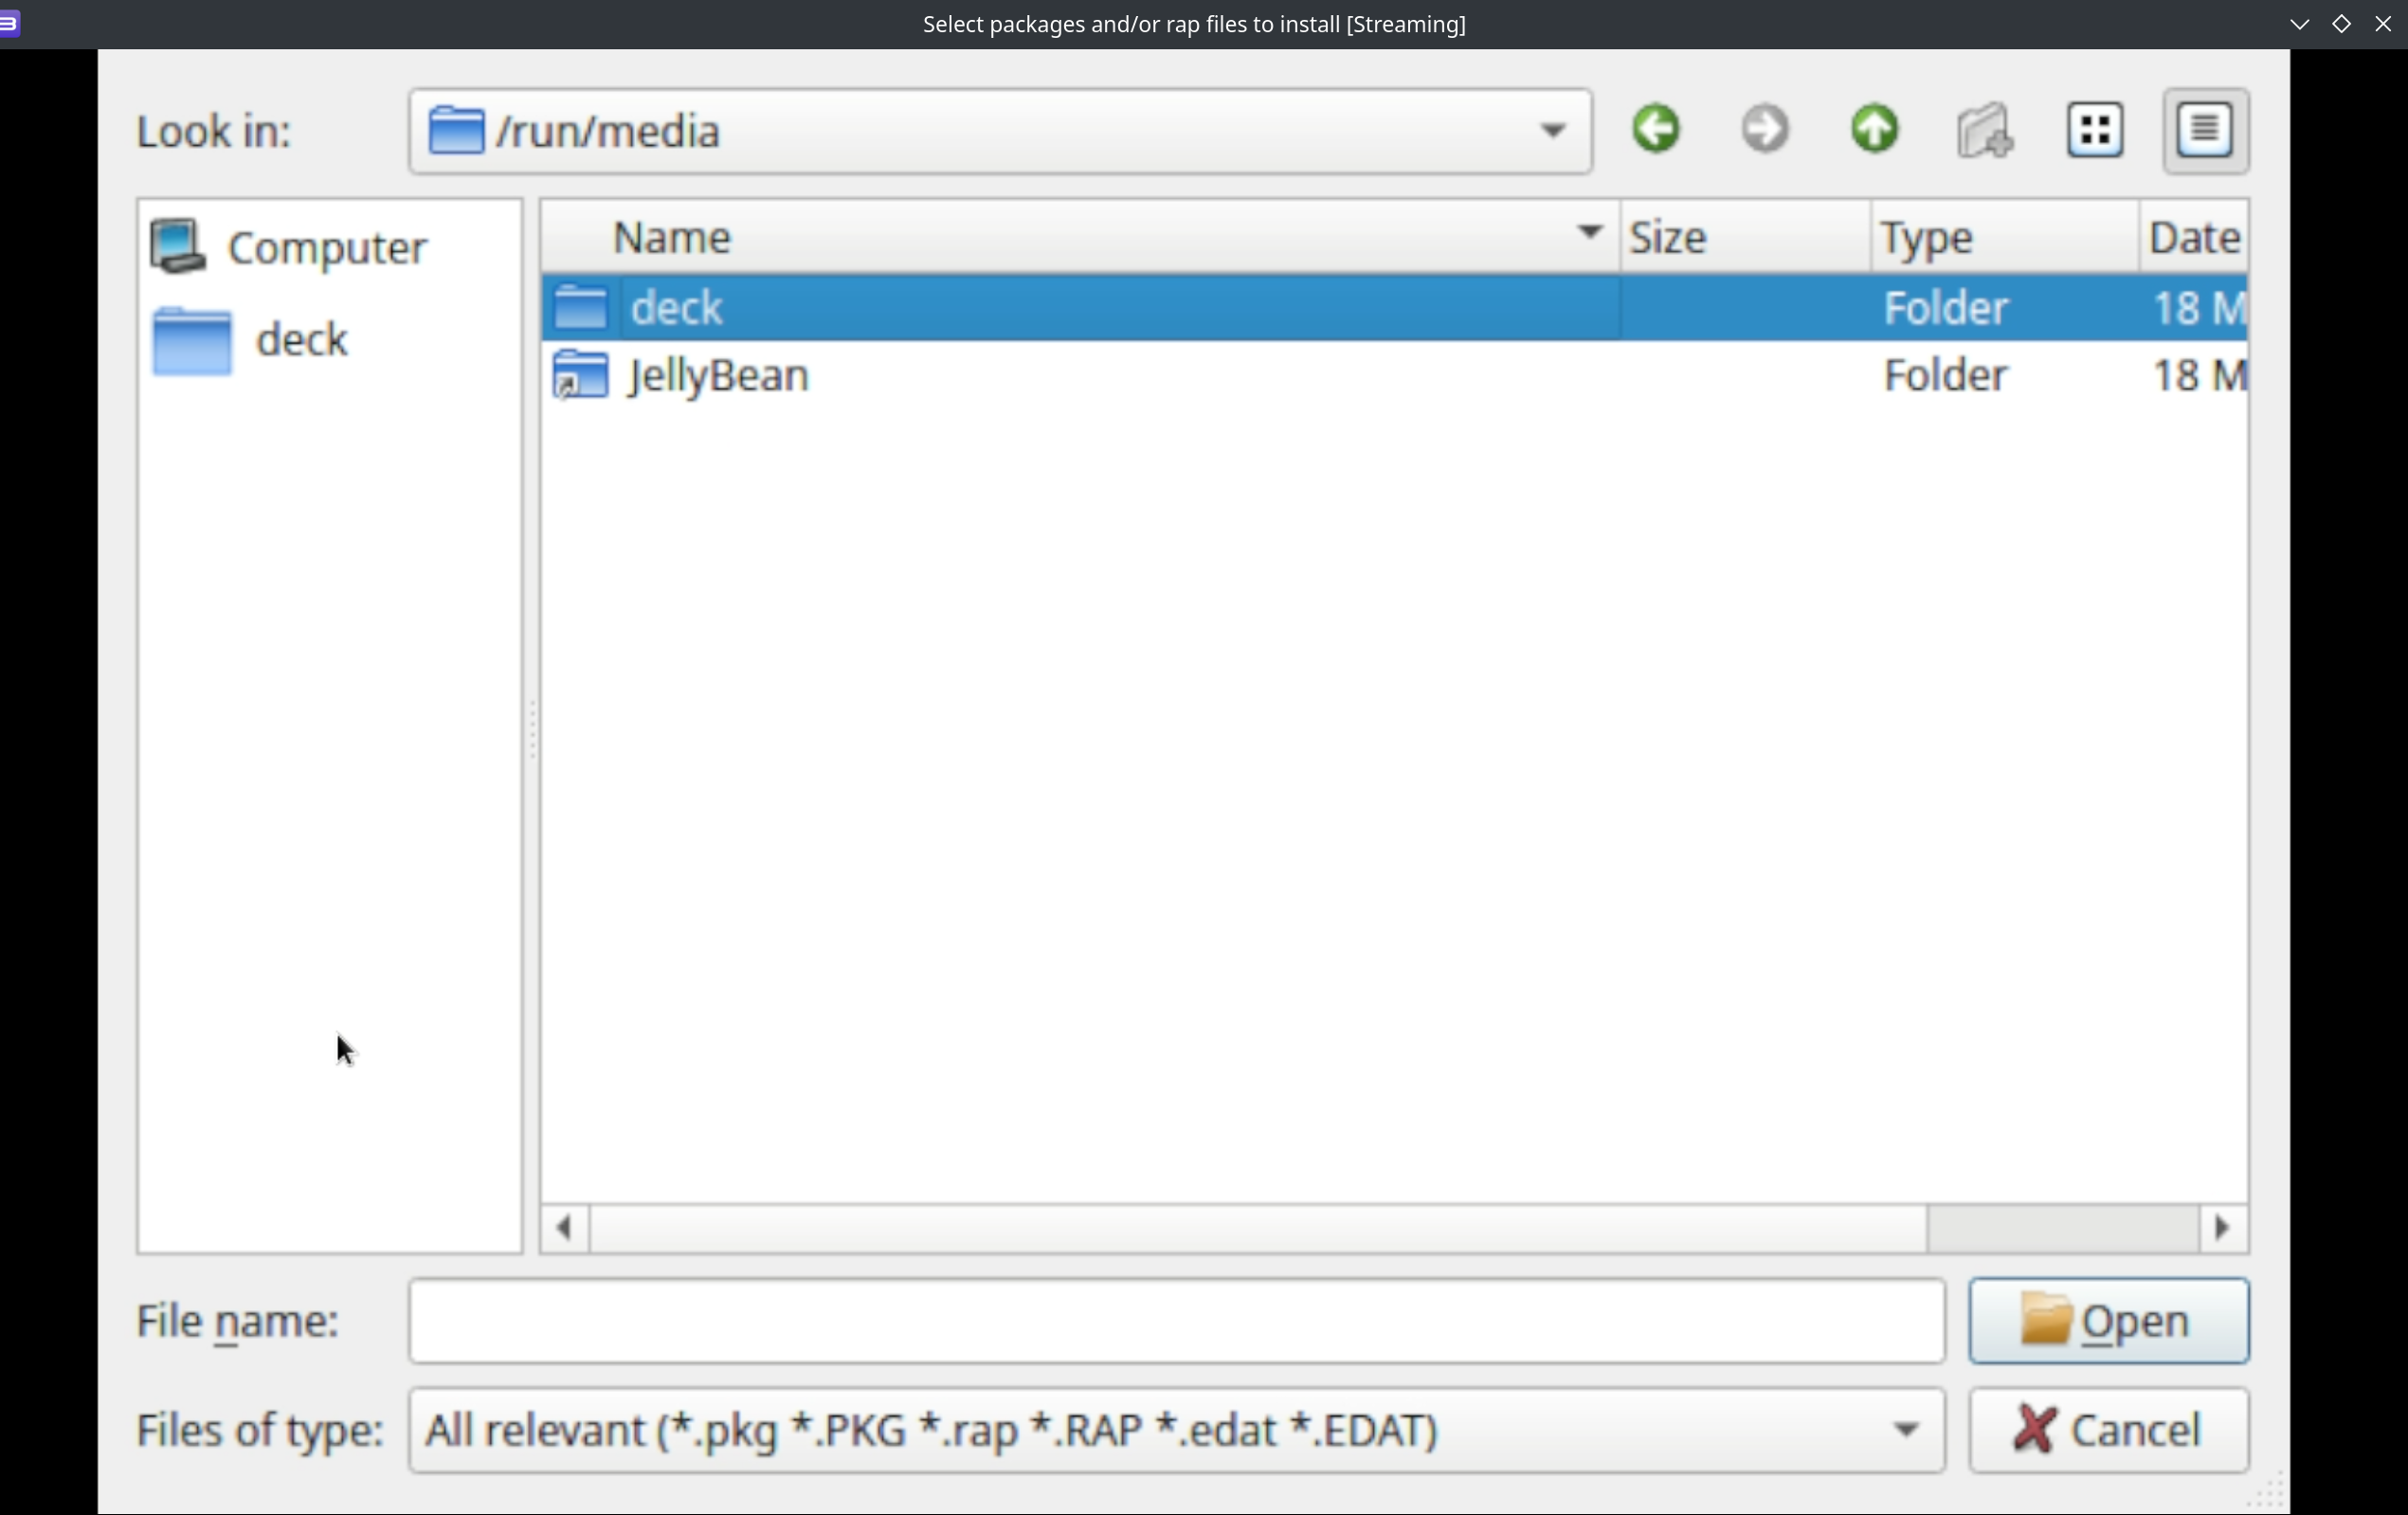
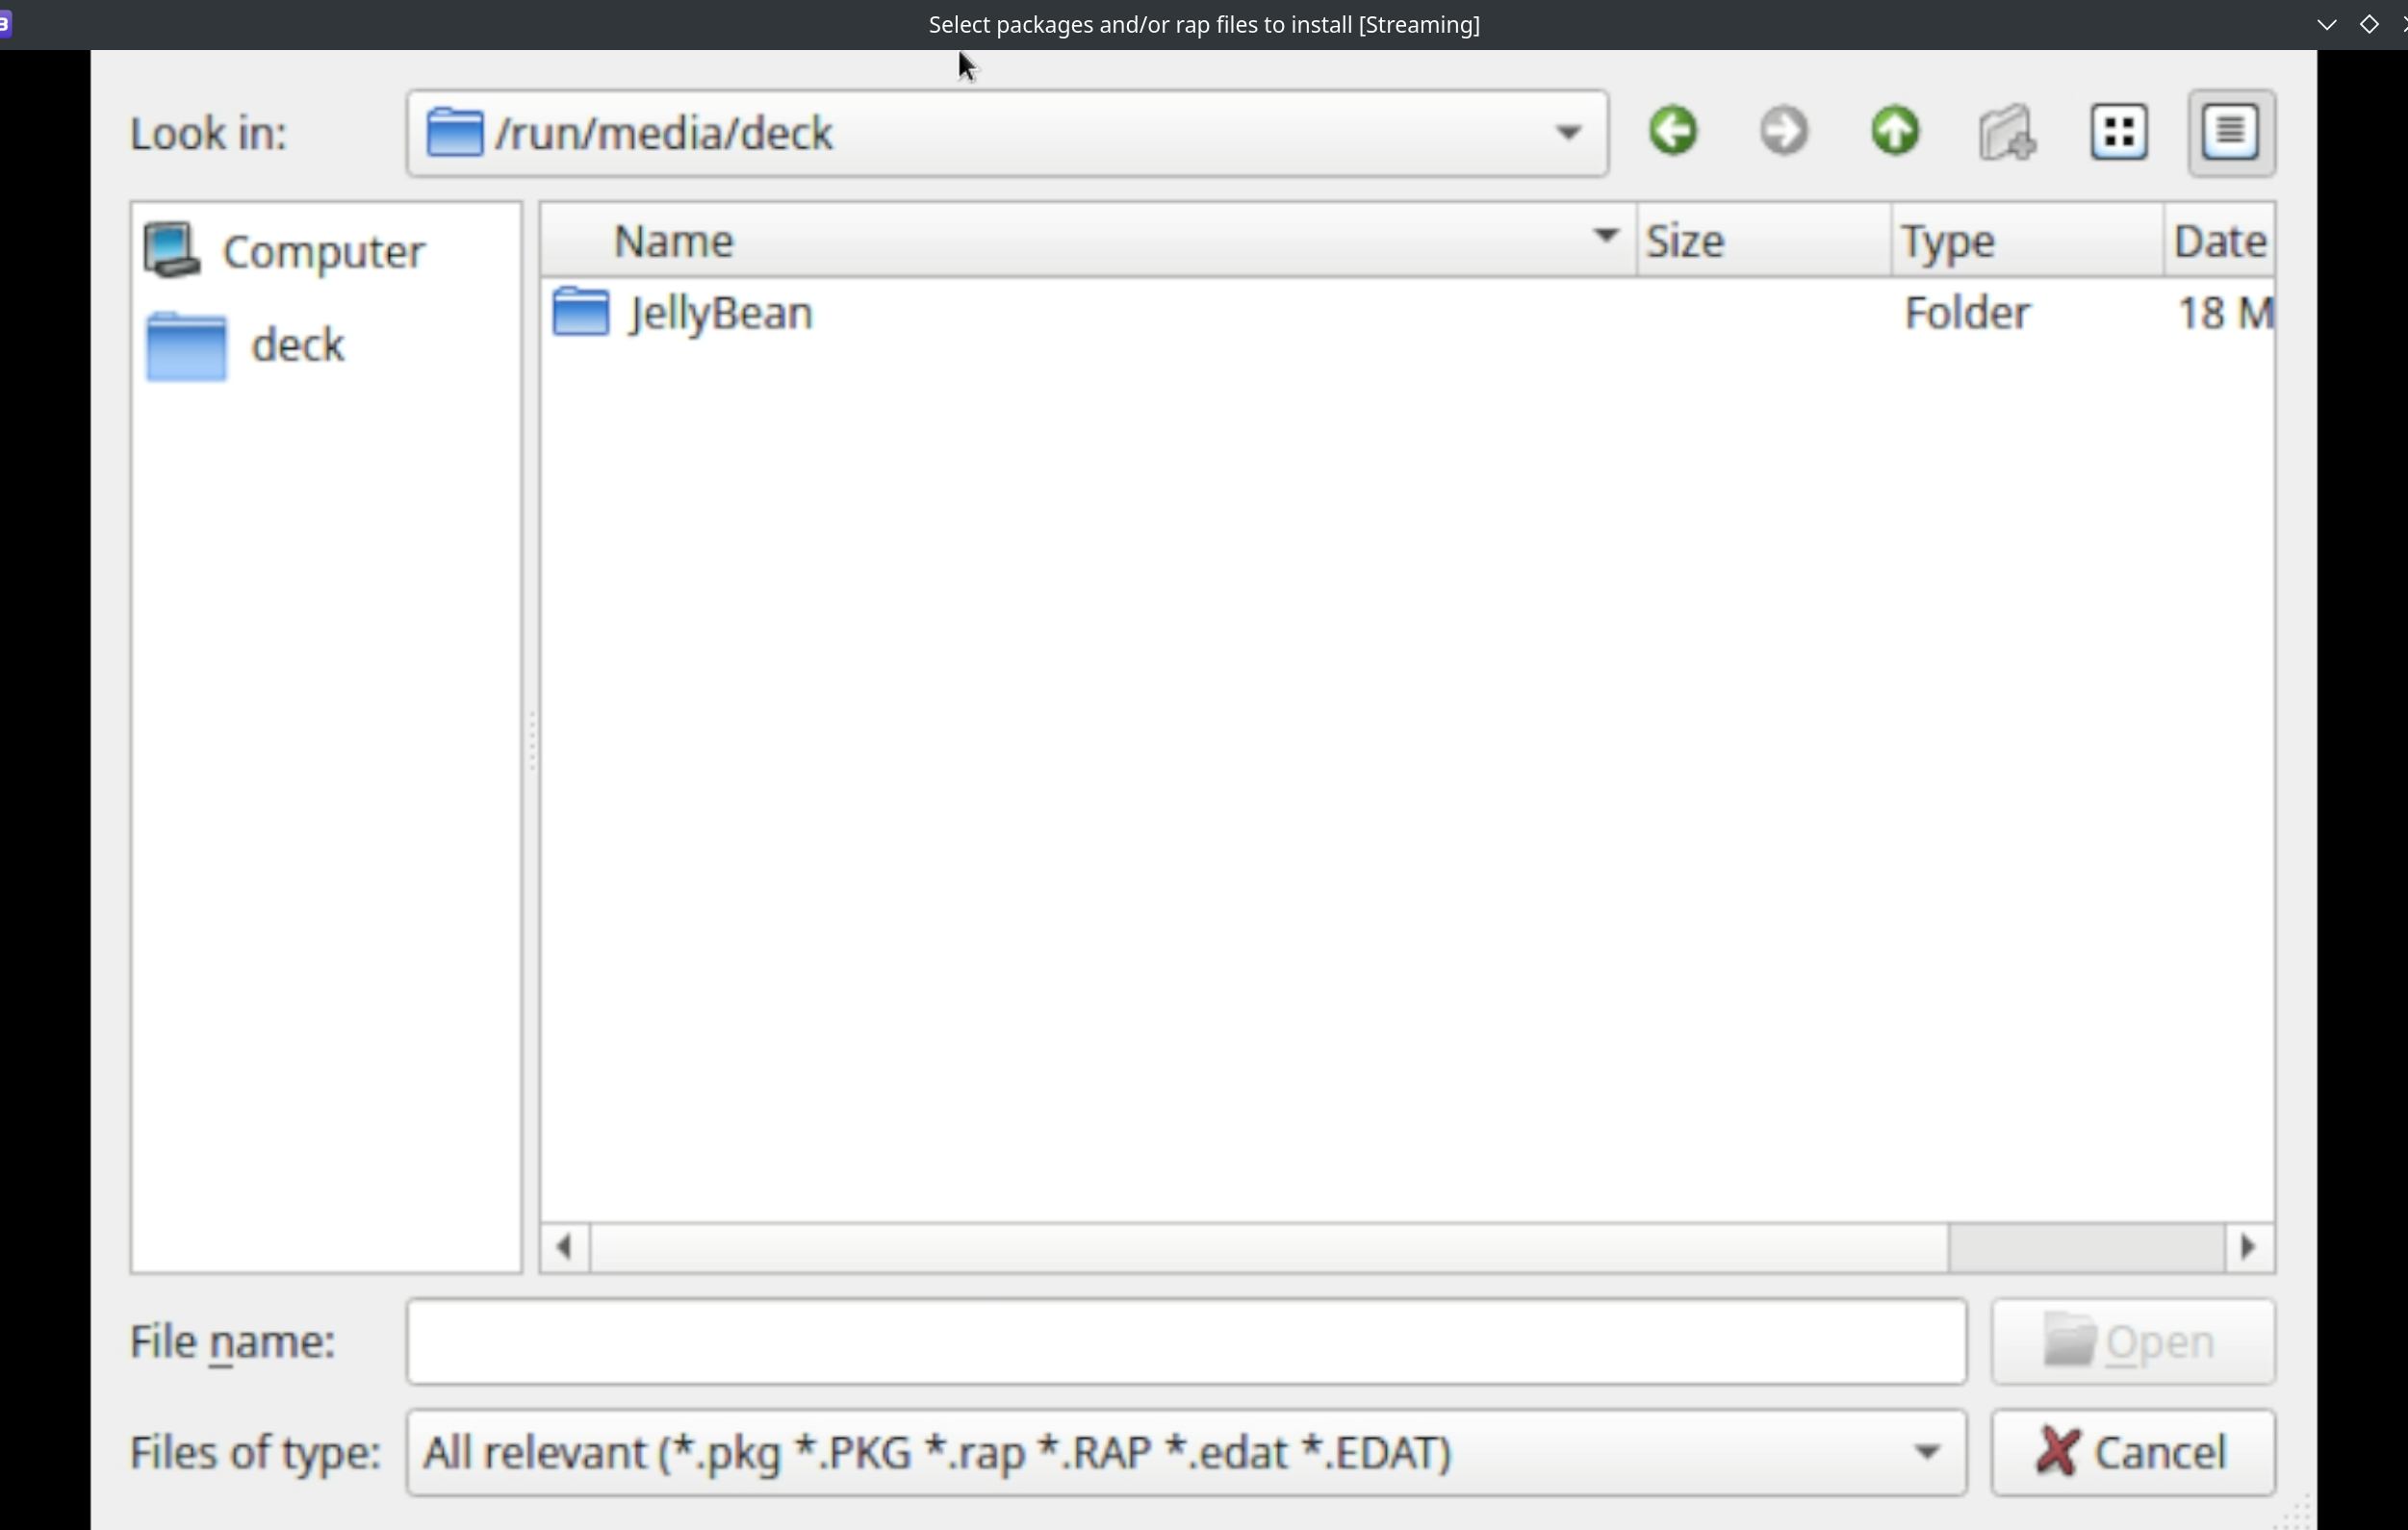
How to Navigate to the SD Card Through RPCS3
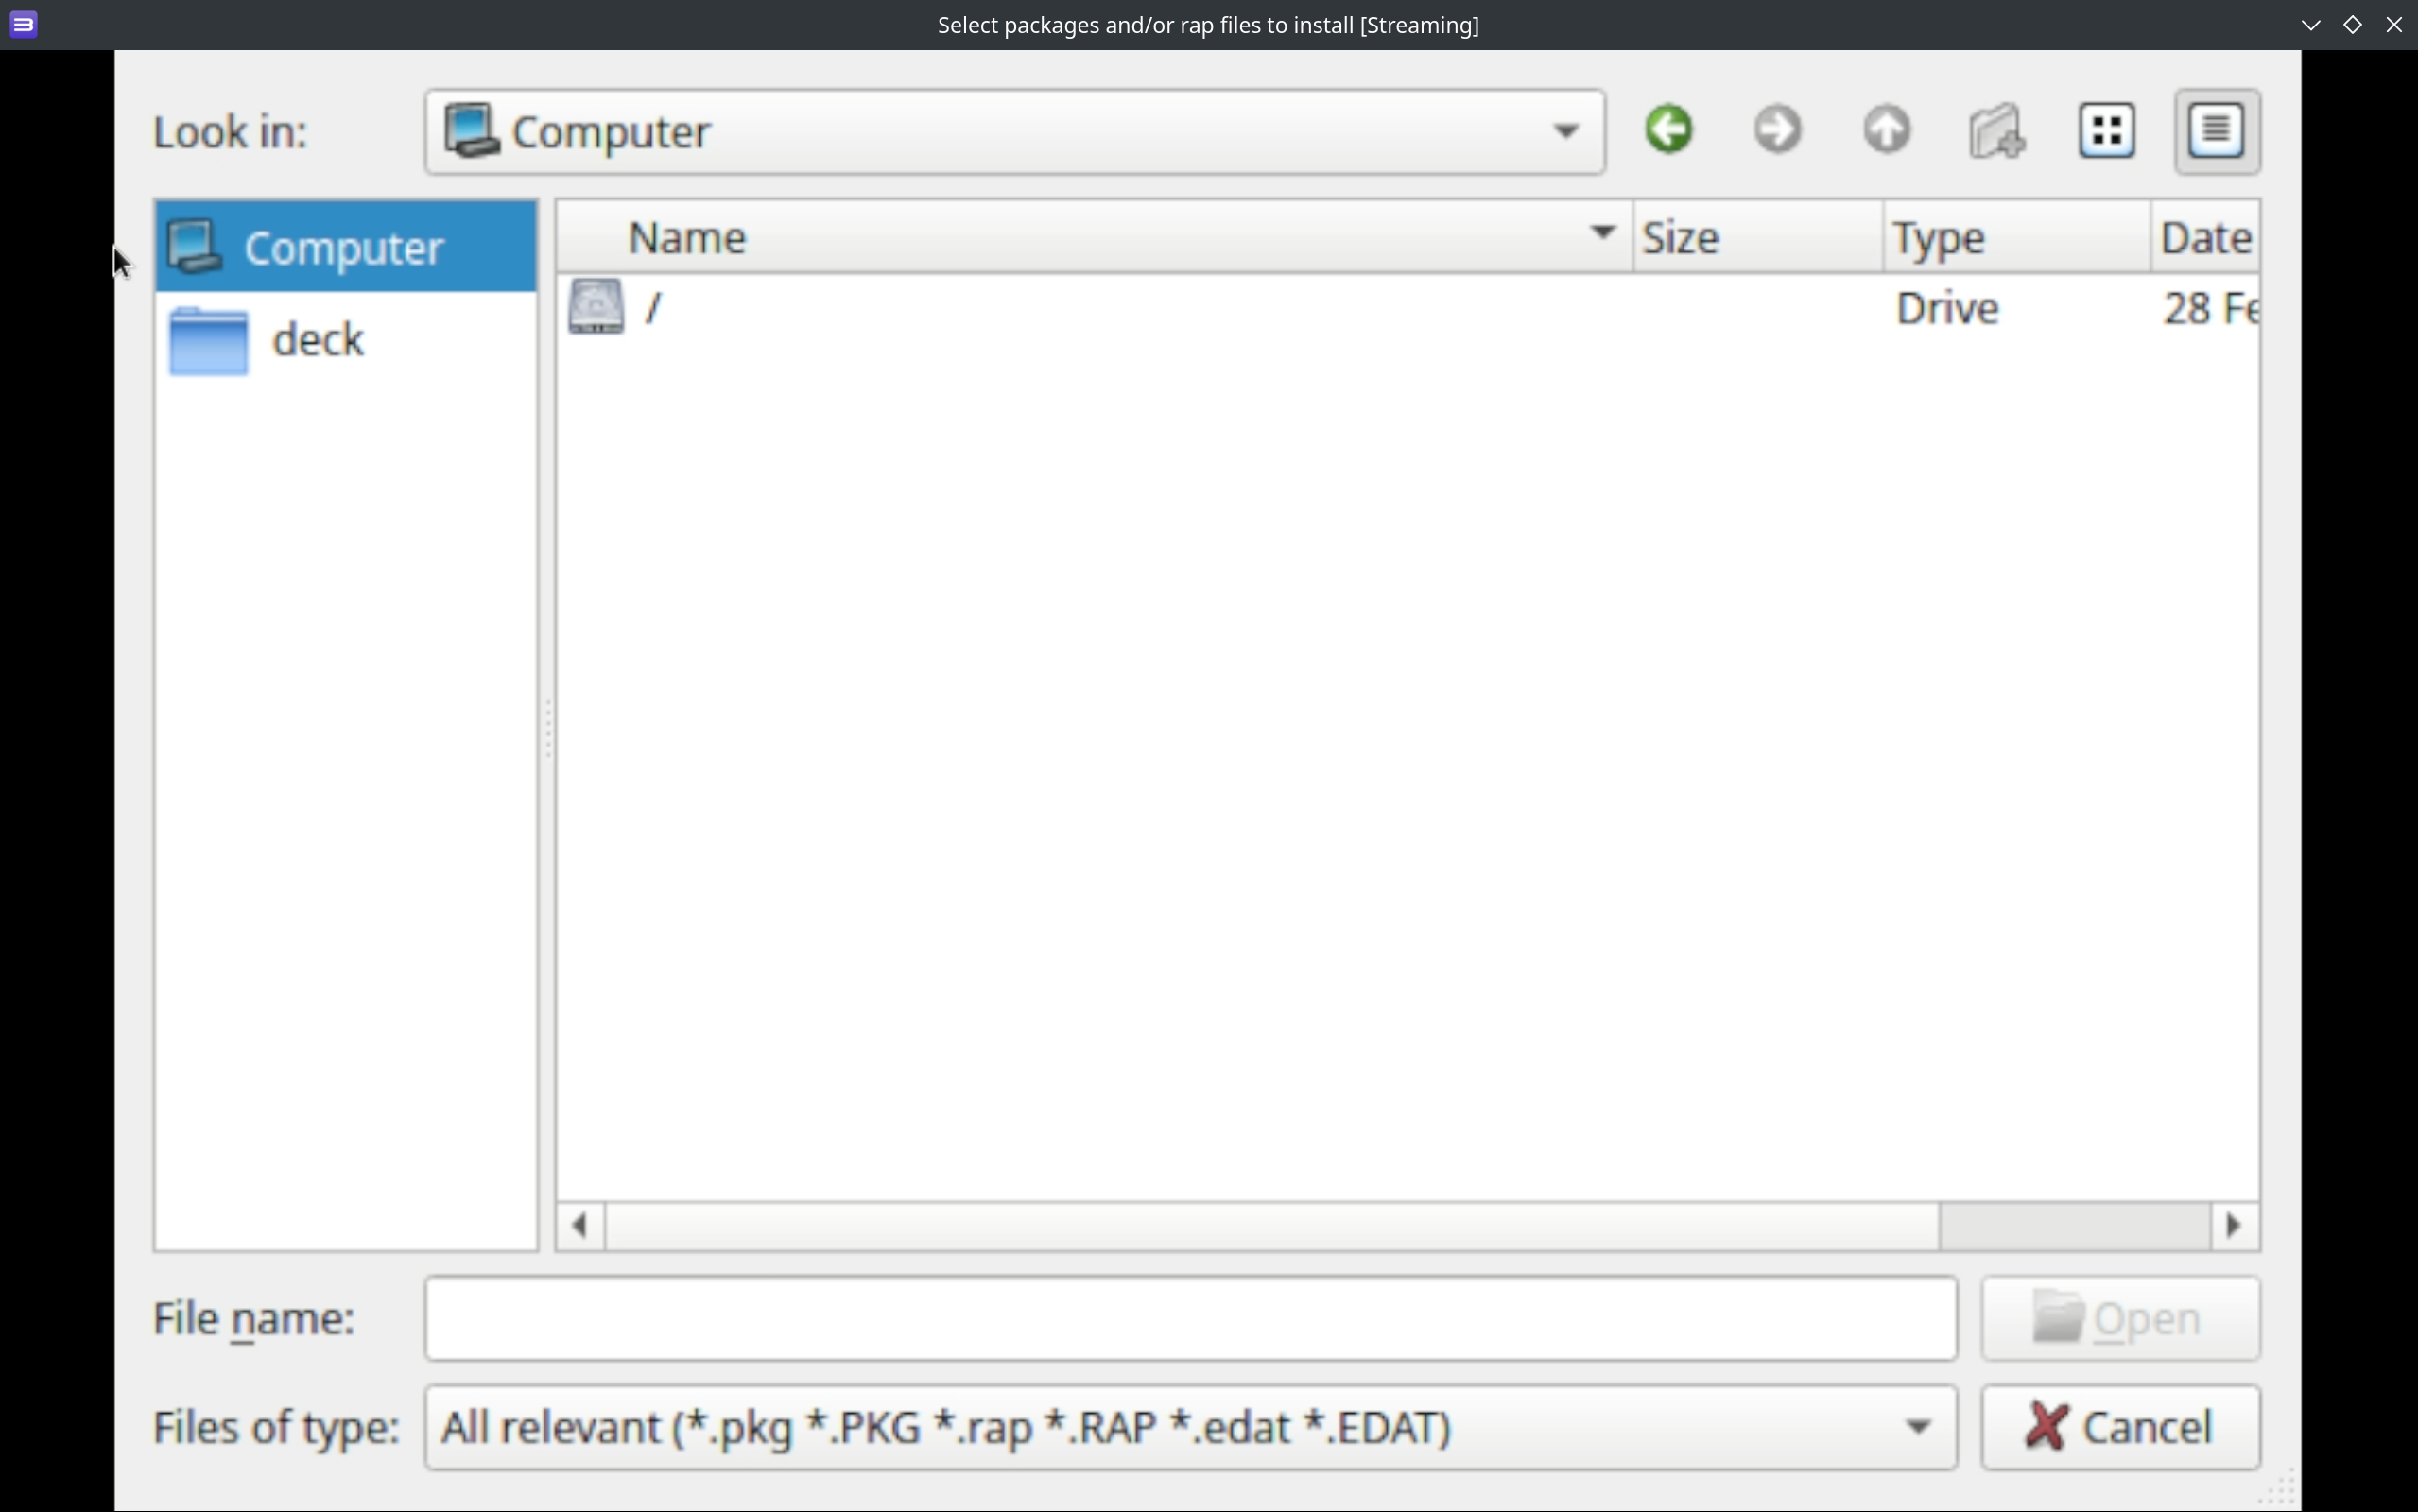
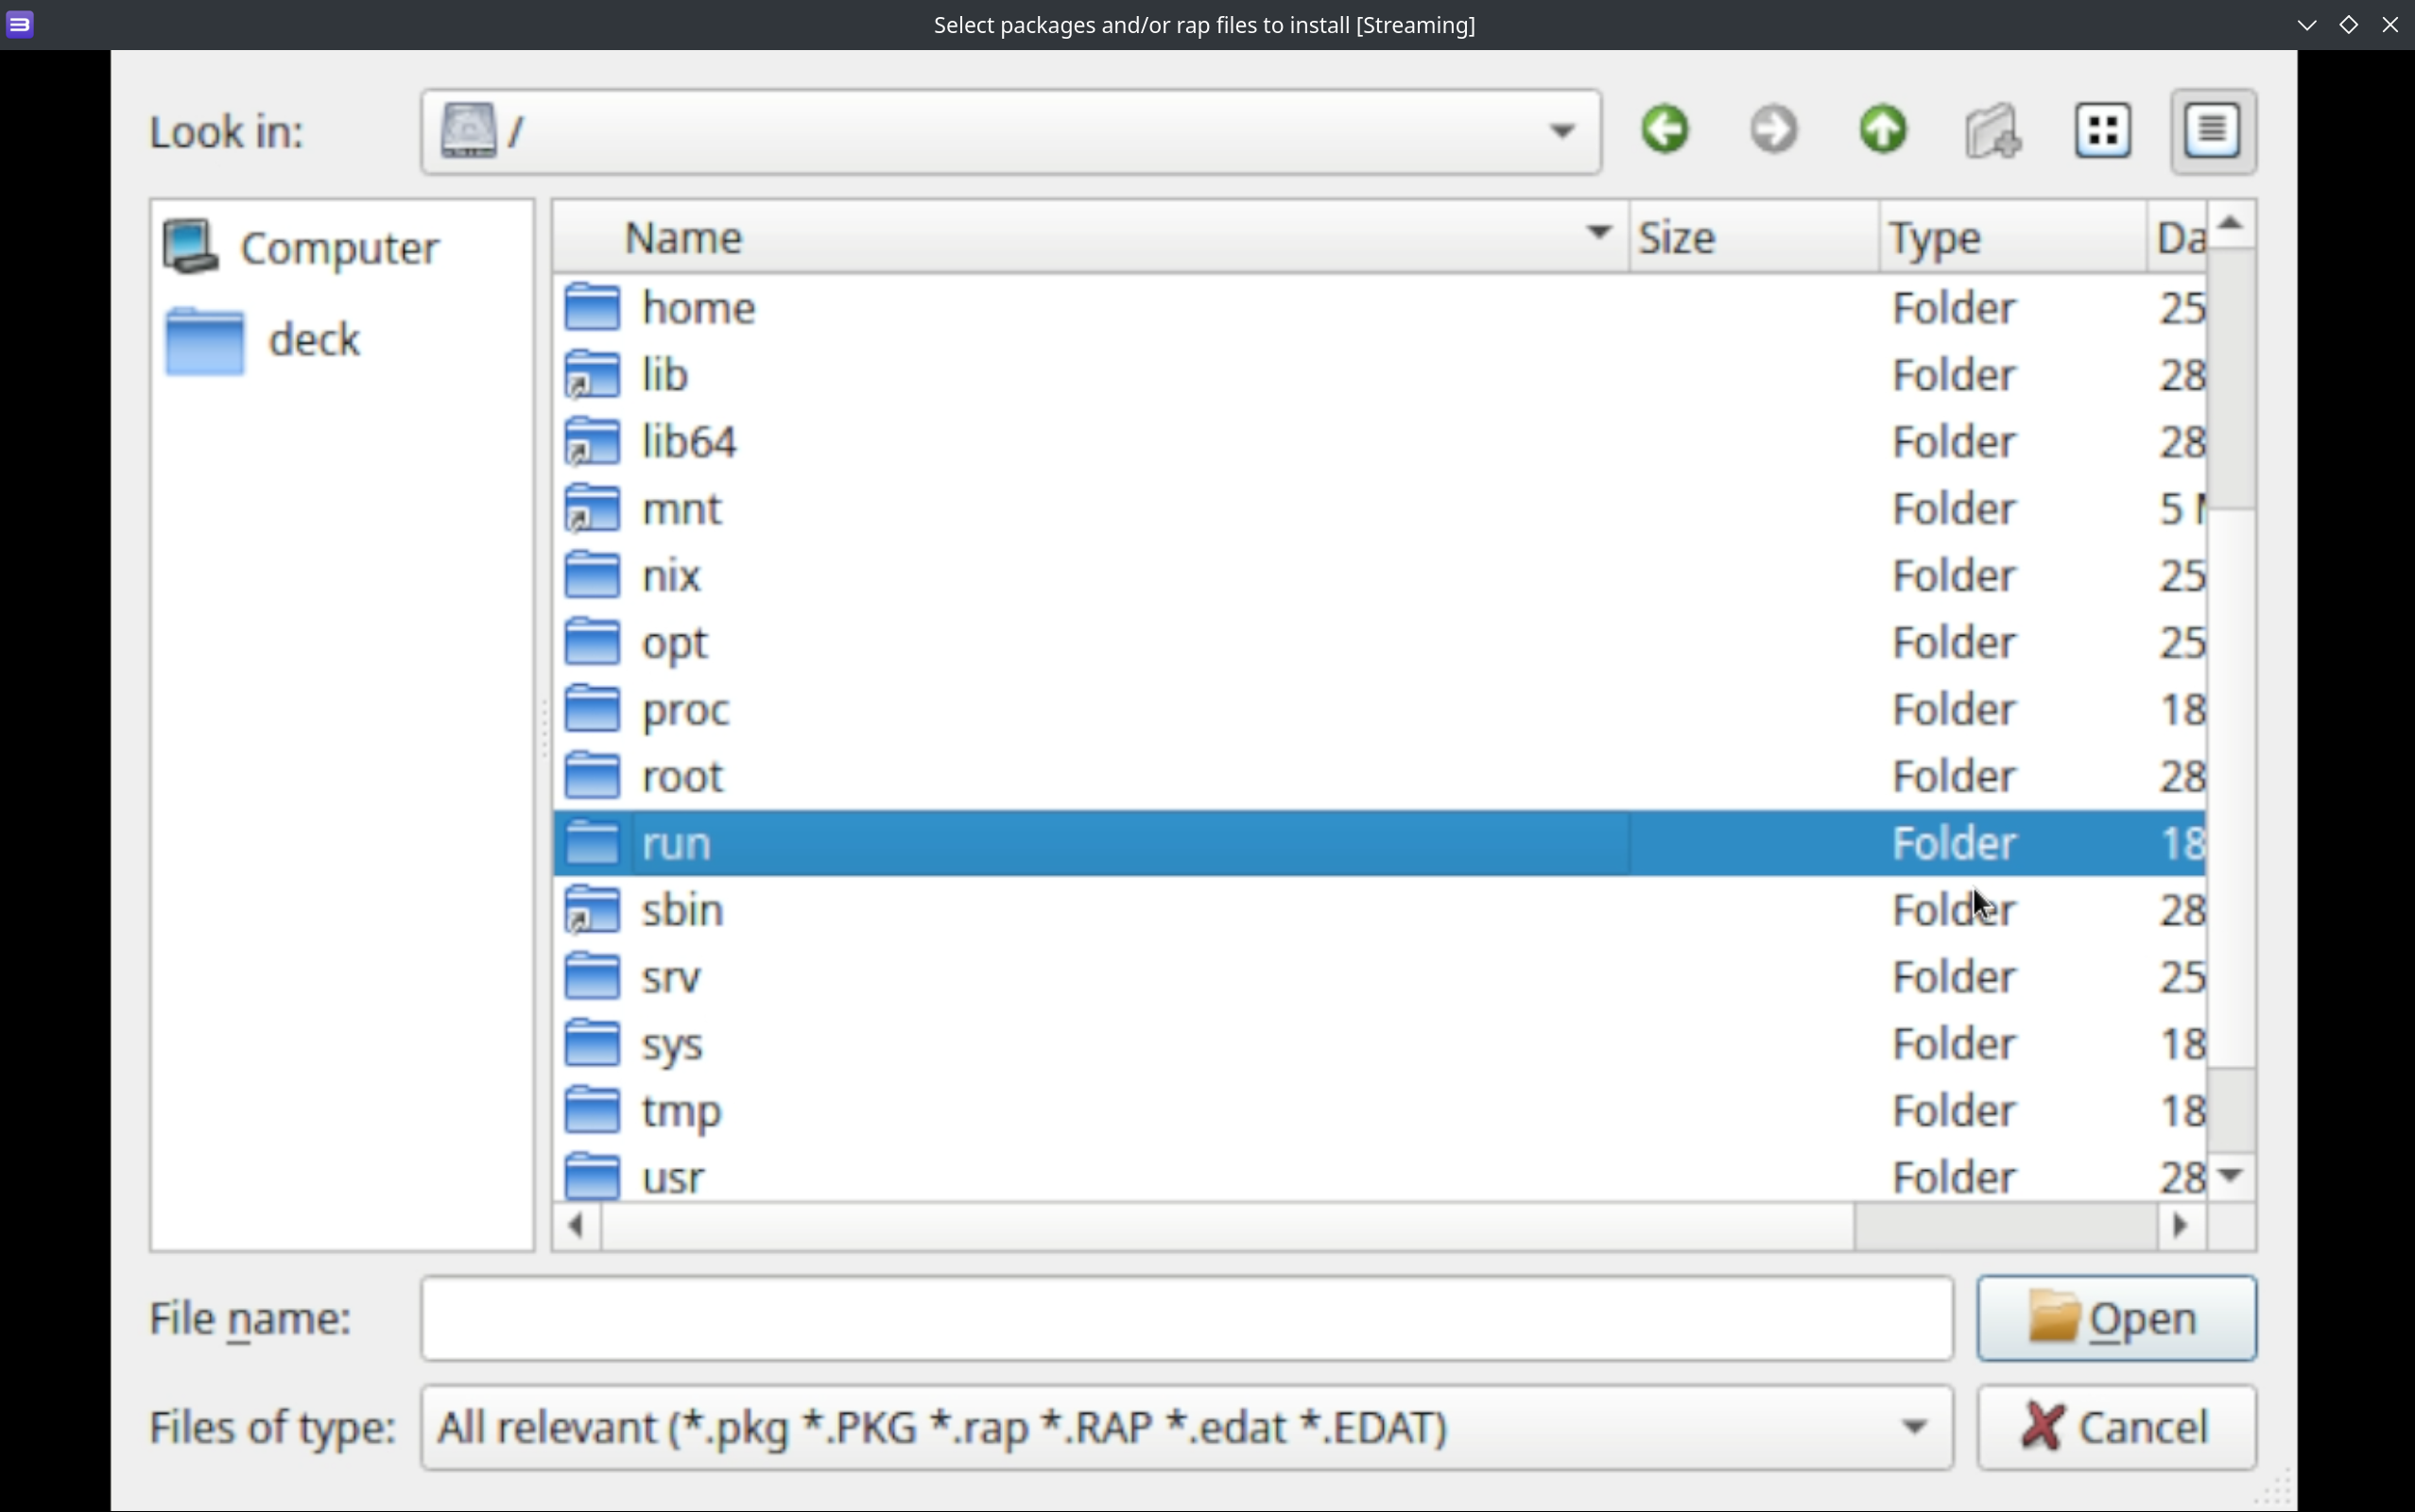
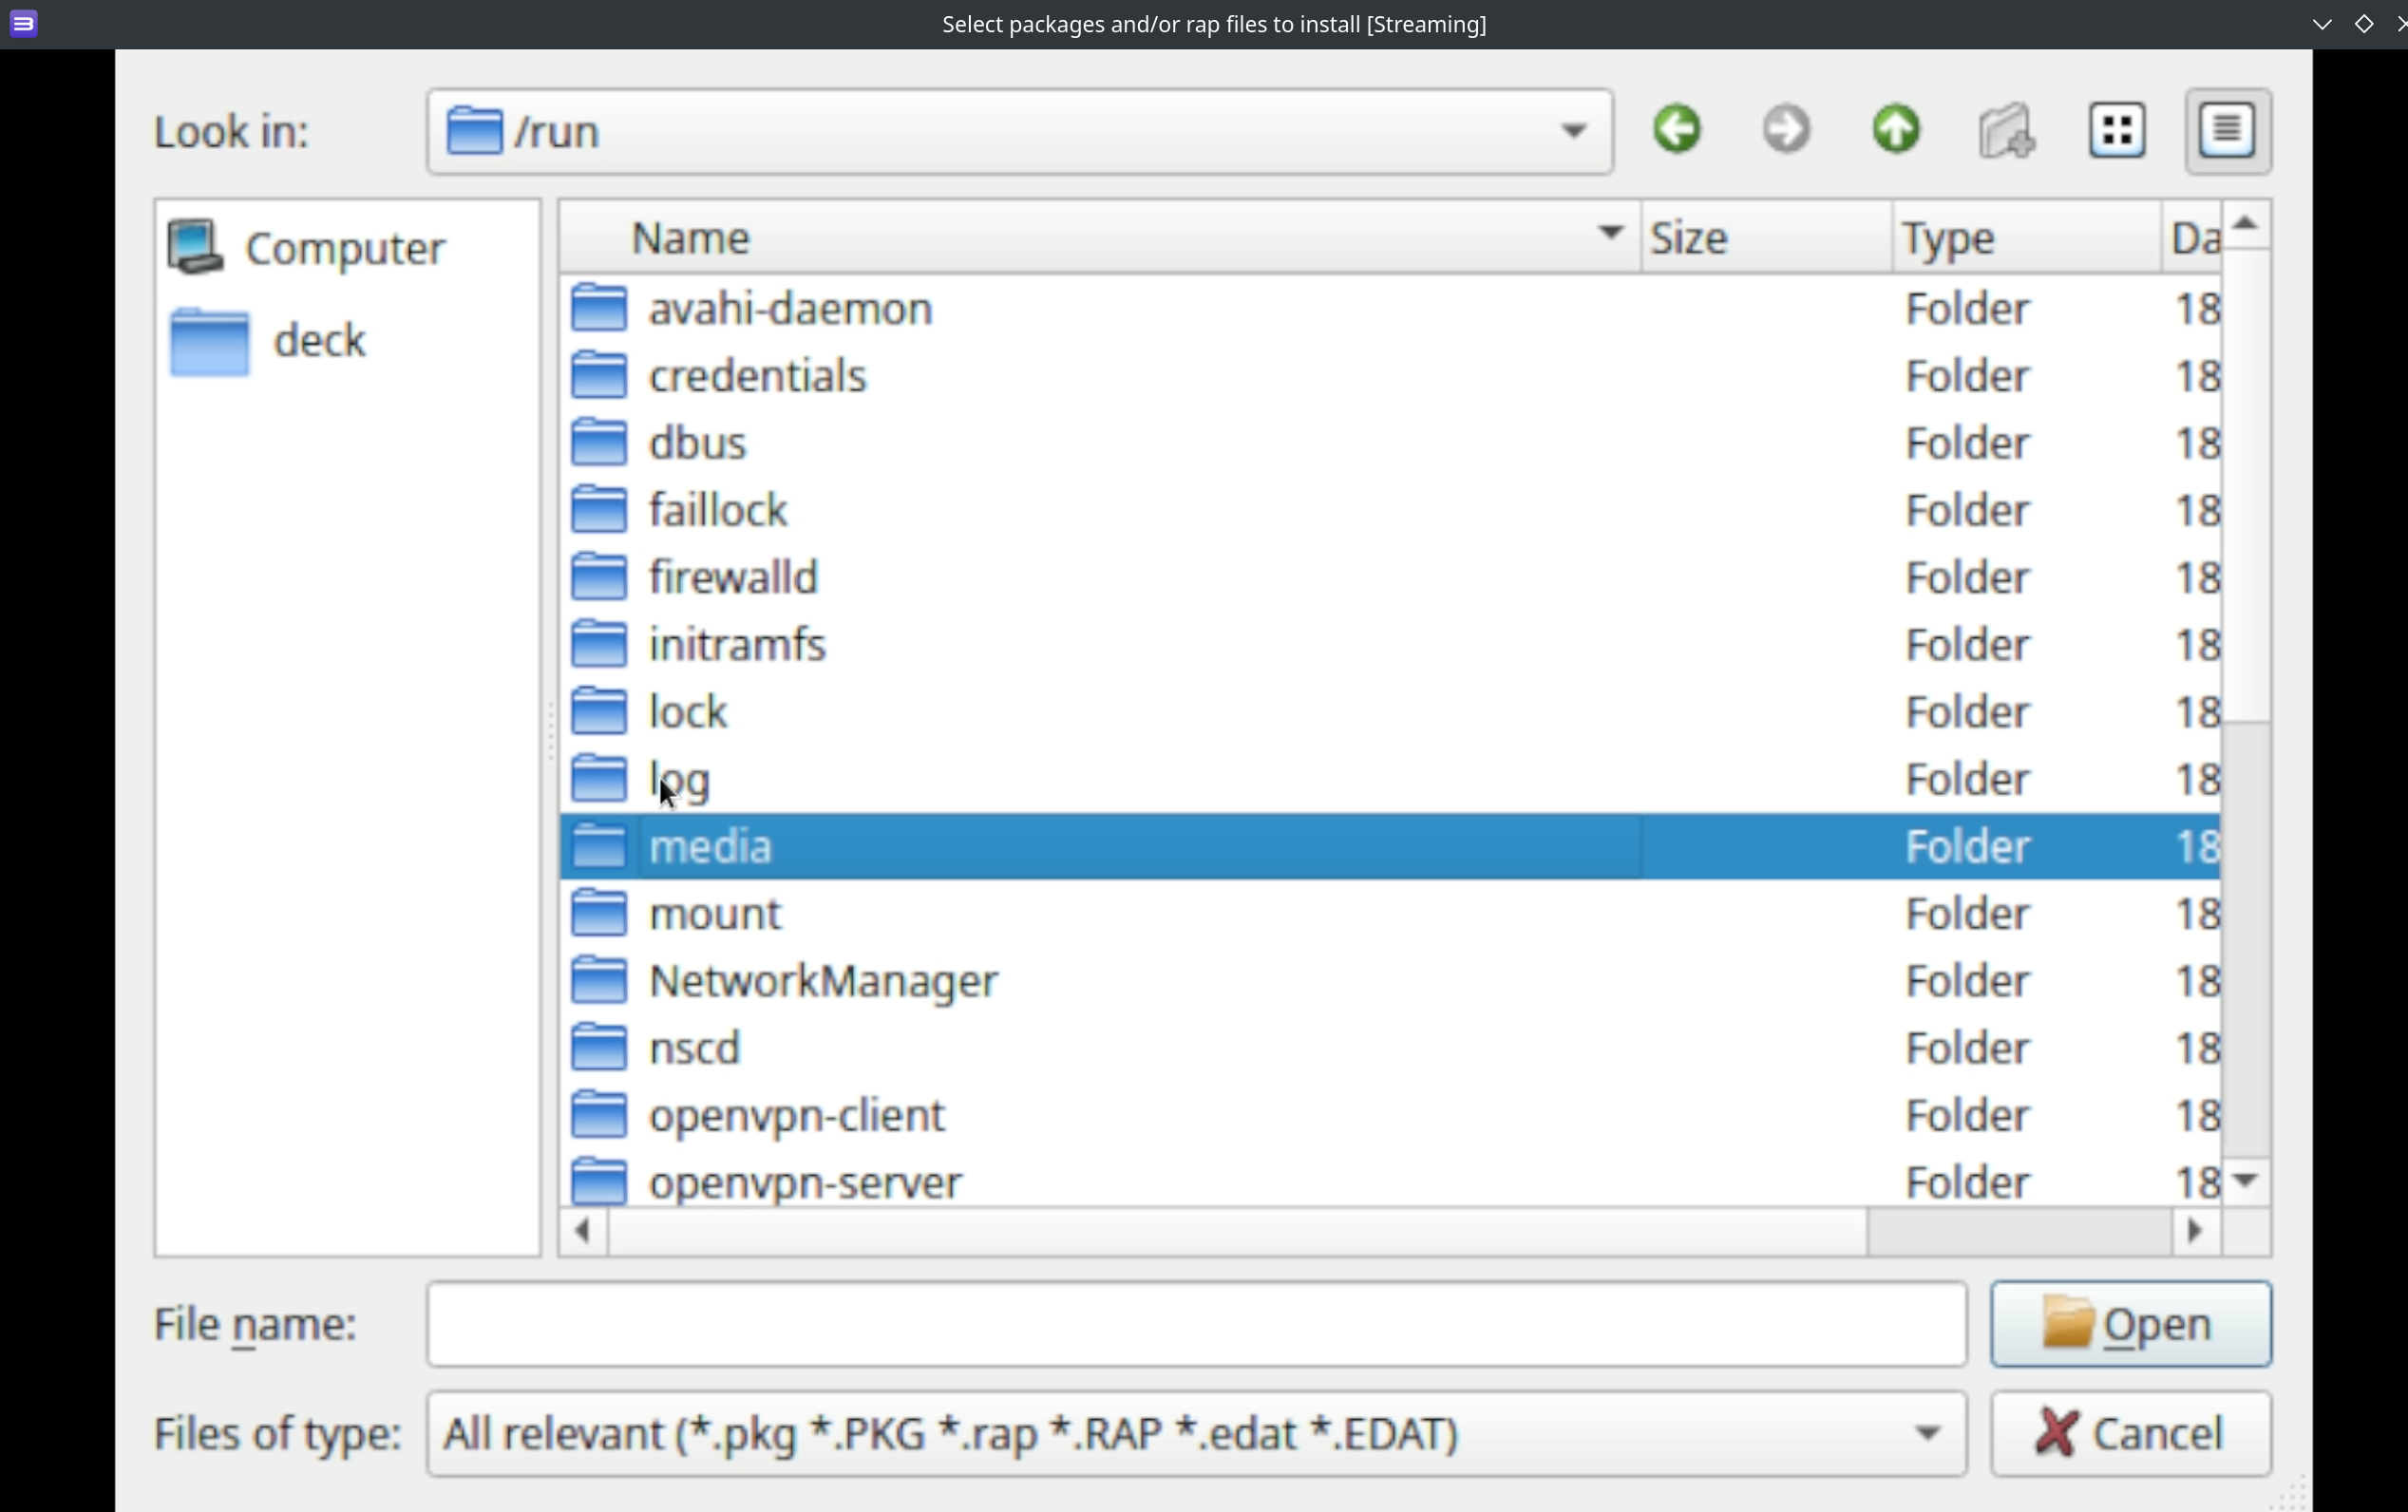
When using RPCS3's GUI to navigate to your SD Card or removable storage device, you will need to treat the location of the SD Card or removable storage device as a file path. Your SD Card or removable storage device will be typically located in /run/media/deck/SDCARDNAME.
To locate this file path, follow the steps below. The steps will cover how to install PKGs, RAPs, and Edats on your SD Card or removable storage device but you may also use the below steps for other RPCS3 functions.
- Open RPCS3
- Click
File, clickInstall Packages/Raps/Edats - On the left-hand side of the screen, click
Computer - Open
/ - Open
run - Open
media - Open
deck - On this screen, you will see a list of your SD Cards and removable storage devices. By default, your SD Card will be named with a long alphanumeric string

RPCS3 Tips and Tricks
How to Configure RPCS3 to Work With ES-DE and Pegasus
AppImage
- In
Desktop Mode, open RPCS3 - Skip this step if you have already added your games to RPCS3:
- Either:
- In the top left click,
File, clickAdd Games, locate your game - In the top left click,
File, clickInstall Packages/Raps/Edats, and install your PKG - For more information, read the File Formats section
- In the top left click,
- Either:
- Right click your game, click
Create Shortcut, clickCreate Desktop Shortcut - On your desktop, you should see an icon for your game. Move this icon to
Emulation/roms/ps3- If your desktop shortcut contains special icons any special symbols (Ex: the copyright symbol,
©), rename the desktop file to remove these symbols.- For example, rename
God Of War® Collection.desktoptoGod Of War Collection.desktop, removing the©afterWar
- For example, rename
- If your desktop shortcut contains special icons any special symbols (Ex: the copyright symbol,
- (Optional) If the desktop file is opening RPCS3 instead of the game:
- In Desktop Mode, right click the desktop file
- Click
Properties - On the
Generaltab, clickChangeto the right of theOpen Withline - Under
Application Preference Order, clickRPCS3 - Click
Removeon the right - Click
Applyin the bottom left and clickOK - The desktop file will not work in Desktop Mode, but will launch the game directly either through a terminal or through ES-DE
- Your game should now show up in and launch directly from ES-DE and Pegasus
If you get an Invalid file or folder error message, you will need to change the Alternative Emulator in ES-DE for PlayStation 3 to RPCS3 Shortcut [Standalone].
You may also do this on a per-game basis if you are using a mix of folders and PKGs. On a game, press the select button, scroll down and select EDIT THIS GAME'S METADATA, scroll down and select ALTERNATIVE EMULATOR, select PS3 and select the corresponding format.
Refer to https://gitlab.com/es-de/emulationstation-de/-/blob/master/USERGUIDE.md#sony-playstation-3, for additional information.
Flatpak
These are legacy instructions for the Flatpak installation from Discover. If you would like to use the AppImage, see Why did EmuDeck switch to the AppImage? for instructions.
- In
Desktop Mode, open RPCS3 - Skip this step if you have already added your games to RPCS3:
- Either:
- In the top left click,
File, clickAdd Games, locate your game - In the top left click,
File, clickInstall Packages/Raps/Edats, and install your PKG - For more information, read the File Formats section
- In the top left click,
- Either:
- Right click your game, click
Create Shortcut, clickCreate Desktop Shortcut - On your desktop, you should see an icon for your game. Move this icon to
Emulation/roms/ps3 - Right click the shortcut, click
Open with Kateor a text editor of your choice - Edit the beginning of the
Exec=line using the following template:- Original Line:
`Exec="/app/bin/rpcs3" --no-gui - Updated Line:
Exec="/usr/bin/flatpak" run net.rpcs3.RPCS3 --no-gui- Replace
"/app/bin/rpcs3" --no-guiwith"/usr/bin/flatpak" run net.rpcs3.RPCS3 --no-gui
- Replace
- Do not edit anything on the line after
--no-gui
- Original Line:
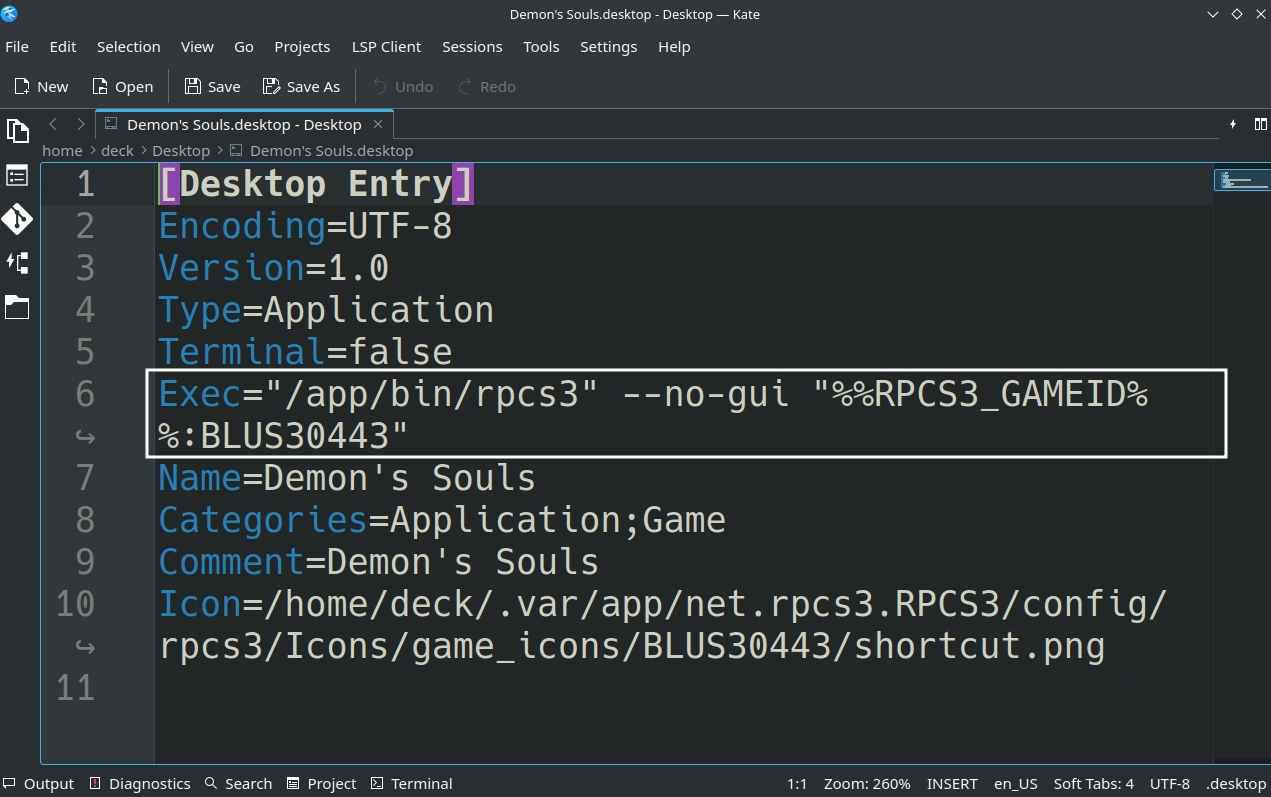
- Example, using Demon Souls:
- Original Line:
Exec="/app/bin/rpcs3" --no-gui "%%RPCS3_GAMEID%%:BLUS30443" - Updated Line:
Exec="/usr/bin/flatpak" run net.rpcs3.RPCS3 --no-gui "%RPCS3_GAMEID%:BLUS30443"
- Original Line:
- Save and close out of the desktop file
- (Optional) If the desktop file is opening RPCS3 instead of the game:
- In Desktop Mode, right click the desktop file
- Click
Properties - On the
Generaltab, clickChangeto the right of theOpen Withline - Under
Application Preference Order, clickRPCS3 - Click
Removeon the right - Click
Applyin the bottom left and clickOK - The desktop file will not work in Desktop Mode, but will launch the game directly either through a terminal or through ES-DE and Pegasus
- Your game should now show up in and launch directly from ES-DE and Pegasus
If you get an Invalid file or folder error message, you will need to change the Alternative Emulator in ES-DE for PlayStation 3 to RPCS3 Shortcut [Standalone].
You may also do this on a per-game basis if you are using a mix of folders and PKGs. On a game, press the select button, scroll down and select EDIT THIS GAME'S METADATA, scroll down and select ALTERNATIVE EMULATOR, select PS3 and select the corresponding format.
Refer to https://gitlab.com/es-de/emulationstation-de/-/blob/master/USERGUIDE.md#sony-playstation-3, for additional information.
How to Configure Multiplayer
RPCS3 comes with a nifty auto-map feature that makes setting up multiplayer a breeze. To set up multiplayer, you simply need to enable the additional ports.
Note: If you are in Desktop Mode, make sure that Steam is open.
- Open RPCS3
- Open the
Padsmenu in theSettings - For each controller you are using for Player 2, 3, 4, etc, click the respective tab
- You do not need to adjust any settings for Player 1
- Under
Handlers, selectSDLfor each player you are enabling - Under
Devices- Player 2:
Steam Virtual Gamepad 2 - Player 3:
Steam Virtual Gamepad 3 - Player 4:
Steam Virtual Gamepad 4 - Player 5:
Steam Virtual Gamepad 5 - Player 6:
Steam Virtual Gamepad 6 - Player 7:
Steam Virtual Gamepad 7
- Player 2:
- Using
Player 2as an example:- On the
Player 2configuration screen, after you have selected the appropriateDeviceandHandler, clickRefreshto the right ofHandler
- On the
- After you are finished enabling any additional players, click
Saveand you may open your game either directly as a shortcut in Steam or through ES-DE and Pegasus - (Optional) You may need to re-arrange the controller order in Game Mode for your controllers to function as expected. See How to Re-Arrange the Controller Order to learn how
Special Game Configurations
RPCS3 Wiki
Some games may require additional setup, needing mods or alteration of settings. The RPCS3 Compatability List can be used to check for these. Simply search for the name of the game and click the hyperlinked name to view the wiki page for that game and see if there are any recommended or required settings changes.
EmuDeck Community Creations
Use the EmuDeck Community Game Configurations page to submit or view special game configurations.
How to Set up the Motion Sensor with External Controllers
The PlayStation 3 controller, or the DualShock 3 notably had "Sixaxis". Sixaxis refers to the motion sensor used in a handful of games. One of the more popular games that utilized Sixaxis was Folklore. For a full list of games, see https://www.giantbomb.com/sixaxis-support/3015-5310/games/.
RPCS3 has implemented support to allow emulating the Sixaxis through evdev, which exposes the gyro in a large variety of modern controllers (including the Nintendo Switch Pro Controller, 8BitDo Ultimate Controller, and the DualSense).
At this time, the Steam Deck gyro cannot be used. But if you own one of these controllers, you may emulate the Sixaxis through RPCS3.
Here's How
Desktop Mode
- Switch to Desktop Mode
- Exit out of Steam
- You may exit out of Steam a couple of different ways:
- Right click the
Steamicon in your taskbar and clickExit Steam - Open Steam, click the
Steambutton in the top left, clickExit - Open a terminal (Konsole) and enter
killall -9 steam - Do note that clicking the the
Xbutton in the top right of the Steam window will not exit out of Steam
- Right click the
- Your controls will switch to
Lizard Mode. UseL2to right click,R2to left click, and theRight Trackpadto move the mouse - You may also connect an external keyboard and mouse
- You may exit out of Steam a couple of different ways:
- Click the bluetooth icon in the bottom right of your taskbar and connect your controller
- Click the Steam icon in the bottom left of the taskbar and open
RPCS3 - Click
Padsat the top - Under the
Player 1tab, click the Dropdown box belowDevicesand select your controller- To switch back to the default controller layout, make sure
Steamis open and selectSteam Virtual Gamepad 1
- To switch back to the default controller layout, make sure
- Click
Save, and exit out of RPCS3
Game Mode
- In Game Mode, connect your controller
- Select your PlayStation 3 game
- On the
Playscreen, select theControllericon to the right of the screen - Select your controller tab at the top
- Click
Reorder Controllersand move your external controller to the top - Click the
Gearicon to the right, and clickDisable Steam Input- You may need to restart first for this setting to properly apply
- Your controller's gyro will now work for this selected game, repeat as needed for your other games
For a video, see below:
Post-Configuration
To restore the default Steam Deck controls:
- Open RPCS3
- Click
Padsat the top - Under the
Player 1tab, click the Dropdown box belowDevicesand selectSteam Virtual Gamepad 1 - Select
SDLunderHandlers - Click
Save, and exit out of RPCS3
(Optional) To restore Steam Input:
- Select your PlayStation 3 game
- On the
Playscreen, select theControllericon to the right of the screen - Select your controller tab at the top
- Click the
Gearicon to the right, and clickEnable Steam Input- You may need to restart first for this setting to properly apply
- The controls will be reverted to Steam Input and the Steam Deck controls will be restored
How to Roll Back RPCS3 to an Older Version
AppImage
Introduction
Your ROMs launch using a script created by EmuDeck, rpcs3.sh in ~/Emulation/tools/launchers.
Emulation Directory
~/Emulation refers to either your home directory or SD Card/removable media depending on your installation location.
The script launches the corresponding emulator in /home/deck/Applications and specifically looks for two traits:
- The most recently downloaded version of the emulator in
/home/deck/Applications, based on the file/release date. - The emulator name at the beginning of the file. Anything after the emulator name is ignored.
- For example, if the latest version of the emulator is
1351and you would like to downgrade to1349. When you download version1349, you could rename it toEMULATORNAME-1349.AppImage, and EmuDeck's script will ignore the-1349in the file name, allowing you to record which versions of the emulator you are using through the file name.
- For example, if the latest version of the emulator is
How to Roll Back RPCS3
- Download the version of the emulator you would like to use from RPCS3's Builds page: https://rpcs3.net/compatibility?b
- Move the downloaded emulator from Step 1 to
/home/deck/Applications - (Optional) Rename or delete the original emulator file
- Right click the newly downloaded emulator, click
Properties, clickPermissions, checkIs executable - Your games will now launch using the version of the emulator you downloaded
Flatpak
These are legacy instructions for the Flatpak installation from Discover. If you would like to use the AppImage, see Why did EmuDeck switch to the AppImage? for instructions.
If you do not have access to a mouse and keyboard for the below section, use L2 to right click and R2 to left click. Alternatively, remote into your Steam Deck using one of the methods found in the FAQ, How do I remotely control my Steam Deck?.
- In Desktop Mode, open
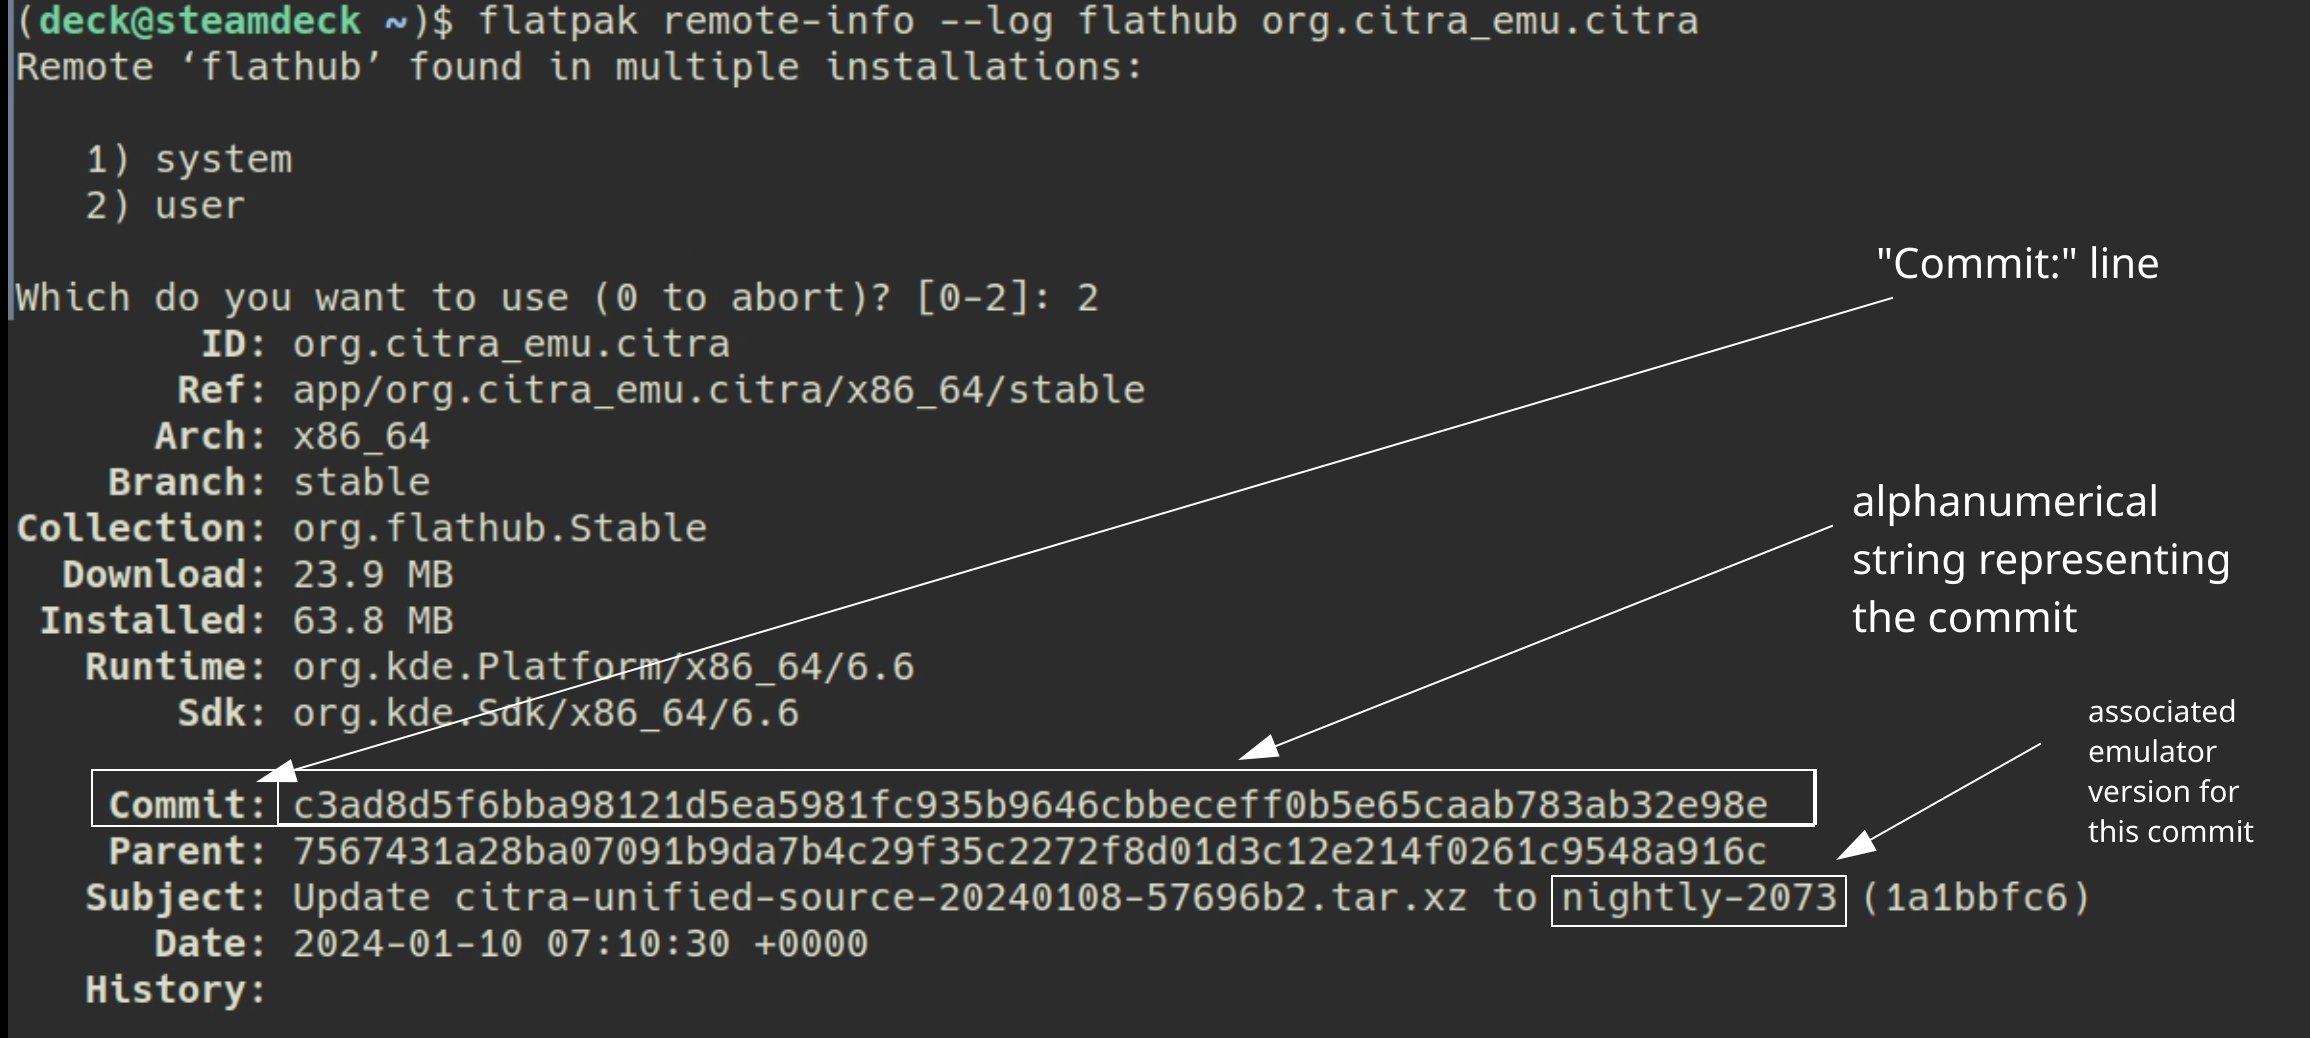
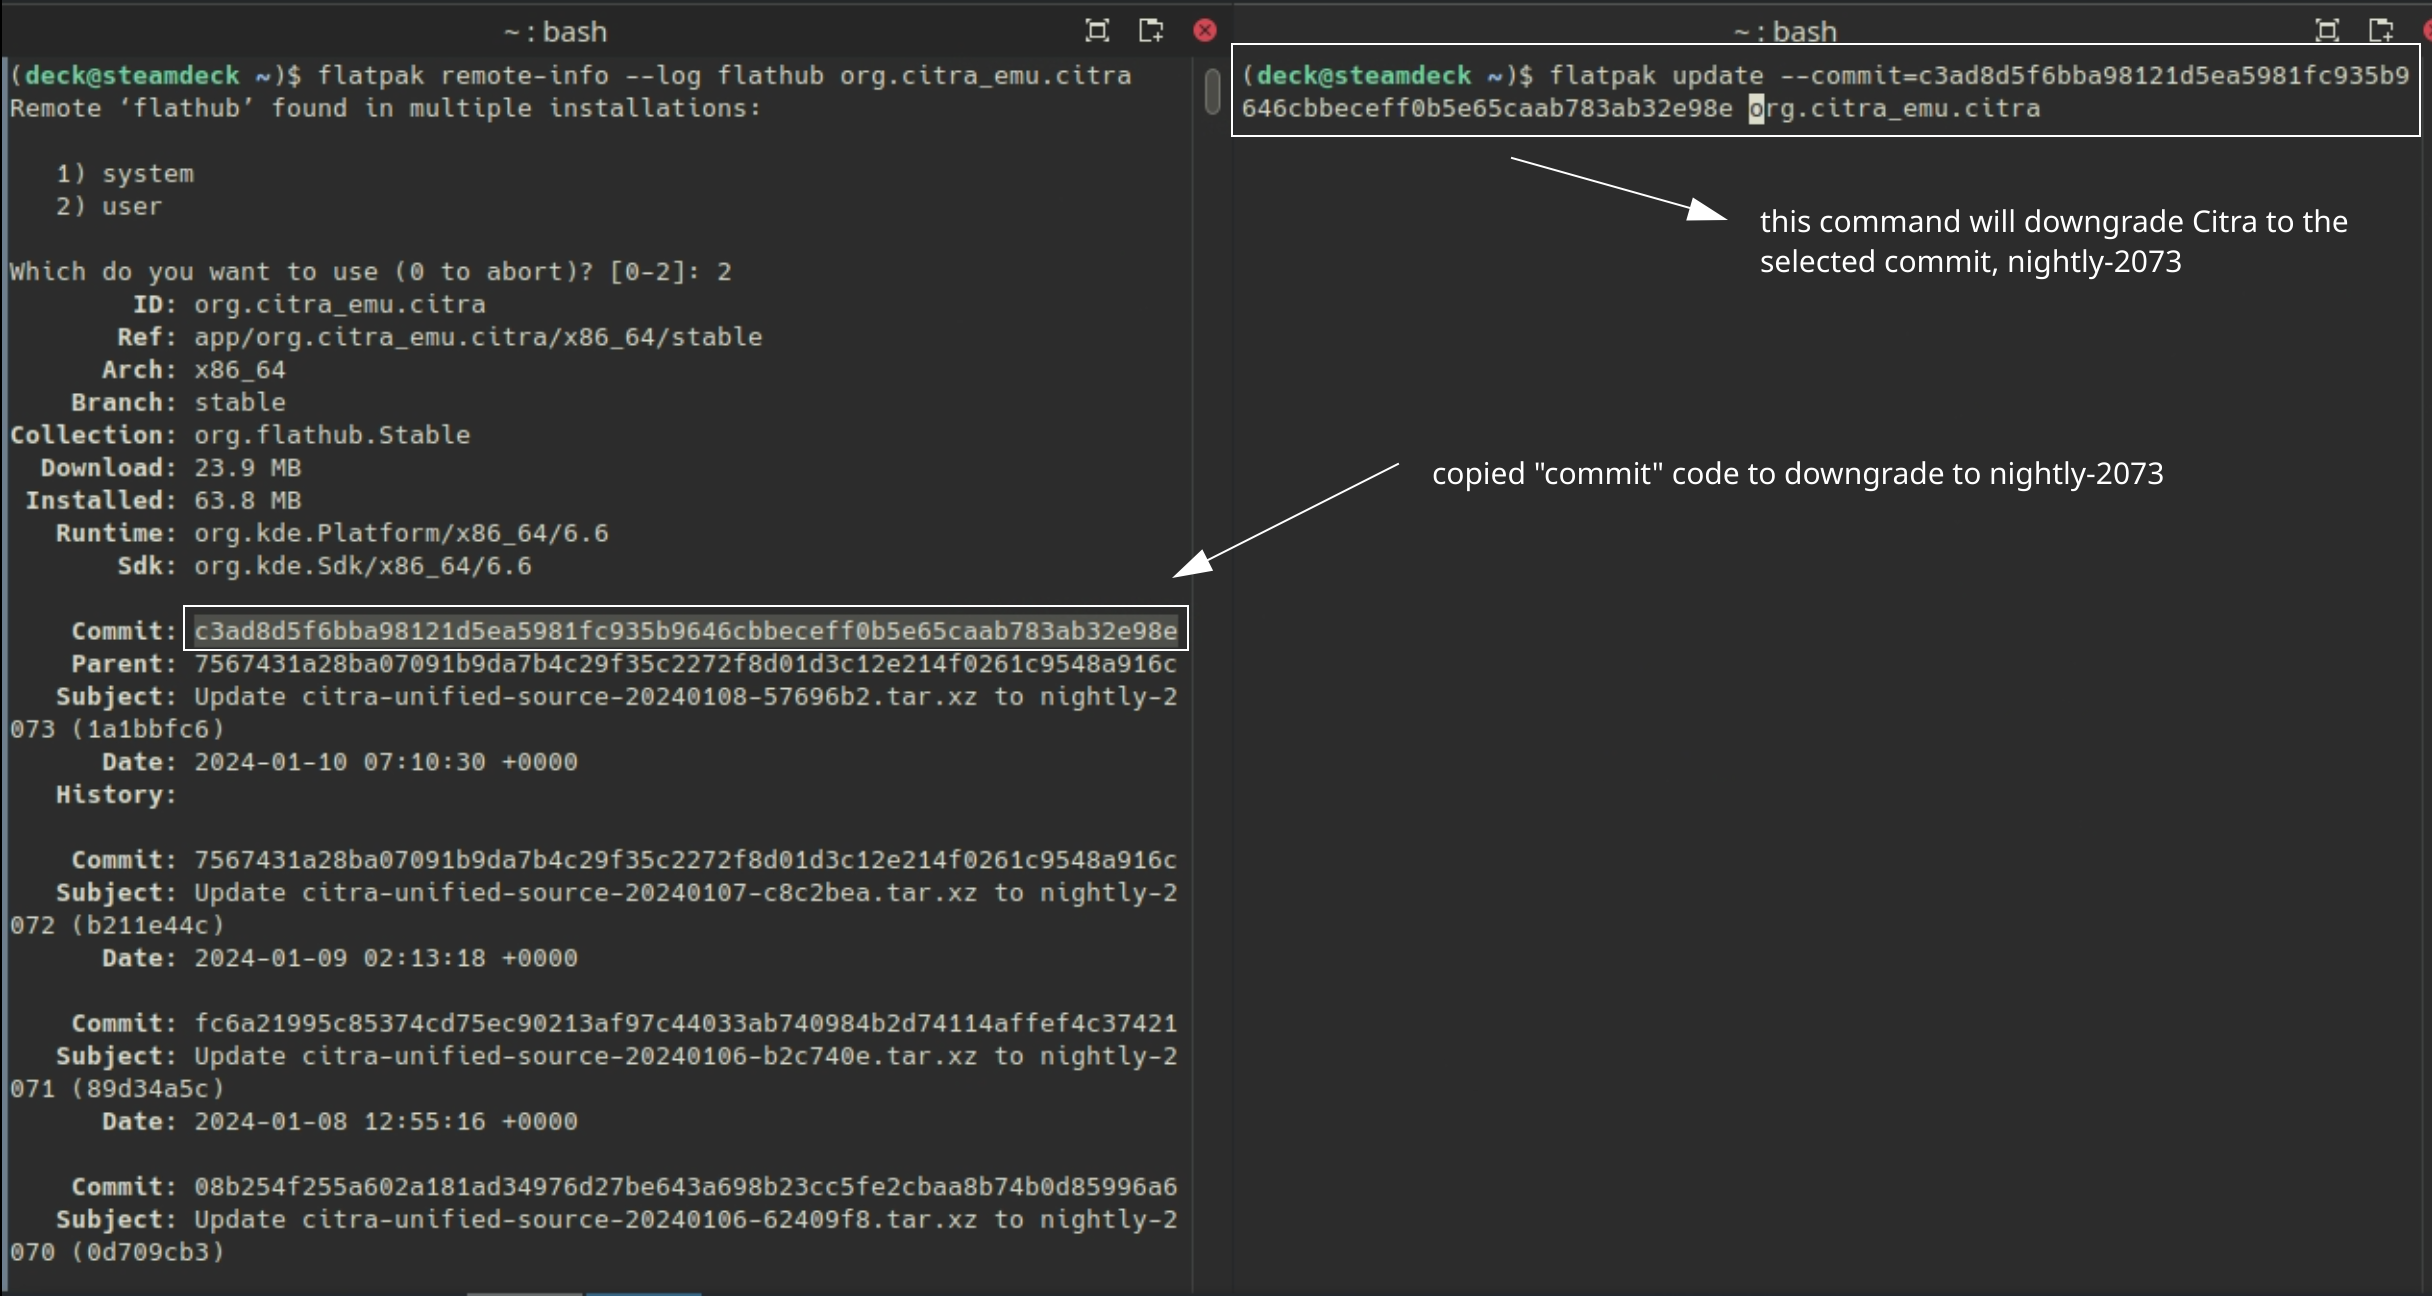
Konsole - To see a list of prior versions of the emulator, type:
flatpak remote-info --log flathub net.rpcs3.RPCS3
- If Konsole prompts you to select
systemoruser, enter2to selectuser - Konsole will list a list of previous versions for the flatpak. The important line for each version is the
Commit:line. TheCommit:line will have a long accompanying alphanumeric string (the “commit” code). Copy the string for the version you want to downgrade to.- Using Citra as an example:
- Using Citra as an example:
- To downgrade to the version you want:
flatpak update --commit=put_commit_code_here net.rpcs3.RPCS3- Replace
put_commit_code_herewith the actual code you located in Step 2.- Using Citra as an example:
- Using Citra as an example:
If the above steps did not work and you are getting an error message along the lines of Flatpak not installed, your Flatpak is likely installed at the system level instead. Select one of the below solutions:
Solution 1: Open the EmuDeck application, click the Manage Emulators page, select the emulator in question, and click Reinstall / Update.
Solution 2: Add sudo in front of the commands written in Step 2 and Step 5. In Step 2, write sudo flatpak remote-info --log flathub net.rpcs3.RPCS3 and in Step 5, write sudo flatpak update --commit=put_commit_code_here net.rpcs3.RPCS3.
How to Configure Language Settings
In-Game
- In Desktop Mode, open RPCS3
- At the top, click
Configuration, clickSystem - Below
Console Language, select your preferred language in the drop-down menu