MAME is a multi-purpose emulation framework. Play arcade games and more.
Website: https://www.mamedev.org/
GitHub: https://github.com/mamedev/mame
MAME Wiki: https://docs.mamedev.org/whatis.html
MAME FAQ: https://docs.mamedev.org/usingmame/commonissues.html
Arcade Database (Lookup required files for MAME ROMs, or what a MAME short name refers to): http://adb.arcadeitalia.net/default.php
MAME Table of Contents
-
- Maintaining ROM Versions
- How to Configure Multiplayer
- How to Determine if a ROM Requires BIOS
- How to Determine if a ROM Requires a CHD File
- How to Configure Controls on a Per Game Basis
- How to Add Custom Bezels
- How to Enable Shaders/Scanlines in MAME (Standalone)
- How to Configure MAME to Work With EmulationStation-DE
- How to Roll Back MAME to an Older Version
- How to Configure Language Settings
- How to Use Cheats
- How to Configure Light Gun Games
- Community MAME Controller Profiles
Getting Started with MAME
MAME Configuration
- Type of Emulator: Flatpak
- Config Location:
/home/deck/.mame- Plugin folders will appear here after enabling them in MAME
- Storage:
Emulation/storage/mame - ROM Location:
Emulation/roms/arcade - BIOS Location:
Emulation/roms/arcade - Saves:
Emulation/saves/MAME/saves - Save States:
Emulation/saves/MAME/states
Note:
~/.mameis a hidden folder by default. In Dolphin (file manager), click the hamburger menu in the top right, clickShow Hidden Filesto see these folders.MAME [Standalone]shares itsEmulation/roms/arcadefolder withArcade - RetroArch MAME Current. Turning both of these parsers on in Steam ROM Manager will cause duplicates in your App List.
Works With
- Steam ROM Manager
- EmulationStation-DE
MAME Folder Locations
These file locations apply regardless of where you chose to install EmuDeck (to your internal SSD, to your SD Card, or elsewhere). Some emulator configuration files will be located on the internal SSD as listed below.
$HOME refers to your home folder. If you are on a Steam Deck, this folder will be named /home/deck (you will likely not see deck in the file path when navigating using the file manager).
Paths beginning with Emulation/.. correspond to your EmuDeck install location. If you installed on an SD Card, your path may be /run/media/mmcblk0p1/Emulation/roms/... If you installed on your internal SSD, your path may be /home/deck/Emulation/roms/..
Note: Folders with a . (.mame, .var, .local, .config, etc.) at the beginning are hidden by default. In Dolphin (file manager), click the hamburger menu in the top right, click Show Hidden Files to see these folders.
$HOME/.mame
Emulation/storage/mame
How to Update MAME
How to Update MAME
- Update through
Discover(Shopping bag icon) - Through the
Update your Emulators & Toolssection on theManage Emulatorspage in theEmuDeckapplication
How to Launch MAME in Desktop Mode
How to Launch MAME in Desktop Mode
- Launch
MAMEfrom the Applications Launcher (Steam Deck icon in the bottom left of the taskbar) - Launch the script from
Emulation/tools/launchers,mame.sh - Launch the emulator from
Steamafter adding it via theEmulatorsparser inSteam ROM Manager
MAME File Formats
ROMs
- .zip
- .chd
BIOS Files
BIOS will be searched through 3 folders:
Emulation/roms/arcade/Emulation/bios/mame/*Emulation/bios/
Note: EmulationStation-DE will ONLY work with the BIOS in the arcade folder
MAME Hotkeys
| Hotkey | MAME |
|---|---|
| Quick Menu* | STEAM + DPad Down or Select + R3 |
| Save State | Select + R1 |
| Load State | Select + L1 |
| Fast Forward | Select + R2 |
| Stop Emulation | Select + Start or STEAM + DPad Left |
| Coin for Player | Select |
| Start for Player | Start |
- If you make any changes in the Quick Menu while in game, make sure to use one of the
Exit Emulatorhotkeys to close out of the game to ensure any changes you made are saved. If you useSTEAM+ theExit gamebutton, your changes will not be saved. - Steam Deck Button Layout
Steam Deck Light Gun Controls
MAME also comes with a EmuDeck - Steam Deck Light Gun Controls profile intended to be used with light gun games. To use this profile, apply it manually. For instructions, see How to Select a Steam Input Profile.
| Controls | EmuDeck - Steam Deck Light Gun Controls | General Notes | Emulator Specific Notes |
|---|---|---|---|
| Left Trackpad | Mouse and Right Click on Click | Mouse sensitivity set to 100% | - |
| Right Trackpad | Mouse and Left Click on Click | Mouse sensitivity increased to 200% | - |
| R2 | Left Click | Typically used to shoot | When using MAME, move the cursor to the bottom left of the screen, and click L2 or R2 depending on the game to reload |
| L2 | Right Click | Typically used to reload | When using MAME, move the cursor to the bottom left of the screen, and click L2 or R2 depending on the game to reload |
MAME Tips and Tricks
Maintaining ROM Versions
Ideally use ROMs that are the same version as MAME's version. MAME often releases improved versions of ROMs to fix issues. Issues are less of a concern with the most popular classics because most of those haven't changed in years. But to avoid having to track multiple different versions of your ROMs, most people just keep their ROM sets updated as the emulator updates.
To understand how MAME works, look up the difference between merged and split ROM sets, and learn what a sample and a chd are and how they're used in conjunction with ROMs to deliver a playable game.
Reference image: 
Tip
Refer to https://docs.mamedev.org/usingmame/aboutromsets.html, for additional information.
How to Configure Multiplayer
Multiplayer for MAME is configured out of the box, no additional configuration is needed.
You may need to re-arrange the controller order in Game Mode for your controllers to function as expected. See How to Re-Arrange the Controller Order for more information.
How to Determine if a ROM Requires BIOS
Some ROMs for MAME may require BIOS to run. For this section, these ROMs will be split into either System or Software ROMs. To delineate between the two simply, System ROMs are typically arcade ROMs and Software ROMs are usually computers or video game consoles.
How to Determine if a System ROM Requires BIOS
- In a folder of your choice, right click anywhere in the folder, and click
Open Terminal here - Enter:
flatpak run org.mamedev.MAME -listxml > mame.xml
- This command will create a
mame.xmlfile in the folder you chose in Step 1 - Right click
mame.xml, clickOpen with Kateor a text editor of your choice - Search the file (either using
Ctrl+For by clickingEdit→Find) and type inisbios - You will see a line that generally looks like the following:
<machine name="MACHINENAME" sourcefile="PATH/FILENAME" isbios="yes">- For example
<machine name="neogeo" sourcefile="neogeo/neogeo.cpp" isbios="yes">
- Let's break this line down, using
neogeoas an example:<machine name="neogeo" sourcefile="neogeo/neogeo.cpp" isbios="yes">isbios="yes"means BIOS are required for the Neo-Geo MV-6F- The
machine_name=gives you the name of the BIOS file. BIOS files forSystemROMs always have a.zipfile extension. Forneogeo, the bios will beneogeo.zip - The list of files below the
manufacturertypically comprise the files in a mergedneogeo.zipfile. Using a mergedneogeo.zipmay take up extra space but guarantees you have the BIOS necessary to play any Neo-Geo MV-6F ROM
- Place your BIOS in
Emulation/biosorEmulation/roms/arcade(the latter is required if you are playing through EmulationStation-DE)
Recreating this file whenever MAME updates will get you the latest list of which System ROMs require BIOS.
How to Determine if a Software ROM Requires BIOS
- Open http://adb.arcadeitalia.net/default.php
- Search for the name of the console or computer in the search box, respecting punctuation and hyphenation when possible
- On the respective console or computer's page, scroll down to
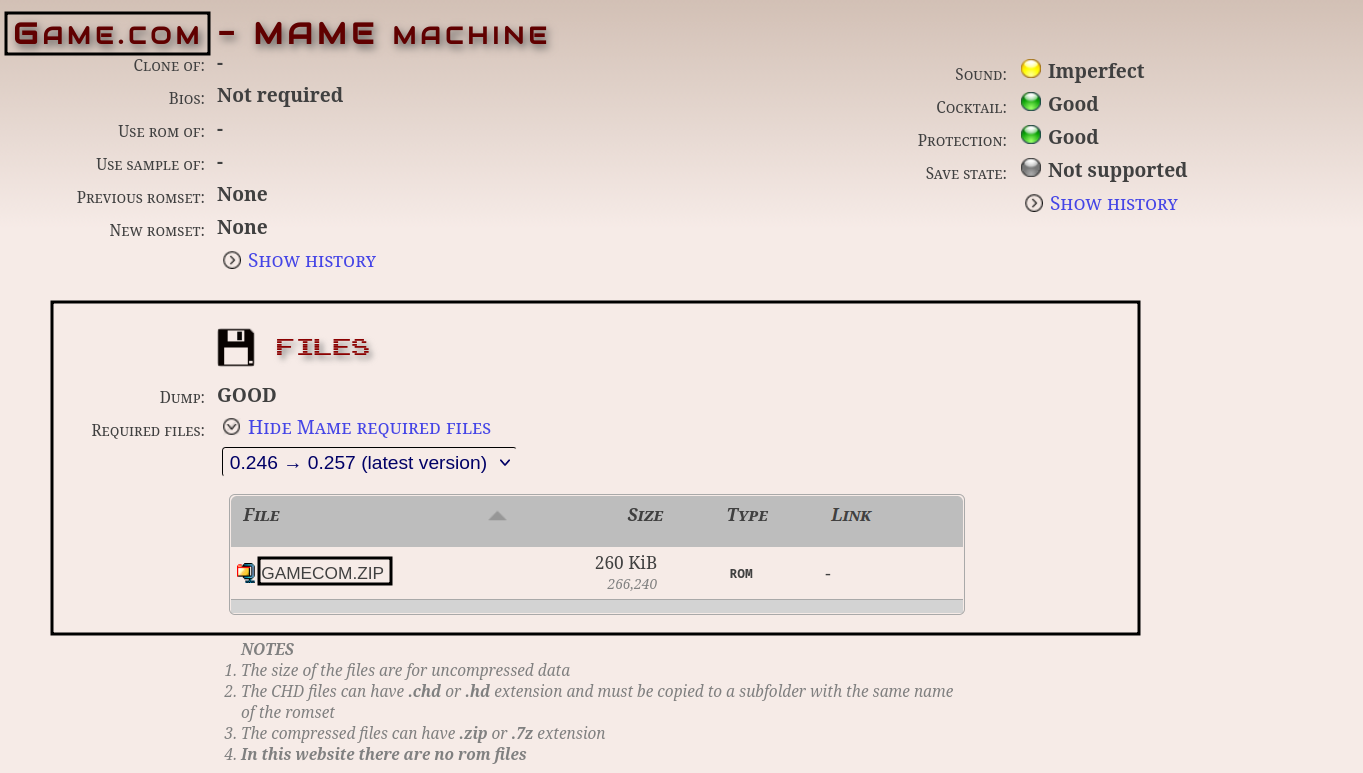
Required Files, and clickSHOW MAME REQUIRED FILES - Place the file(s) in the list in
Emulation/biosor the matching ROM folder (the latter is required if you are playing through EmulationStation-DE)- For example, if you are playing
Game.comthrough EmulationStation-DE, placegamecom.zipinEmulation/roms/gamecom
- For example, if you are playing
How to View Compatibility for Software ROMs
- Open http://adb.arcadeitalia.net/default.php
- Click
SOFTWAREon the left side - Search for your console or computer in the
SYSTEMbox and clickSearch- For example, Game.com: http://adb.arcadeitalia.net/?search=mess&machine_name=gamecom%3B
- You will see a full list of the ROMs for that respective console or computer. The circle color in the top right of each box is the game's compatibility
- Green: Supported
- Yellow: Imperfect
- Some pages may explain the specific issues affecting the game
- Red: Not Supported
How to Determine if a ROM Requires a CHD File
Game ROMs for MAME are primarily .zip files. Some of these games require additional files to run. These additional files are primarily .chd files.
To determine if your ROM requires a .chd file:
- In Desktop Mode, open Konsole
- Enter:
flatpak run org.mamedev.MAME -listroms ROMSHORTNAME- Typically, the short name of the ROM is the file name. For example, the file name for
Street Fighter III 3rd Strikeissfiii3.zipand the short name issfiii3 - You can also use http://adb.arcadeitalia.net/ to locate a MAME ROM's short name
- Typically, the short name of the ROM is the file name. For example, the file name for
- You will get an output similar to below:
- The line without a file size or a CRC is the
.chdfile required. The line with a file size and a CRC is the file located within the zip file- For example,
sfiii3_euro.29f400.u2is the file located insfiii3.zipandcap-33s-2is the.chdfile required to runsfiii3.zip
- For example,
- Create a subfolder matching the shortname in
Emulation/roms/arcadeand place the.chdfile in the subfolder- For example, with
sfiii3, create asfiii3folder inEmulation/roms/arcadeand placecap-33s-2.chdinEmulation/roms/arcade/sfiii3 - Place
sfiii3.zipdirectly inEmulation/roms/arcade
- For example, with
How to Configure Controls on a Per Game Basis
- While in game, press
STEAMandDPad Down - Select
Input Settings - Select
Input Settings (this system) - Configure controls
- To ensure your controls are saved, press
STEAMandDPad Leftto exit out of the game- If you press
STEAMand use theExit gamebutton, your controls will not be saved
- If you press
- Your controls will be saved as a file to
home/deck/.mame/cfg/GAMESHORTNAME.cfg- You may also share this configuration file with others
How to Add Custom Bezels
- Open
Emulation/storage/mame - Copy bezel files, in .zip format, into this folder, named the same as the ROM.
- Done.
Tip
Use the Bezel Project to locate bezels for your MAME ROMs: https://github.com/thebezelproject/BezelProject-Windows
How to Enable Shaders/Scanlines in MAME (Standalone)
- In Desktop Mode, open
/home/deck/.mame/mame.ini~/.mameis a hidden folder by default. In Dolphin (file manager), click the hamburger menu in the top right, clickShow Hidden Filesto see these folders.
- Under the
OSD VIDEO OPTIONSsection, setvideotobgfx - Under the
BGFX POST-PROCESSING OPTIONSsection, setbgfx_screen_chainsto the shader of your choice- For example:
crt-geom-deluxe
- For example:
- Save your changes to the file
Tip
Other shader values can be found here: https://docs.mamedev.org/advanced/bgfx.html
How to Configure MAME to Work With EmulationStation-DE
EmuDeck installs both MAME (Standalone, installed as a flatpak), and RetroArch's MAME core.
In order to use MAME (Standalone), make sure your ROMs are in Emulation/roms/arcade.
In order to use MAME (Standalone) for EmulationStation-DE, make sure you are selecting MAME [Standalone] in the Alternative Emulators menu.
Tutorial
- In EmulationStation-DE, press the
Startbutton - Scroll down and select
Other Settings - Select
Alternative Emulators - Scroll down to
Arcadeand selectMAME [Standalone]
How to Roll Back MAME to an Older Version
If you do not have access to a mouse and keyboard for the below section, use L2 to right click and R2 to left click. Alternatively, remote into your Steam Deck using one of the methods found in the FAQ, How do I remotely control my Steam Deck?.
- In Desktop Mode, open
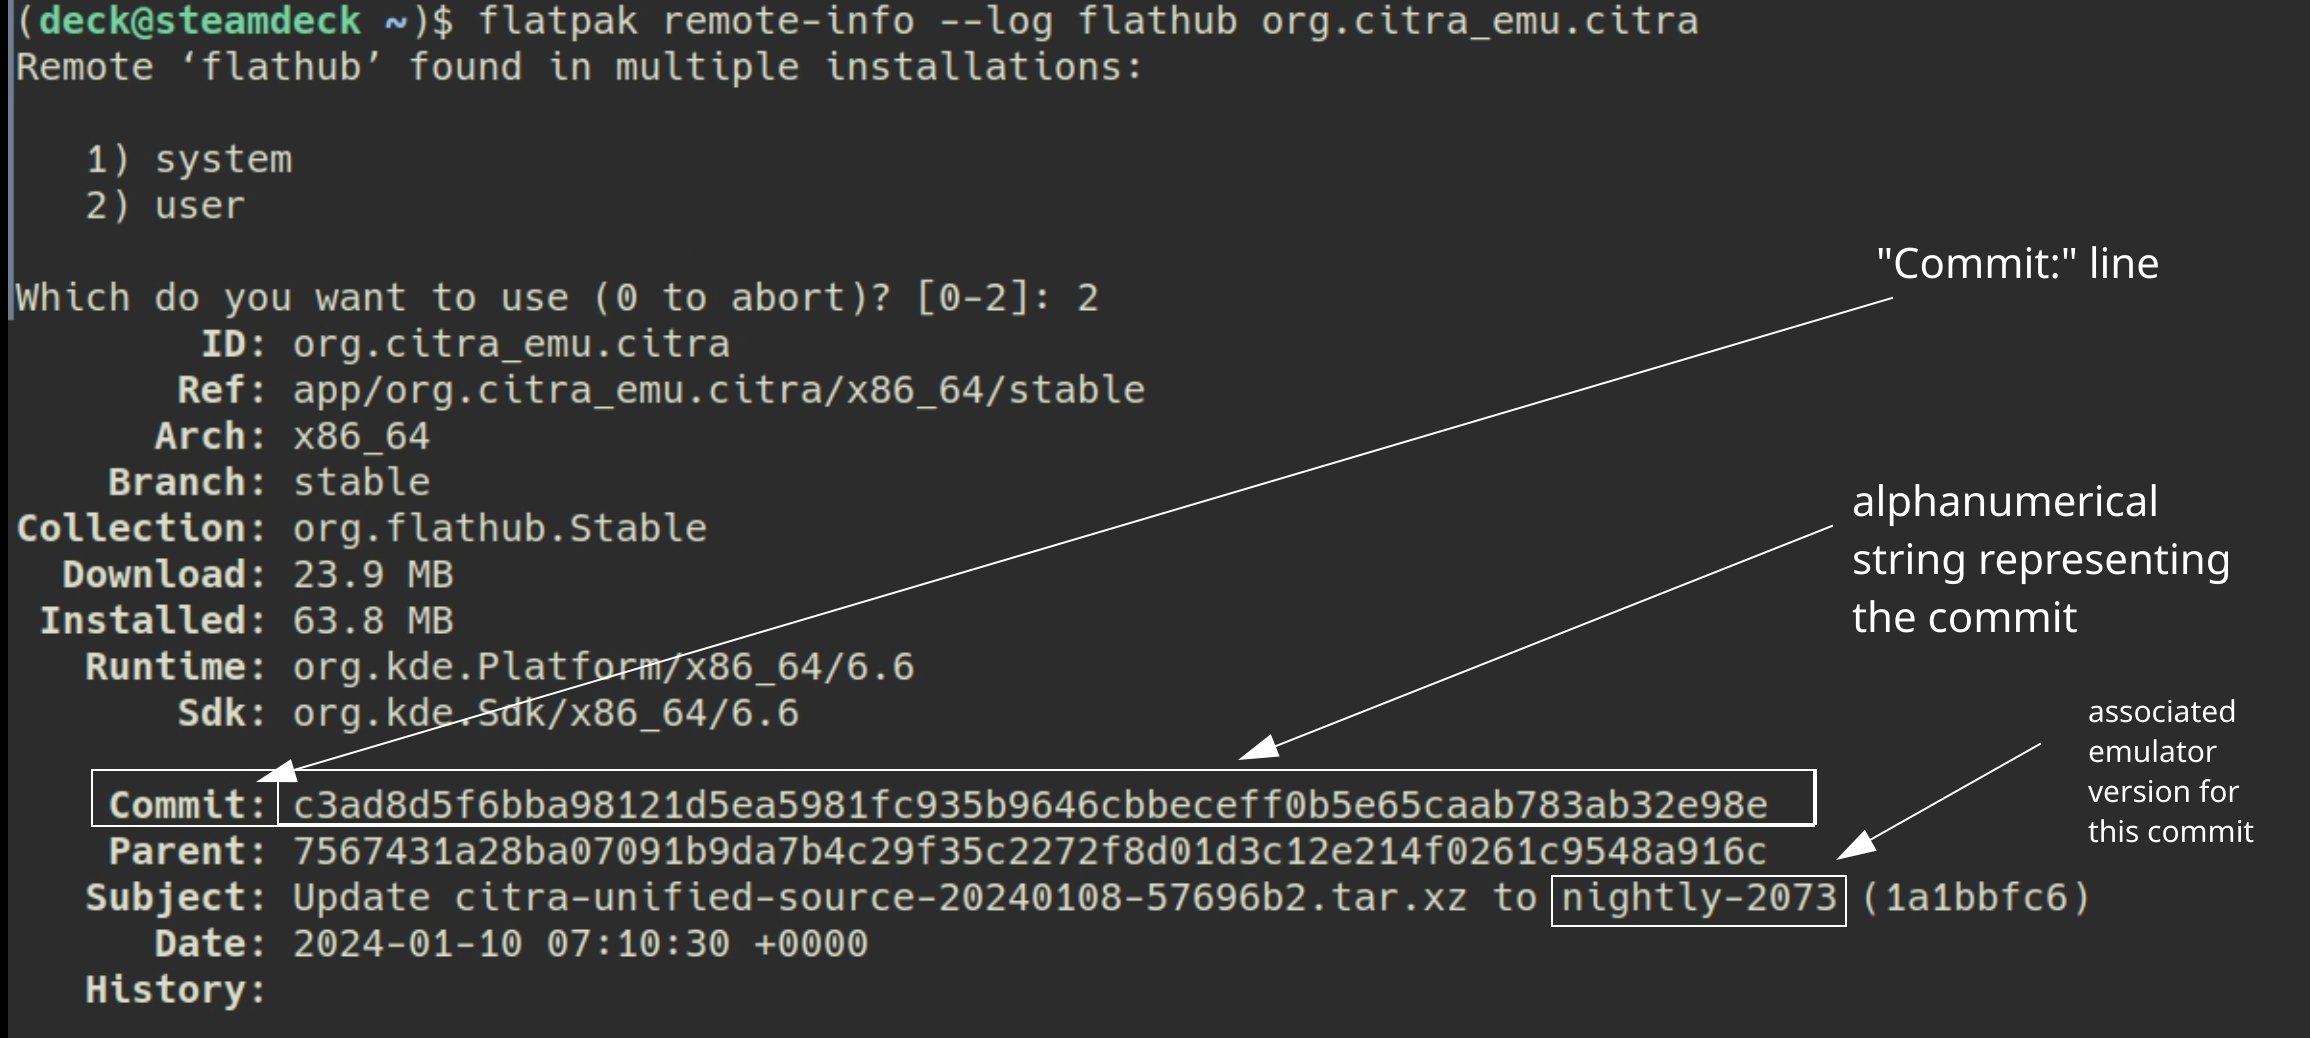
Konsole - To see a list of prior versions of the emulator, type:
flatpak remote-info --log flathub org.mamedev.MAME
- If Konsole prompts you to select
systemoruser, enter2to selectuser - Konsole will list a list of previous versions for the flatpak. The important line for each version is the
Commit:line. TheCommit:line will have a long accompanying alphanumeric string (the “commit” code). Copy the string for the version you want to downgrade to.- Using Citra as an example:
- Using Citra as an example:
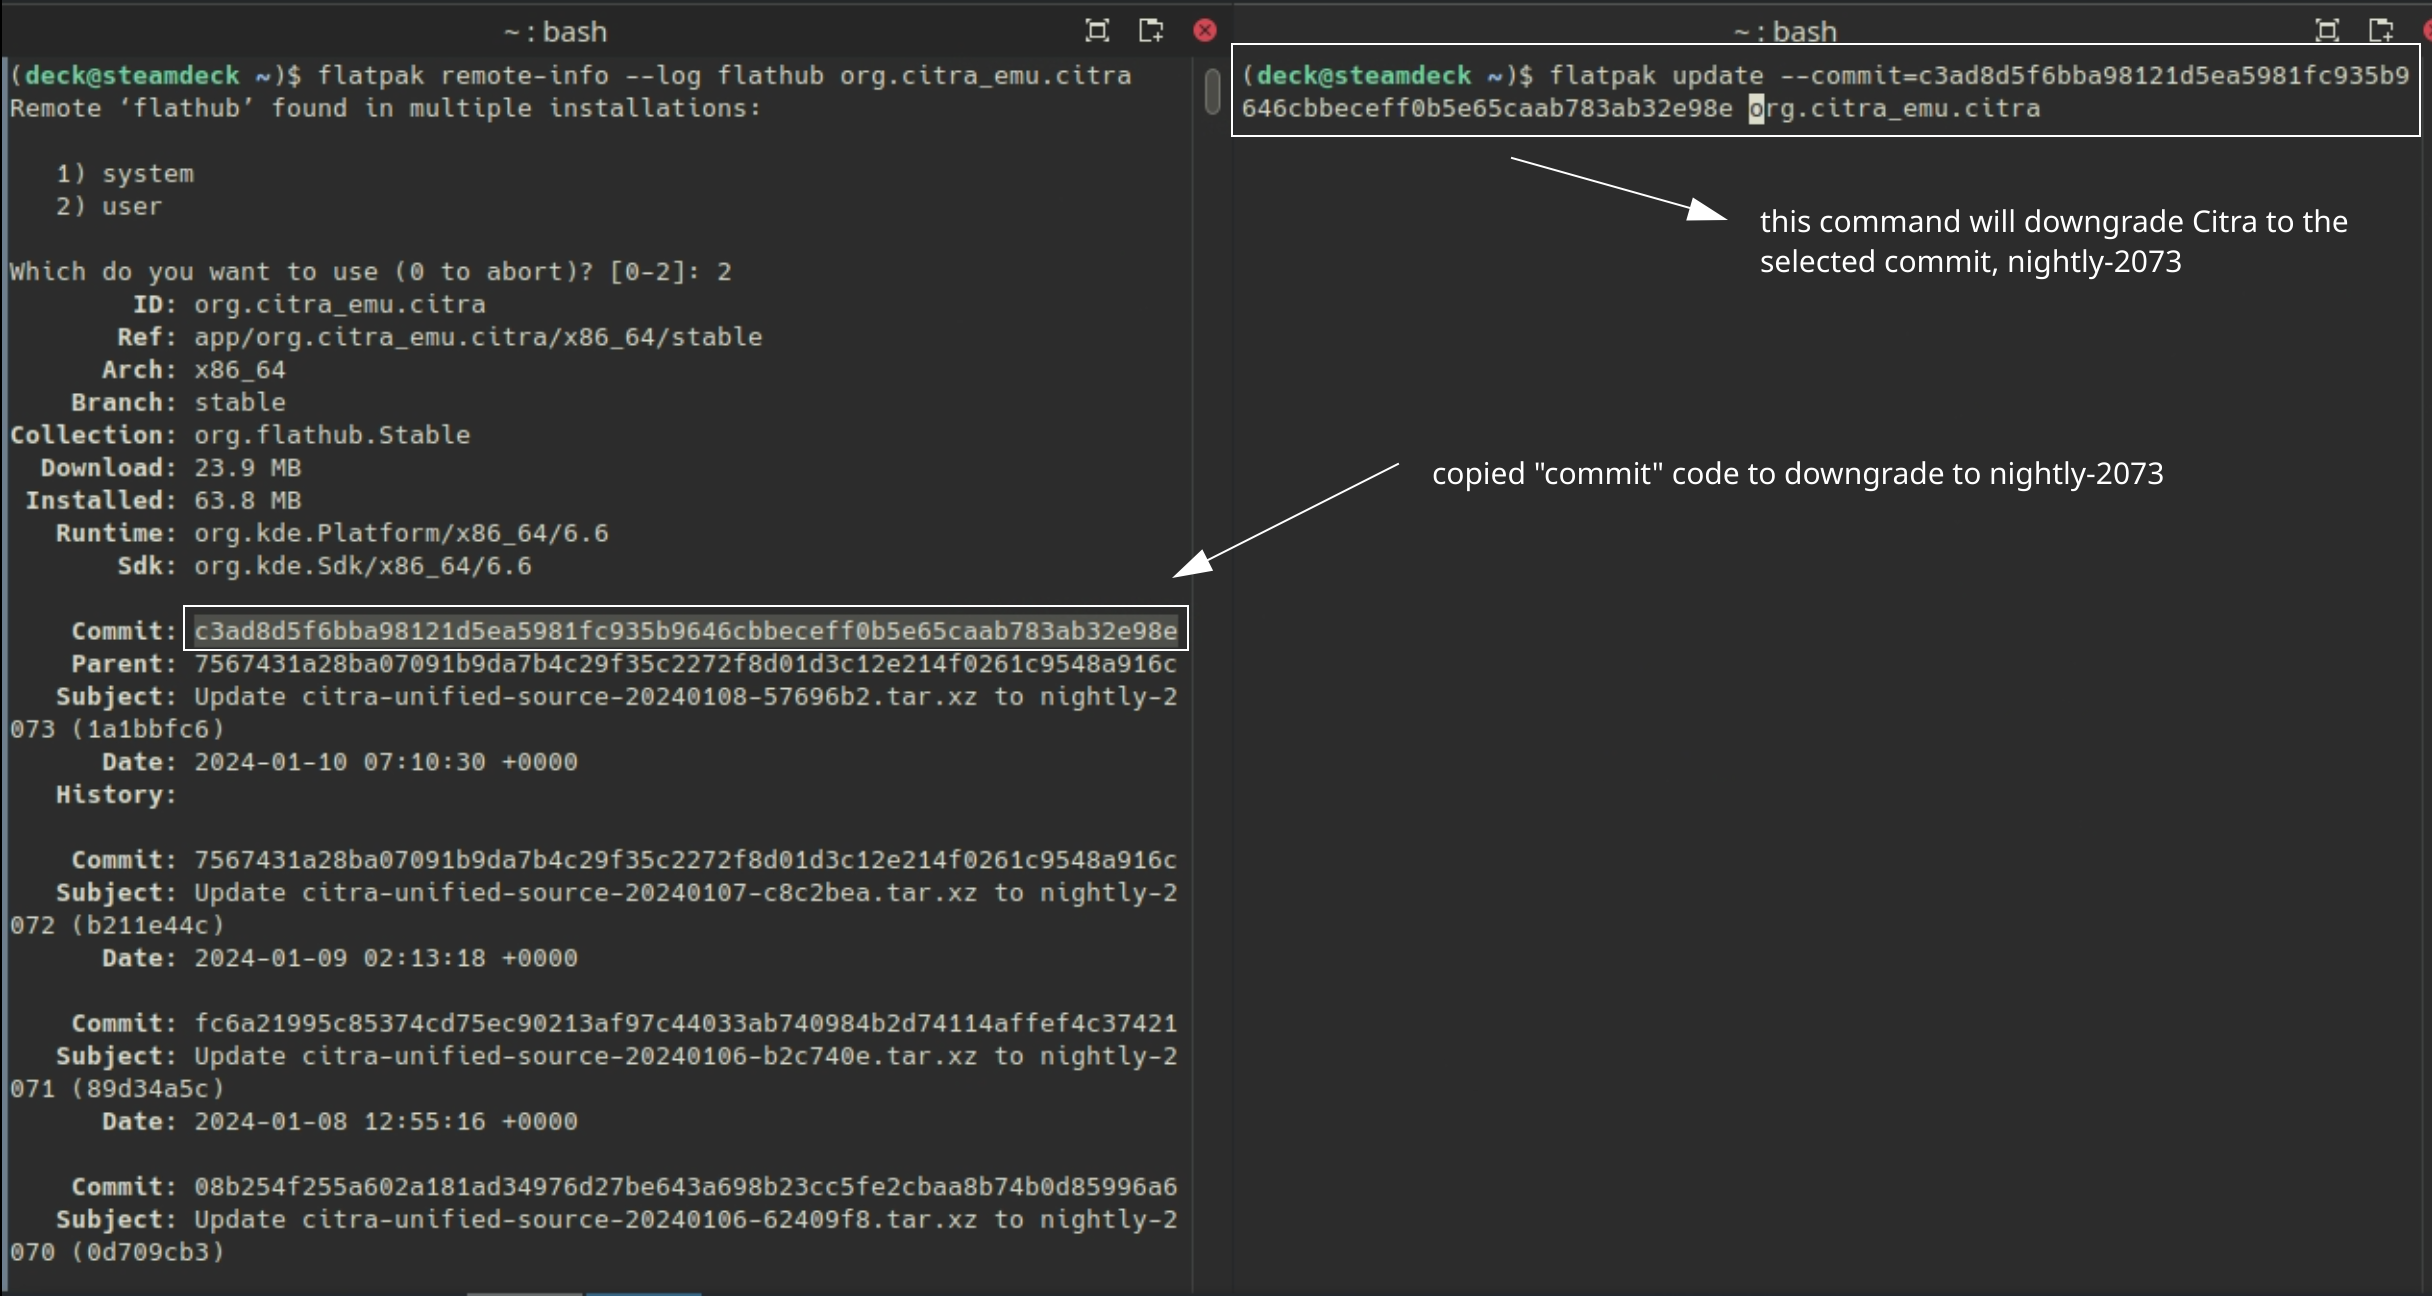
- To downgrade to the version you want:
flatpak update --commit=put_commit_code_here org.mamedev.MAME- Replace
put_commit_code_herewith the actual code you located in Step 2.- Using Citra as an example:
- Using Citra as an example:
If the above steps did not work and you are getting an error message along the lines of Flatpak not installed, your Flatpak is likely installed at the system level instead. Select one of the below solutions:
Solution 1: Open the EmuDeck application, click the Manage Emulators page, select the emulator in question, and click Reinstall / Update.
Solution 2: Add sudo in front of the commands written in Step 2 and Step 5. In Step 2, write sudo flatpak remote-info --log flathub org.mamedev.MAME and in Step 5, write sudo flatpak update --commit=put_commit_code_here org.mamedev.MAME.
How to Configure Language Settings
UI
- In Desktop Mode, open MAME
- At the bottom, click
General Settings - Click
Customize UI - Click
Language, select your preferred language in the drop-down menu
How to Use Cheats
- Download the latest cheat package from https://www.mamecheat.co.uk/. Click the
XML/JSON Cheat Collection for MAME 0.###at the top to download the latest cheat package###matches the MAME version of the cheat package which may vary depending on when you visit the site
- Extract
cheat###.zipto a folder of your choice###matches the MAME version of the cheat package which may vary depending on when you visit the site
- Move
cheat.7zfrom the extracted folder toEmulation/storage/mame/cheat - Open MAME without a game loaded, click
General Settings,Miscellaneous Options, toggleCheatson, back out of this menu, clickSave Settings - While in game, press
Select+R3to open the Quick Menu, clickCheat Options, enable cheat(s)
How to Configure Light Gun Games
- In Game Mode, single click the game you would like to change the Steam Input Profile for, and click the
Controller Iconon the right of the screen. Click the layout (whichever name it is currently set to) at the top - Click the
Templatestab - Select the
EmuDeck - Steam Deck Light Gun Controlsprofile - Light gun controls will now be configured for this game
| Controls | EmuDeck - Steam Deck Light Gun Controls | General Notes | Emulator Specific Notes |
|---|---|---|---|
| Left Trackpad | Mouse and Right Click on Click | Mouse sensitivity set to 100% | - |
| Right Trackpad | Mouse and Left Click on Click | Mouse sensitivity increased to 200% | - |
| R2 | Left Click | Typically used to shoot | When using MAME, move the cursor to the bottom left of the screen, and click L2 or R2 depending on the game to reload |
| L2 | Right Click | Typically used to reload | When using MAME, move the cursor to the bottom left of the screen, and click L2 or R2 depending on the game to reload |