PCSX2-QT is a Sony Playstation 2 emulator.
Website: https://pcsx2.net/
PCSX2-QT Releases: https://pcsx2.net/downloads/#nightly-anchor
GitHub: https://github.com/PCSX2
Compatibility List: https://forums.pcsx2.net/Forum-Public-compatibility-list
PCSX2 Wiki: https://wiki.pcsx2.net/Main_Page
PCSX2-QT Table of Contents
- Getting Started with PCSX2
- Common Issues
- PCSX2 Tips and Tricks
- How to Verify ROMs
- How to Optimize Performance (Power Tools)
- How to Optimize Storage (Compression Tool)
- How to Configure Multiplayer
- How to Manage Multiple Discs
- How to Switch to Folder Memory Cards
- How to Enable Big Picture Mode
- How to Use Cheats
- How to Use Widescreen or No Interlace Cheats
- How to Set Game Settings On a Per-Game Basis
- How to Install Custom Textures
- How to Mod Persona 3 FES
- How to Roll Back PCSX2 to an Older Version
- How to Configure Language Settings
- How to Configure Pressure Sensitive Buttons
- How to Configure Online Multiplayer
- How to Set Up mymc
- Custom Game Settings
Getting Started with PCSX2
PCSX2 is a fairly straight-forward emulator to set up. Place your ROMs in Emulation/roms/ps2. Place your BIOS directly in Emulation/bios. Read the Configuration section to learn more about PCSX2 and its folder locations.
To launch your ROMs in game mode, use Steam ROM Manager and use one of the following parsers to play your PS2 ROMs:
EmulationStation-DESony PlayStation 2 - PCSX2Emulators
PCSX2 Configuration
- Type of Emulator: AppImage
- Executable Location:
/home/deck/Applications/pcsx2-Qt.AppImage - Config Location:
/home/deck/.config/PCSX2 - Storage Location:
Emulation/storage/PCSX2 - ROM Location:
Emulation/roms/ps2/ - BIOS Location:
Emulation/bios/- IMPORTANT: Files go directly in this folder. Do not make or use a
PS2,PCSX2, or any sort of folder here. PCSX2 will not be able to find your bios files if they are in a folder. - Required BIOS - SEE: https://pcsx2.net/docs/setup/gather#how-to-dump-your-ps2-bios
- IMPORTANT: Files go directly in this folder. Do not make or use a
- Saves:
Emulation/saves/pcsx2/saves - Save States
Emulation/saves/pcsx2/states
Note: ~/.config is an invisible folder by default. In Dolphin (file manager), click the hamburger menu in the top right, click Show Hidden Files to see these folders.
Important Info: Prior to version 0.17.6 of EmuDeck, the Flatpak version of PCSX2 was used. This was installed from the discover store. EmuDeck has since moved away from this release for performance reasons, and usability reasons (menus not opening).
Works With
- Steam ROM Manager
- EmulationStation-DE
PCSX2 Folder Locations
These file locations apply regardless of where you chose to install EmuDeck (to your internal SSD, to your SD Card, or elsewhere). Some emulator configuration files will be located on the internal SSD as listed below.
$HOME refers to your home folder. If you are on a Steam Deck, this folder will be named /home/deck (you will likely not see deck in the file path when navigating using the file manager).
Paths beginning with Emulation/.. correspond to your EmuDeck install location. If you installed on an SD Card, your path may be /run/media/mmcblk0p1/Emulation/roms/... If you installed on your internal SSD, your path may be /home/deck/Emulation/roms/..
Note: Folders with a . (.var, .local, .config, etc.) at the beginning are hidden by default. In Dolphin (file manager), click the hamburger menu in the top right, click Show Hidden Files to see these folders.
$HOME/.config/PCSX2
PCSX2
├── cheats
├── gamesettings
├── inis
│   └── PCSX2.ini
├── inputprofiles
├── logs
├── memcards
├── patches
├── sstates
└── videos
Emulation/storage/pcsx2
How to Update PCSX2
How to Update PCSX2
- Through the
Update your Emulators & Toolssection on theManage Emulatorspage in theEmuDeckapplication - Manual file replacement of
pcsx2-Qt.AppImage- Refer to How to Swap Out AppImages and Binaries for instructions
- Through PCSX2's built-in updater
- Desktop Mode:
- Search for PCSX2 in the
Applications Launcher(Steam Deck icon in the bottom left of the taskbar) and open it, PCSX2 will prompt for an update if one is available
- Search for PCSX2 in the
- Game Mode:
- Add PCSX2 to Steam by using the
Emulatorsparser in Steam ROM Manager. After adding it to Steam, you may open it in Game Mode, PCSX2 will prompt for an update if one is available
- Add PCSX2 to Steam by using the
- Desktop Mode:
- Through
binupdate.shinEmulation/tools/binupdate, double click to launch
How to Launch PCSX2 in Desktop Mode
How to Launch PCSX2 in Desktop Mode
- Launch
PCSX2-QT AppImagefrom the Applications Launcher (Steam Deck icon in the bottom left of the taskbar) - Launch the script from
Emulation/tools/launchers,pcsx2-Qt.sh - Launch the AppImage in
/home/deck/Applications/pcsx2-Qt.AppImage - Launch the emulator from
Steamafter adding it via theEmulatorsparser inSteam ROM Manager
PCSX2 File Formats
- .iso
- .bin
- .chd
PCSX2 Hotkeys
| Hotkey | PCSX2-QT |
|---|---|
| Quick Menu | Select + R3 |
| Toggle Full Screen | Start + L3 |
| Save State | Select + R1 |
| Load State | Select + L1 |
| Next Save State Slot | Start + R1 |
| Previous Save State Slot | Start + L1 |
| Fast Forward | Select + R2 |
| Slow Motion | Select + L2 |
| Pause/Play | Select + A |
| Screenshot | Select + B |
| Reset Emulation | Select + L3 |
| Stop Emulation | Select + Start |
| Increase Upscale Multiplier | Start + DPad Up |
| Decrease Upscale Multiplier | Start + DPad Down |
| Toggle Software Rendering | Start + DPad Left |
| Cycle Aspect Ratio | Start + DPad Right |
Note:
Common Issues
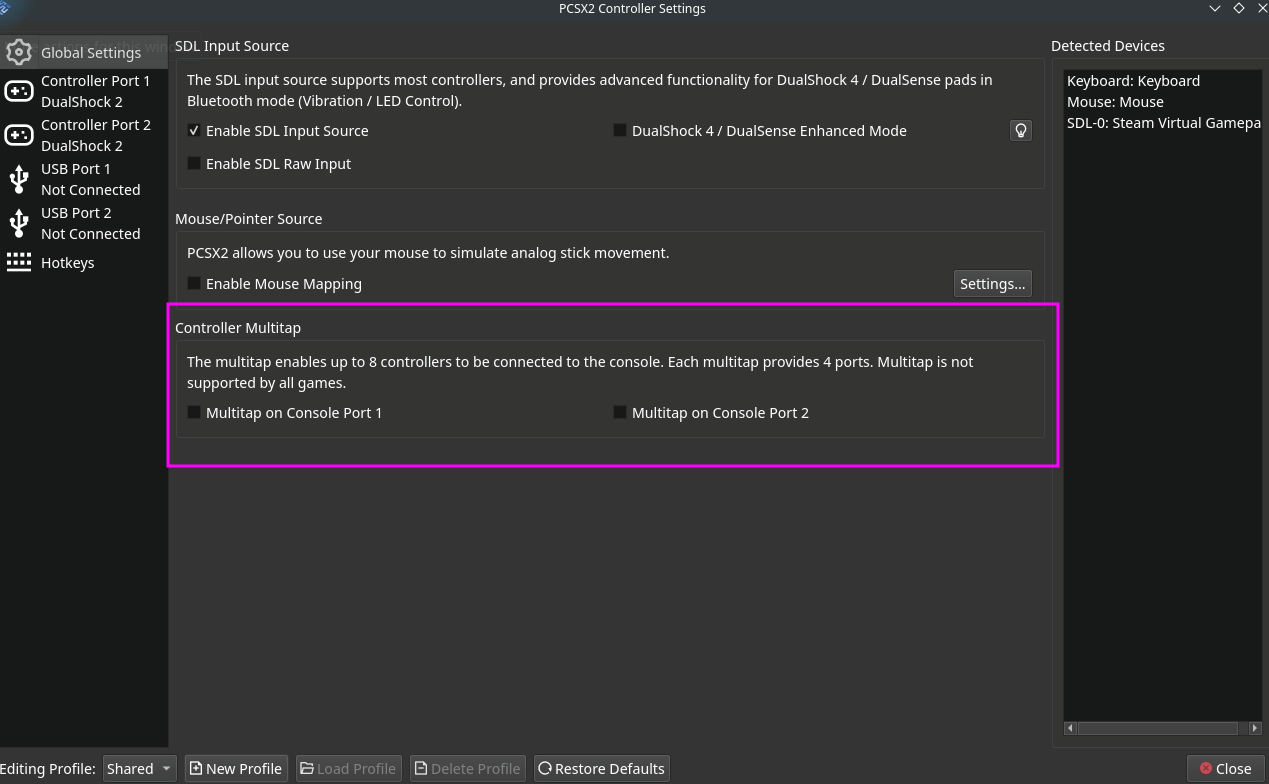
Controller isn't working?
Try turning off multitap. Certain games may not handle it.
- Open PCSX2-QT
- Open the
Controllerssettings menu - Disable Multitap
Black screen immediately or just after the game boots?
This indicates a bad dump. Please validate and redump your game files.
After starting a game it goes back to Steam or EmulationStation-DE?
This usually means you haven't placed your bios in the right place.
Where to place your BIOS: Configuration
Why do some of my multi-disc games not show up in Steam ROM Manager?
Primarily with the Playstation 2 parser, turning on Remove (...) and [...] brackets will trim the ROM name and cause Steam ROM Manager to deem multiple discs of the same game as the same file. When you generate an app list, only one of your discs will show up.
To fix this, do one of the following solutions:
* Remove the () in the file name
* Open the respective folder with the ROMs, and rename each disc to remove the ()
* Example:
* Original File Name: Xenosaga: Episode 2 (Disc 1) and Xenosaga: Episode 2 (Disc 2)
* Updated File Name: Xenosaga: Episode 2 Disc 1 and Xenosaga: Episode 2 Disc 2
* Turn off Remove (...) and [...] brackets in the respective parser
* Visual Reference (Using Playstation 2 as an example):  * Note: With this setting off, Steam ROM Manager will include any content in the parantheses of the file name when parsing ROMs. This means that if you include region names or any other information in parantheses, your ROM will include this information in a generated app list
PCSX2 Tips and Tricks
How to Verify ROMs
If you have a ROM that is not launching, you can verify your ROM directly in PCSX2. Verifying your ROM confirms whether you have a good dump or a bad dump. If you have a bad dump, your issue may be that your ROM either transferred incorrectly or that you have a bad dump.
If your ROM transferred incorrectly, see How to Transfer Files to a Steam Deck for a few methods.
If you have a bad dump, you will need to re-dump your PlayStation 2 ROM, following PCSX2's guide. For the dumping guide, see https://pcsx2.net/docs/usage/setup/#dumping-ps2-discs-via-imgburn.
If you have a good dump, your issue lies elsewhere. Make sure you have PlayStation 2 BIOS directly in the Emulation/bios folder and make sure PCSX2 is up to date. If neither of these resolve your issue, make sure to either check Google or retrieve a PCSX2 log so you can share it with the PCSX2 team.
How to Verify ROMs
Note: Make sure PCSX2 is up to date first. Verifying ROMs directly in PCSX2 is a fairly new feature.
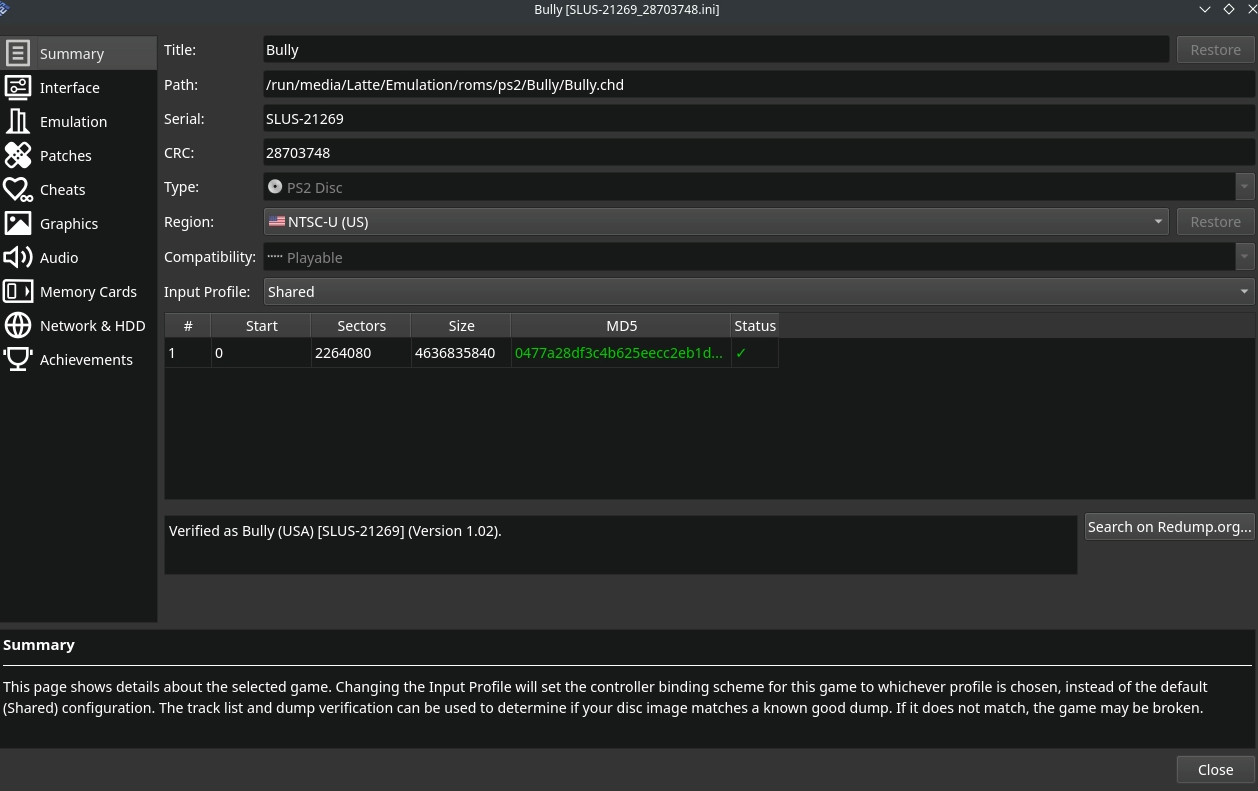
- Open PCSX2
- If you are in Big Picture mode:
- Press the square icon in the top right
- Click
Viewat the top - Click
Game List
- Right click a game
- Click
Properties - On the
Summarytab, clickVerifyon the right of the screen and wait a few moments - After a few moments, you will see either a green checkmark or an x in addition to a message indicating if your ROM was verified
How to Optimize Performance (Power Tools)
Visit Power Tools to learn how to optimize performance using Power Tools.
How to Optimize Storage (Compression Tool)
To optimize storage, you can use the EmuDeck Compressor within EmuDeck.
The EmuDeck Compressor will compress your Playstation 2 ROMs from ISO or BIN/CUE to CHD. If your ROM is a BIN/CUE, the Compression Tool will only compress it if you have both the BIN and the CUE files for a ROM. If the ROM is in a zip file or is missing a paired BIN or CUE file, the Compression Tool will not detect the ROM.
After running the EmuDeck Compression Tool, re-run Steam ROM Manager to update your ROM shortcuts to the newly compressed ROM.
Visual Reference: 
How to Configure Multiplayer
Multiplayer for PCSX2 is configured out of the box, no additional configuration is needed.
You may need to re-arrange the controller order in Game Mode for your controllers to function as expected. See How to Re-Arrange the Controller Order for more information.
How to Manage Multiple Discs
PCSX2 does not support M3U files.
You can manage multiple discs two ways:
Method 1: Hotkeys
- While in game, when you are ready to switch discs, press
Select+R3at the same time - Select
Change Discand select your next disc
Method 2: Separate Game Entries
- When you are ready to switch discs, save and exit out of your game
- Open the next disc entry, either as a separate shortcut through Steam ROM Manager or a separate entry through EmulationStation-DE
How to Switch to Folder Memory Cards
By default PCSX2 stores each memory card as a single file. This does not have any compatibility problems, but means that once you hit the 8MB limit you will have to start manually swapping cards. You can get around this by converting to folders for your memory cards:
- Open PCSX2
- Settings menu > Memory cards
- Eject the memory cards you wish to convert, by clicking the appropriate eject icons near the top of the window
- Right click each card to convert, and select
Convert - Ensure the conversion type dropdown is set to "Folder" and click OK
- This process will create a new folder that is a copy of the original memory card file. The file will be left intact as a backup.
- Right click the newly converted memory card folder, and select
Use for slot 1/Use for slot 2as appropriate - At the bottom of the window, ensure
Automatically manage saves based on running gameis checked
PCSX2 will now give each game its own separate memory card automatically.
How to Enable Big Picture Mode
Big Picture Mode: ES-DE
- Open the
/home/deck/ES-DE/custom_systemsfolder and right clickes_systems.xml, clickOpen with Kateor a text editor of your choice -
Scroll to the bottom of the
es_systems.xmlfile and paste the following above</systemList><system> <name>ps2</name> <fullname>Sony PlayStation 2</fullname> <path>%ROMPATH%/ps2</path> <extension>.arcadedef .bin .BIN .chd .CHD .ciso .CISO .cso .CSO .dump .DUMP .elf .ELF .gz .GZ .m3u .M3U .mdf .MDF .img .IMG .iso .ISO .isz .ISZ .ngr .NRG .zso .ZSO</extension> <command label="LRPS2">%EMULATOR_RETROARCH% -L %CORE_RETROARCH%/pcsx2_libretro.so %ROM%</command> <command label="PCSX2">%EMULATOR_RETROARCH% -L %CORE_RETROARCH%/pcsx2_libretro.so %ROM%</command> <command label="PCSX2 (Standalone)">%EMULATOR_PCSX2% -batch -fullscreen -bigpicture %ROM%</command> <command label="PCSX2 Legacy (Standalone)">%EMULATOR_PCSX2-LEGACY% --nogui %ROM%</command> <command label="Play! (Standalone)">%EMULATOR_PLAY!% --disc %ROM%</command> <platform>ps2</platform> <theme>ps2</theme> </system> -
Save and exit out of the text file, PCSX2 games will now launch in "Big Picture Mode" from ES-DE

Warning
Creating this custom system means that you will not receive any updates to the PlayStation 2 system in ES-DE if there are new configurations or emulators added or modified. You may monitor the file on ES-DE's repository for any changes and add them to the es_systems.xml file as necessary. See https://gitlab.com/es-de/emulationstation-de/-/blob/master/resources/systems/linux/es_systems.xml#L1566 for the upstream version of the es_systems.xml file.
Big Picture Mode: Pegasus
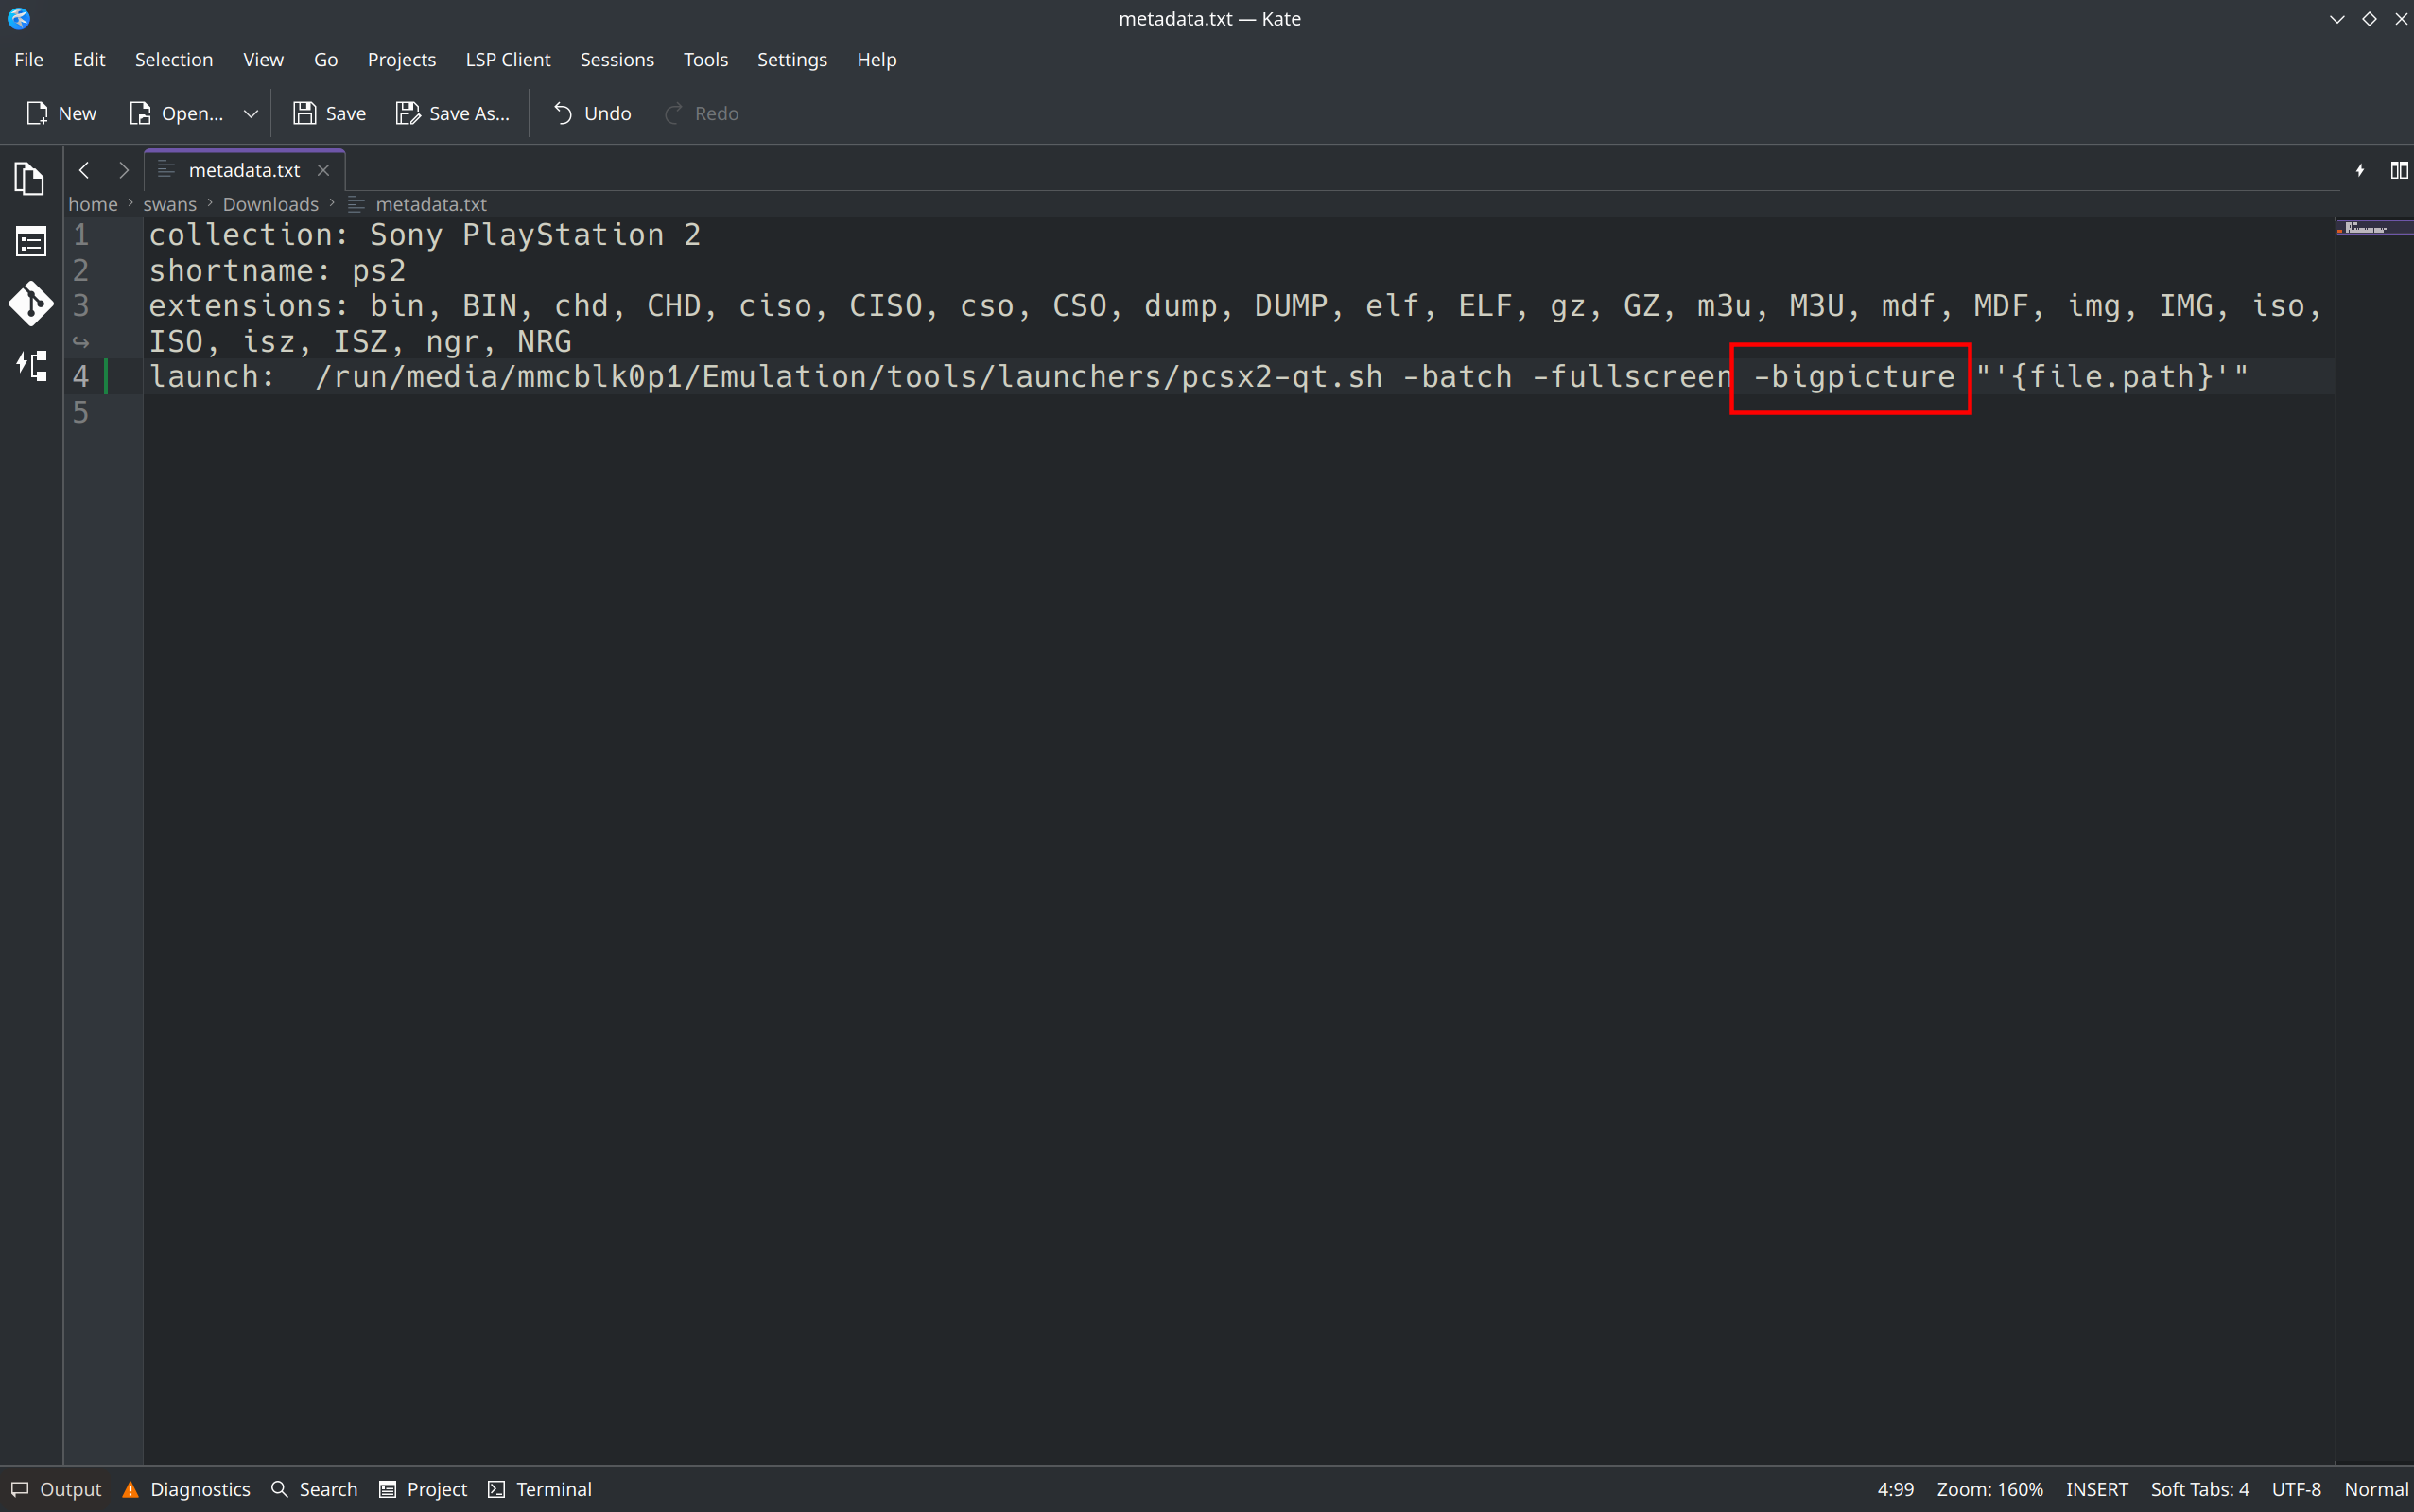
- Open the
Emulation/roms/ps2folder and right clickmetadata.txt, clickOpen with Kateor a text editor of your choice - On the
launch:line, add-bigpictureafter-batch -fullscreenand before"'{file.path}'" - Save and exit out of the text file, PCSX2 games will now launch in "Big Picture Mode" from Pegasus
Big Picture Mode: Steam ROM Manager
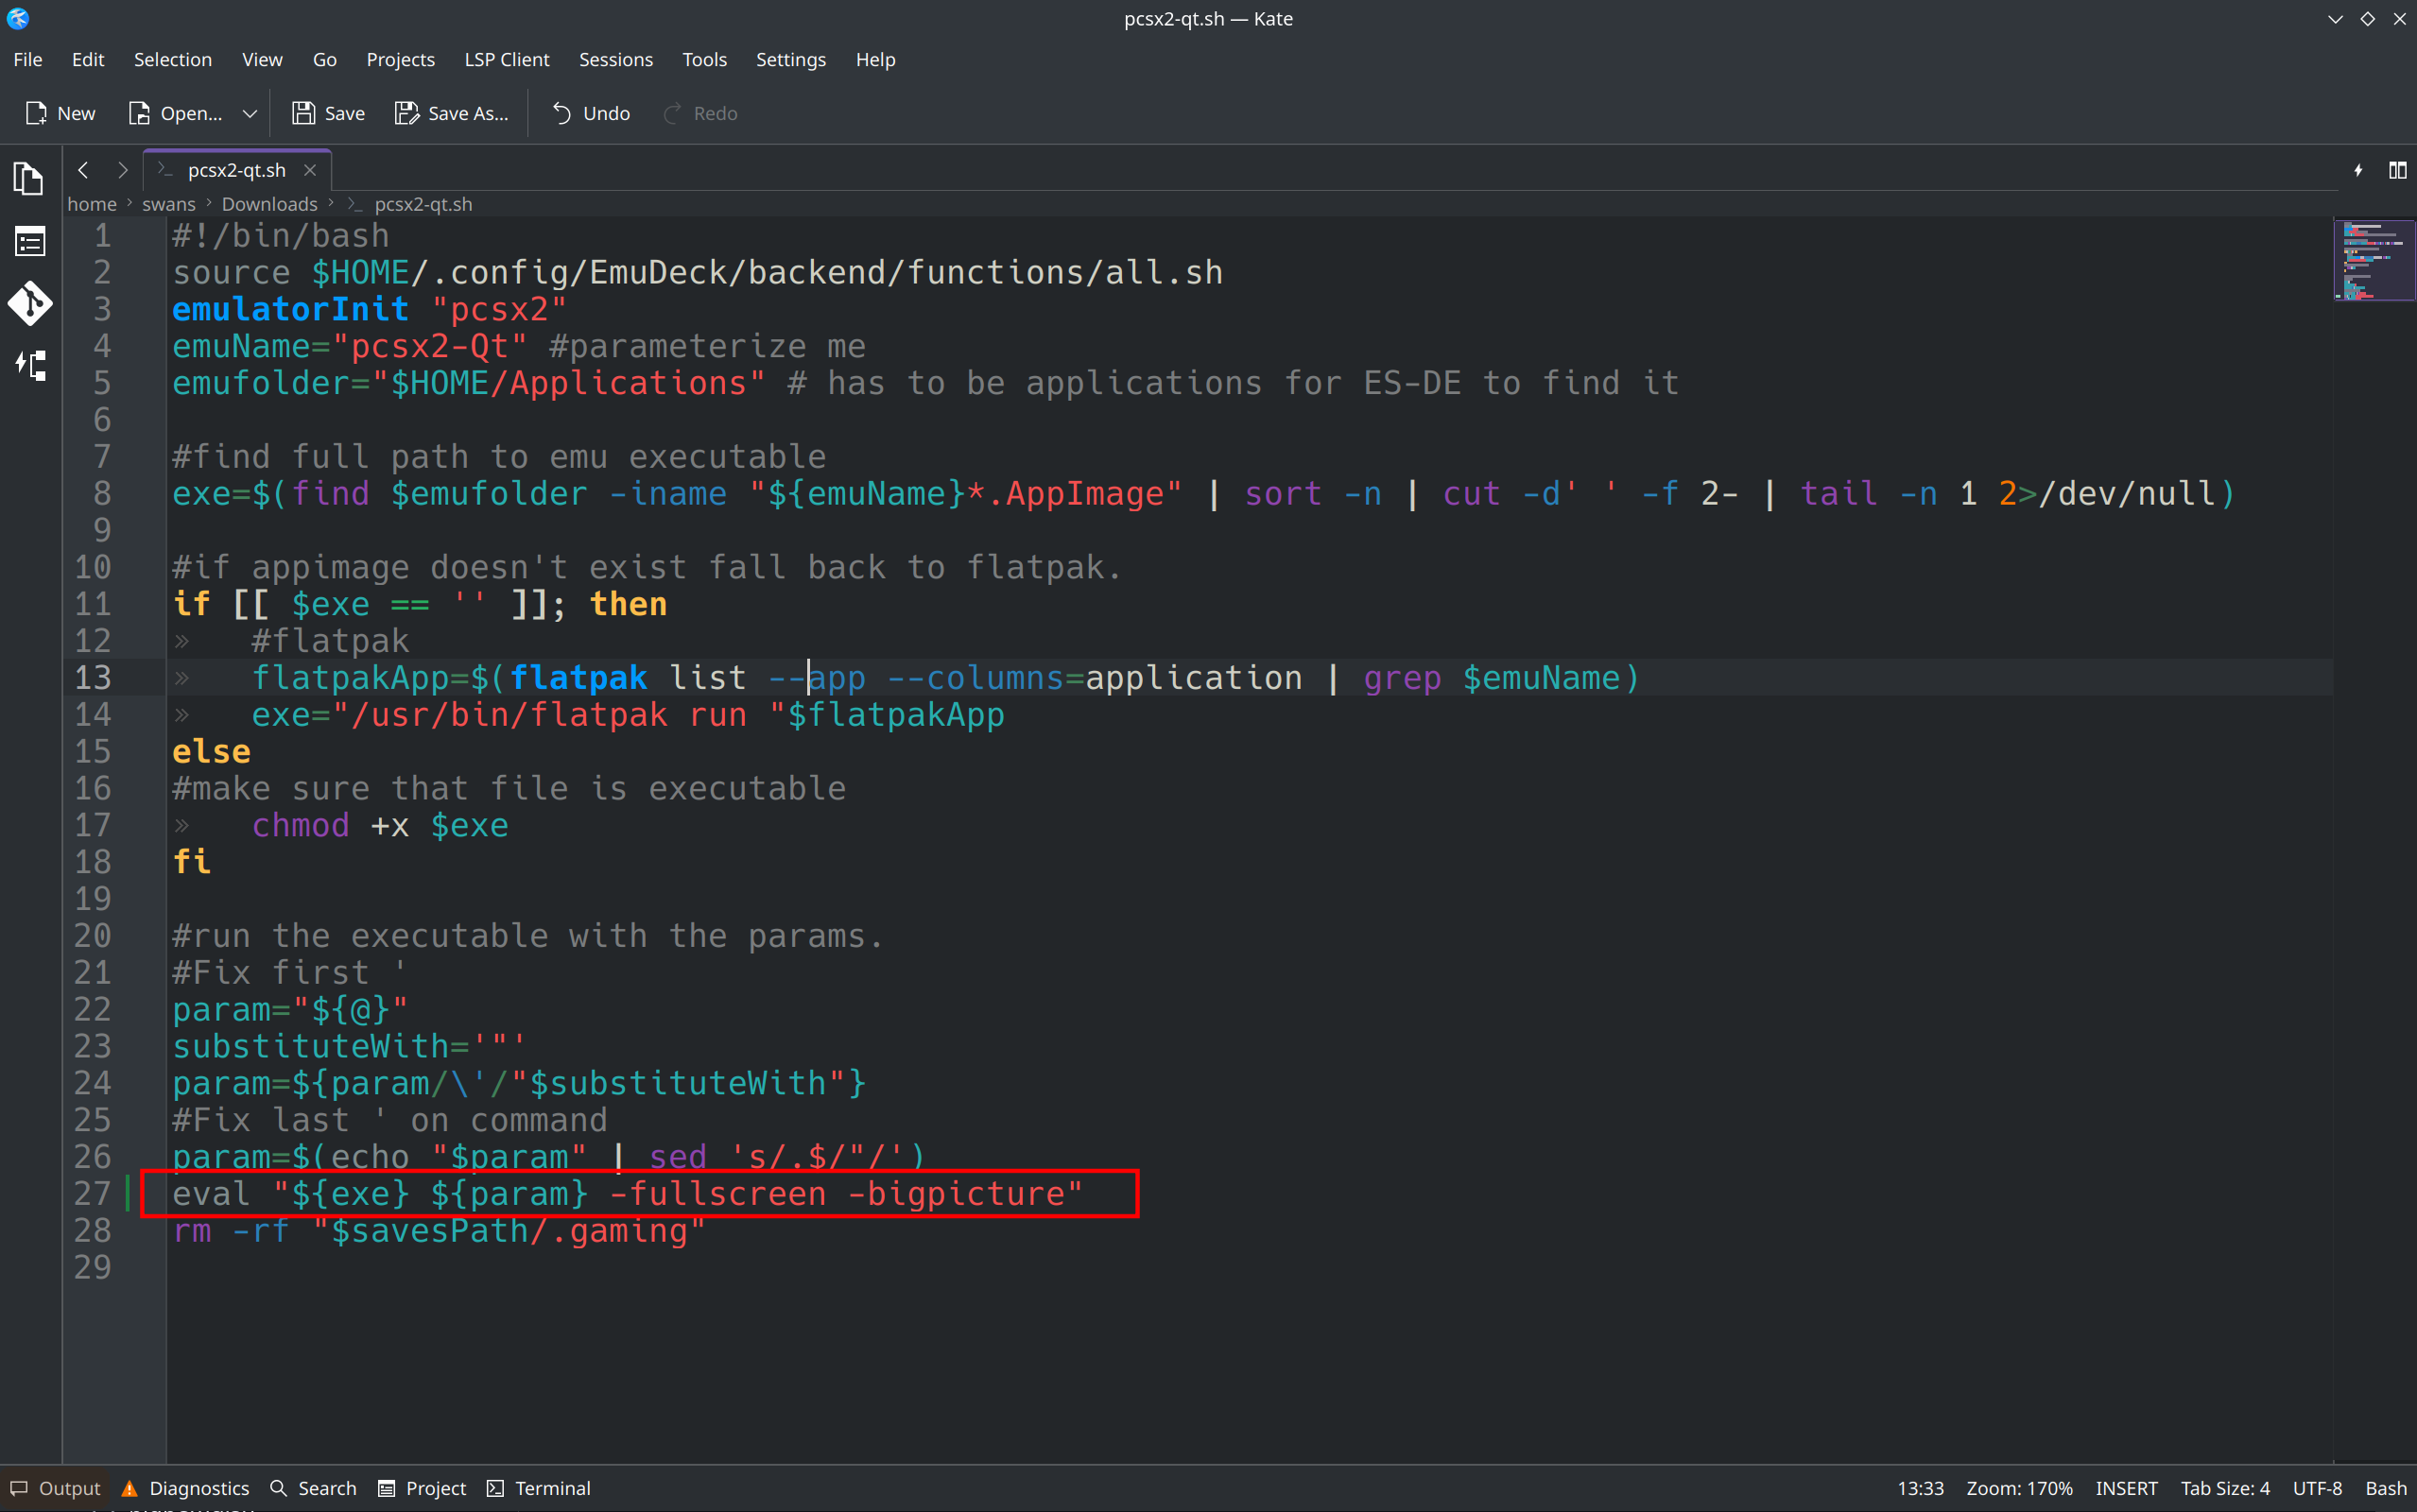
- Open the
Emulation/tools/launchersfolder and right clickpcsx2-qt.sh, clickOpen with Kateor a text editor of your choice - Locate the
eval "${exe} ${param} -fullscreen"line - Add
-bigpictureafter-fullscreenand before the end" - Save and exit out of the text file, PCSX2 games will now launch in "Big Picture Mode" from shortcuts in Steam created by Steam ROM Manager
How to Use Cheats
Important
Individual Widescreen and "No Interlace" cheats are no longer supported. These are now officially bundled with PCSX2 and can be enabled in the per-game settings menu. For a tutorial on how to use these in PCSX2, read How to use Widescreen or No Interlace Cheats.
For more detail, read https://forums.pcsx2.net/Thread-Sticky-Important-Patching-Notes-1-7-4546-Pnach-2-0
Note: This change means that the cheats_ni and cheats_ws are no longer used by PCSX2. Do not use these folders. PCSX2 will not recognize any files placed in these folders.
Cheat Resources
This list is not comprehensive
- https://forums.pcsx2.net/Thread-Post-your-PCSX2-cheats-patches-here
- https://gamehacking.org/system/ps2
- https://forums.pcsx2.net/Thread-Fixing-unplayable-games
You can find more information about PCSX2 cheats here: https://wiki.pcsx2.net/Game_cheats.
Tutorial
Information on Cheats
Cheat files have a .pnach file extension. Sometimes websites will provide the raw content of a cheats file. You can copy and paste these contents into a text file, and save the file as CRC-descriptivename.pnach.
The website will usually provide the crc as an 8 character long alphanumerical string. Replace the CRC with the alphanumerical string and replace the descriptive name with the function of the cheat.
For example, a Controllable Party Members cheat for Persona 3 FES could be named: 94A82AAA-Controllable Party Members.pnach
Preparing the Cheat File
This section goes over identifying and creating headers for your cheats. Creating headers is not necessary to do but allows for easier cheat management in PCSX2. Headers allow you to toggle cheats on a per-cheat basis and allow you to identify your various cheats directly in PCSX2's GUI.
If you would simply like to add the cheat to PCSX2 without adding headers, skip to How to Use the Cheat File.
- Download the cheat file
- Open it in a text editor of your choice
-
Check to see if the cheat file has headers at the top of each cheat bundled in the file.
- The header is typically the name of the cheat in
[]with an optional description or author- For example:
[Controllable Party Members]
author=TGE
description=This cheat allows you to control your party members in Persona 3 FES
- For example:
- The header is typically the name of the cheat in
-
If the cheat file does not have headers, you can manually add them
- The header is not required but allows you to toggle cheats on a per cheat basis in PCSX2
- Note: If a cheat file has multiple sections for the same cheat, you can choose to add one header at the top of the file. This header will treat the cheat file as one cheat in PCSX2
- You can now split cheats out into multiple files
- Use the format:
CRC-descriptivename.pnach
- Use the format:
- To add headers, use the following format, note that the author and description fields are optional:
[NAMEOFCHEAT]
author=NAMEOFAUTHOR
description=DESCRIPTIONOFCHEAT
For an example of a full cheat file with a header: https://gist.githubusercontent.com/rawdatafeel/4ac815f27ace770a84fe1ad7937355c7/raw/ddcacfaf9a0ebf930d27f95c86507cd89e2db704/94A82AAA-Controllable%2520Party%2520Members.pnach
How to Use the Cheat File
- Place your cheat file, with a
.pnachfile extension in/home/deck/.config/PCSX2/cheats~/.configis an invisible folder by default. In Dolphin (file manager), click the hamburger menu in the top right, clickShow Hidden Filesto see these folders
- Open PCSX2-QT
- Click the fullscreen button in the top right
- Right click a game, click
Properties
If you are using the Big Picture GUI:
- Click the frowny face
- Toggle the
Enable Cheatsbutton - Toggle the cheats you would like to use
- Repeat as needed
If you are using the Desktop GUI:
- Click
Cheatson the left - Check
Enable Cheatsat the top - Toggle the cheats you would like to use
- Repeat as needed
How to Use Widescreen or No Interlace Cheats
Important
Individual Widescreen and "No Interlace" cheats are no longer supported. These are now officially bundled with PCSX2 and can be enabled in the per-game settings menu. This section will go over how to apply the included cheats.
For more detail, read https://forums.pcsx2.net/Thread-Sticky-Important-Patching-Notes-1-7-4546-Pnach-2-0
Tutorial
- In Desktop Mode, open PCSX2
- Click the fullscreen button in the top right
- Click
Viewat the top, clickGame List - Right click a game, click
Properties - Click
Patcheson the left, and check theEnabledbox for the respective cheats you would like to enable
How to Set Game Settings On a Per-Game Basis
- In either Desktop or Game Mode, open PCSX2
- (Optional) Exit out of PCSX2's big picture mode by clicking the square box in the top right
- Right click a game
- In Game Mode, hold
Steamand clickL2to right click
- In Game Mode, hold
- Click
Properties - Select your settings, any settings changed in this menu will only be applied for this specific game


How to Install Custom Textures
Texture Pack Sources
This list is not exhaustive
- https://gbatemp.net/threads/list-of-hd-texture-packs-by-panda_venom.620163/
- https://gbatemp.net/forums/pcsx2-hd-texture-pack-group.549/
How to Use Custom Textures Packs
Typically a texture pack download will come in the following format: GAMEID/replacements. For example, a Suikoden V texture pack will look like the following: SLUS-21291/replacements. The replacements folder will typically contain a large amount of texture files.
Do note that the Game ID may vary depending on the region or version of your ROM. A US and a PAL ROM may have different Game IDs. If a texture pack is made for a US version, it may not work for the PAL version.
- In Desktop Mode, open the
Emulation/storage/pcsx2/texturesfolder - Place your texture pack directly in the
Emulation/storage/pcsx2/texturesfolder - Open PCSX2
- Right click the game
- Click
Game Properties - Click
Graphic Settings - Scroll down to
Texture Replacementsand toggleLoad Textures- Optionally, toggle
Asynchronous Texture Loading 
- Optionally, toggle
- The custom texture pack will now be enabled for this game
- If you do not see custom textures loading, you can bind a "Texture Replacements" hotkey and toggle the texture pack on and off to see if it is loading. If the texture pack is not loading, you either have a mismatching ROM or the texture pack is out of date.
How to Mod Persona 3 FES
Prerequisites
- Persona 3 FES ISO
Aemulus Mod Manager
- Download Aemulus Mod Manager: https://github.com/TekkaGB/AemulusModManager/releases
- For instructions on how to run Aemulus Mod Manager through Wine, see How to Set Up Aemulus Package Manager
- Aemelus Package Manager through Wine is a little finicky so you may prefer to set it up on a Windows PC instead and transfer over a completed mod loadout
- For instructions on how to run Aemulus Mod Manager through Wine, see How to Set Up Aemulus Package Manager
- Build a mod loadout: https://persona-3-fes-modding-guide.readthedocs.io/en/latest/installingmods.html
- This guide will not go into detail on how to do this
- Your mod loadout will look similar to the below image:
- Proceed to the next section

On the Steam Deck
- In
Emulation/roms/ps2, create aP3FESfolder- This is a recommendation, you may either use a different folder name or place the files directly into
Emulation/roms/ps2
- This is a recommendation, you may either use a different folder name or place the files directly into
- Place your Persona 3 FES ISO in the
P3FESfolder - Right click your Persona 3 FES ISO and click
Open with Ark - Extract these files to
Emulation/roms/ps2/P3FES - Delete all of the extracted files except
SLUS_216.21 - Rename
SLUS_216.21toShin Megami Tensei - Persona 3 FES - Modded.ELF- The important part here is the file extension. You may rename the file to whatever you would like, but for the sake of differentiating the ELF and the base game in Steam ROM Manager, this section adds a
- Moddedto the end of the file name
- The important part here is the file extension. You may rename the file to whatever you would like, but for the sake of differentiating the ELF and the base game in Steam ROM Manager, this section adds a

Setting up the Mod Folders on the Steam Deck
- Move your mod folders to the extracted Persona 3 FES Extracted ISO Folder,
Emulation/roms/ps2/P3FES

Setting up PCSX2
- In Desktop Mode, Open PCSX2
- Right click
SLUS_216.21in the game list, clickProperties - Enable
CheatsandHost Filesystem - On the
Disc Pathfield, select your Persona 3 FES ISO

Setting up Cheats
- Download the attached cheat file
- Download: 94A82AAA.HostFS.pnach
- Place the cheat file in
/home/deck/.config/PCSX2/cheats/~/.configis an invisible folder by default. In Dolphin (file manager), click the hamburger menu in the top right, clickShow Hidden Filesto see these folders
- Right click
Shin Megami Tensei - Persona 3 FES - Moddedin the game list, clickProperties - Click the
Cheatstab and enableCheats - Enable the following cheat:
hostFS Patch- If you are in the Big Picture GUI, the cheats icon is a frowny face
Setting up Steam ROM Manager
If you would like to launch Persona 3 FES directly in Game Mode, follow the below steps. You may also choose to open PCSX2 in Game Mode and open the Shin Megami Tensei - Persona 3 FES - Modded.ELF from the PCSX2 GUI instead.
- In Desktop Mode, open Steam ROM Manager
- Select the PCSX2 parser on the left and add
|.ELFto the end of theUser's globbox. ClickSavein the bottom left- You may need to change themes to
DeckorClassicfirst in theSettingstab
- You may need to change themes to
- Turn on the PCSX2 parser and parse your games
- You will see a large amount of seemingly junk entries from your mod folder, this is expected behavior. You can identify what each entry is by hovering over the text in the top left
- Click the
Excludebutton at the bottom - Select all of the entries generated from your mod folder as well as the Persona 3 FES entry and click
Savein the top right- Do not exclude
Shin Megami Tensei - Persona 3 FES - Modded.ELF
- Do not exclude
- If
Shin Megami Tensei - Persona 3 FES - Modded.ELFdoes not match properly, read Steps 8-10. If it matches properly, skip to Step 11 - On the
Shin Megami Tensei - Persona 3 FES - Modded.ELFentry, click the magnifying glass in the bottom left - Search for
Persona 3 FESin the search box, select it, and clickSave and close - Click
Save to Steam - You can now launch a modded version of Persona 3 FES directly in
Game Mode
Popular Mods
- Direct Commands
- Successor to the
Party Controlscheat
- Successor to the
How to Roll Back PCSX2 to an Older Version
Preface
Your ROMs launch using a script created by EmuDeck, pcsx2-Qt.sh in Emulation/tools/launchers.
The script launches the corresponding emulator in /home/deck/Applications and specifically looks for two traits:
- The most recently downloaded version of the emulator in
/home/deck/Applications, based on the file/release date. - The emulator name at the beginning of the file. Anything after the emulator name is ignored.
- For example, if the latest version of the emulator is
1351and you would like to downgrade to1349. When you download version1349, you could rename it toEMULATORNAME-1349.AppImage, and EmuDeck's script will ignore the-1349in the file name, allowing you to record which versions of the emulator you are using through the file name.
- For example, if the latest version of the emulator is
How to Roll Back PCSX2
- Download the version of the emulator you would like to use from PCSX2's website: https://pcsx2.net/downloads/#nightly-anchor or GitHub: https://github.com/PCSX2/pcsx2/releases
- Move the downloaded emulator from Step 1 to
/home/deck/Applications - (Optional) Rename or delete the original emulator file
- Right click the newly downloaded emulator, click
Properties, clickPermissions, checkIs executable - Your games will now launch using the version of the emulator you downloaded
How to Configure Language Settings
UI
- In Desktop Mode, open PCSX2
- At the top, click
Settings, clickInterface - Click the
Interfacetab - To the right of
Language, select your preferred language in the drop-down menu
In-Game
- In Desktop Mode, open PCSX2
- At the top, click
Settings, clickBIOS - Uncheck
Fast BootunderOptions and Patches - Close out of the
BIOSsettings - At the top, click
System - Click
Start BIOS - Select
System Configuration - Scroll down to
Language - Select your preferred language
How to Configure Pressure Sensitive Buttons
The S button on the keyboard is bound out of the box as a pressure modifier. To apply it to your PCSX2 games, you will need to use Steam Input.
Steam Input
- In Game Mode, select your ROM shortcut, the PCSX2 shortcut, or EmulationStation-DE
- Click the Controller icon
- Map your preferred button(s) to the
Skeyboard key- One method is to use any of the back bumpers.
- While in game, press the button you mapped to the
Skeyboard key
PCSX2
The default pressure modifier is set at 30%. If you would like to adjust this setting, you may do so directly in PCSX2's settings.
- In Desktop Mode, open PCSX2
- If you are in Big Picture mode, press the square icon in the top right to exit out of Big Picture mode
- At the top, click
Settings,Controllers - On the left-hand side of the screen, click
Controller Port 1 - At tthe top, to the right of
Dualshock 2, clickSettings - Scroll down to
Modifier Pressureand adjust the pressure setting to your liking- If you are in Desktop Mode, press
Xon the Steam Deck to open the keyboard
- If you are in Desktop Mode, press
- When you are finished, click
Closeand your setModifier Pressurewill be automatically applied the next time you open your game
Example
As an example, in Silent Hill 2, when clicking the right trigger (R2) and either L5 or R5 (the buttons bound to the keyboard key, S, in this example) together while using the A button, the attacks will be light. Release L5 or R5, but hold R2 and click A to attack as normal.
How to Configure Online Multiplayer
PCSX2 Servers:
- https://docs.google.com/spreadsheets/d/1k4kJcJLkANysILr5jpmB08Px-08CIFGYvNsiwoHuCWw/edit#gid=0
- https://ps2online.com/
- In Desktop Mode, open Konsole or a terminal of your choice, enter the following commands one at a time:
sudo groupadd netdevsudo usermod -a -G netdev deck
- In Desktop Mode, open Konsole or a terminal of your choice
- Enter the following commands, one bullet point at a time and press enter after each line:
distrobox create -i archlinux:latest -n pcsx2distrobox enter pcsx2sudo pacman -S --needed git base-devel && cd /tmp && git clone https://aur.archlinux.org/yay-bin.git && cd yay-bin && makepkg -si && cd .. && rm -rf yay-bin- If you receive any prompts, press enter without typing anything in
yay -S pcsx2-git- If you receive any prompts, press enter without typing anything in
- Exit out of the terminal once it is finished and proceed to the next step
- Download the attached
.shfile and place it in a folder of your choice- pcsx2-netplay.sh
- For the contents of the script, see https://raw.githubusercontent.com/EmuDeck/emudeck.github.io/main/docs/configuration-files/pcsx2-netplay.sh
- Right click
pcsx2-netplay.sh, clickProperties, clickPermissions, checkIs Executable - Double click
pcsx2-netplay.shto open it- Use this file whenever you want to play online mulitplayer. Your shortcuts through Steam ROM Manager, ES-DE, or Pegasus will be using a separate version of PCSX2 not configured for online multiplayer
- You may add this version of
pcsx2-netplay.shto Steam by right clicking it and clickingAdd to Steam, you may want to give it a distinctive name in Steam so you do not mix it up with your other shortcuts
- Click
Settings,Network & HDD, check theEnabledbox underEthernet- Ethernet Device Type
- Select
PCAP Bridged,PCAP Switched, orSocket, depending on what game you are playing
- Select
- Ethernet Device
Anyif usingPCAP BridgedorPCAP SwitchedAutoif usingSocket
- Intercept DHCP
- Leave unchecked
- If you would like to manually tweak settings, check
Intercept DHCPand adjust settings as needed
- If you would like to manually tweak settings, check
- Leave unchecked
- DNS1 Address and DNS2 Address
- Match the addresses to the spreadsheet, https://docs.google.com/spreadsheets/d/1k4kJcJLkANysILr5jpmB08Px-08CIFGYvNsiwoHuCWw/edit#gid=1383772811
- For example, if using the
Cristianserver, type45.7.228.197intoDNS1 Addressand0.0.0.0intoDNS2 Address
- Hard Disk Drive
- Check the
Enabledbox - Click
Create Imagein the bottom right corner
- Check the
- HDD File
/home/deck/.config/PCSX2/inis/DEV9hdd.raw
- Ethernet Device Type
- While in game, open the
Networkingsettings and use the below spreadsheet or website for the DNS settings - Online multiplayer will now be configured for your game(s)
Warning
If you get a DNAS error when connecting, you will need to apply a DNAS bypass patch to your game. You can find a DNAS Bypass PNACH in the "Emulator (PCSX2)" column on the ps2online.com spreadsheet: https://docs.google.com/spreadsheets/d/1k4kJcJLkANysILr5jpmB08Px-08CIFGYvNsiwoHuCWw/edit#gid=1383772811
How to Update PSCSX2-Netplay
- In Desktop Mode, open Konsole or a terminal of your choice
- Enter the following commands, one bullet point at a time and press enter after each line:
distrobox enter pcsx2yay -Syu- If you receive any prompts, press enter without typing anything in
- Exit out of the terminal once it is finished and proceed to the next step
- PCSX2 will now be updated and you can continue using the
pcsx2-netplay.shscript to use the latest version of PCSX2
Custom Game Settings
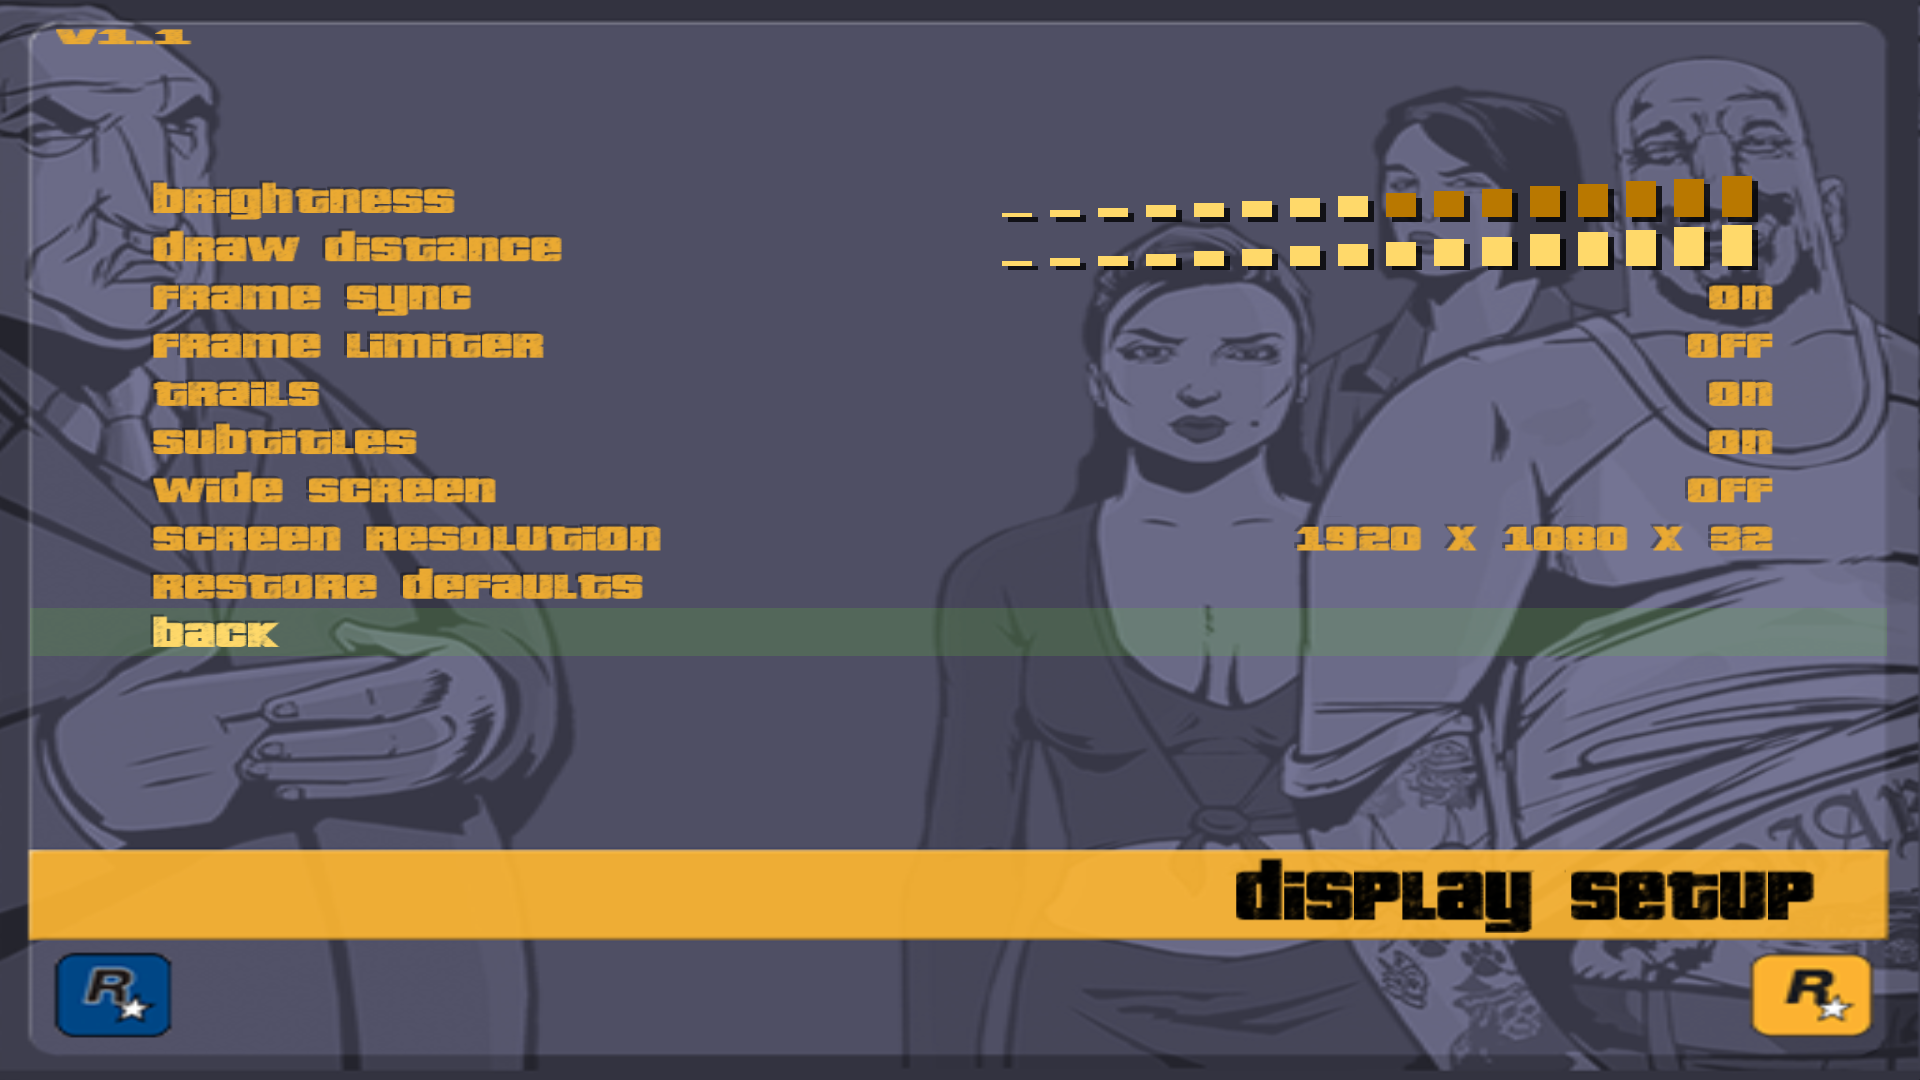
Grand Theft Auto III "Ghosting"
While in game, open the settings menu and disable trails.
Grand Theft Auto: San Andreas "Ghosting"
The below quote is copied from the PCSX2 Discord.
Quote
Grand Theft Auto: San Andreas - No, the "Ghosting" isn't a bug The screen is supposed to have a colored double image, it was an intentional design choice and still exists on native resolution. Upscaling makes it easier to notice but it is still correct.
But I don't like it. Make it go away. Lucky for you, the community has made a patch and ported it to all (known) versions of the game. The patch is included in the latest PCSX2 nightly version.
How to Apply the Patch
- In Desktop Mode, open PCSX2
- Right click Grand Theft Auto: San Andreas, click
Properties - Click the
Patchestab - Enable the patch for removing the radiosity effect