Citra is a Nintendo 3DS Emulator.
Website: https://citra-emu.org/
GiHhub: https://github.com/citra-emu/citra
Compatibility List: https://citra-emu.org/game/
Citra Table of Contents
- Getting Started with Citra
- Common Issues
- Citra Tips and Tricks
- How to Configure Gyro
- How to Configure Gyro With External Controllers
- How to Optimize Performance (Power Tools)
- How to Install Custom Textures
- How to Use Cheats
- How to Roll Back Citra to an Older Version
- How to Set Up PKHeX
- How to Install the Universal Pokemon Randomizer
- How to Configure Language Settings
- Custom Screen Layouts
Getting Started with Citra
Citra is a fairly straight-forward emulator to set up. Place your ROMs in Emulation/roms/n3ds or Emulation/roms/3ds. No additional setup is required if you are using decrypted ROMs. Read the Configuration section to learn more about Citra and its folder locations. The Configuration section covers where to place your aes_keys.txt if you are using encrypted ROMs.
To launch your ROMs in game mode, use Steam ROM Manager and use one of the following parsers to play your Citra ROMs:
EmulationStation-DENintendo 3DS - CitraEmulators
Citra Configuration
- Type of Emulator: Flatpak
- Config Location:
/home/deck/.config/citra-emu/home/deck/.local/share/citra-emu
- ROM Location:
Emulation/roms/3dsorEmulation/roms/n3ds aes_keys.txtlocation:/home/deck/.local/share/citra-emu/sysdata- Only necessary if the 3DS ROM is encrypted
- If the
sysdatafolder does not exist, create the folder
- Saves Location:
- Symlink:
Emulation/saves/citra/saves - Target:
/Emulation/storage/citra/sdmc
- Symlink:
- Save States Location:
- Symlink:
Emulation/saves/citra/states/ - Target:
/home/deck/.local/share/citra-emu/states
- Symlink:
Note: ~/.config and ~/.local are hidden folders by default. In Dolphin (file manager), click the hamburger menu in the top right, click Show Hidden Files to see these folders.
Works With
- Steam ROM Manager
- ES-DE
Citra Folder Locations
These file locations apply regardless of where you chose to install EmuDeck (to your internal SSD, to your SD Card, or elsewhere). Some emulator configuration files will be located on the internal SSD as listed below.
$HOME refers to your home folder. If you are on a Steam Deck, this folder will be named /home/deck (you will likely not see deck in the file path when navigating using the file manager).
Paths beginning with Emulation/.. correspond to your EmuDeck install location. If you installed on an SD Card, your path may be /run/media/mmcblk0p1/Emulation/roms/... If you installed on your internal SSD, your path may be /home/deck/Emulation/roms/..
Note: Folders with a . (.var, .local, .config, etc.) at the beginning are hidden by default. In Dolphin (file manager), click the hamburger menu in the top right, click Show Hidden Files to see these folders.
/home/deck/.config/citra-emu
/home/deck/.local/share/citra-emu
citra-emu/
├── cheats
├── load
│   └── textures
├── log
│   ├── citra_log.txt
│   └── citra_log.txt.old.txt
├── shaders
│   └── vulkan
├── states
├── sysdata
│   └── mcu.dat
└── textures
Emulation/storage/citra
citra/
├── cheats -> /home/deck/.local/share/citra-emu/cheats
├── nand
│   └── data
│       └── 00000000000000000000000000000000
│           ├── extdata
│           │   └── 00048000
│           └── sysdata
│               ├── 00010017
│               ├── 00010026
│               └── 00010035
├── screenshots
├── sdmc
│   └── Nintendo 3DS
│       └── 00000000000000000000000000000000
│           └── 00000000000000000000000000000000
│               └── title
└── textures -> /home/deck/.local/share/citra-emu/load/textures
How to Update Citra
How to Update Citra
- Through the
Update your Emulators & Toolssection on theManage Emulatorspage in theEmuDeckapplication - Manual file replacement of
citra-qt.AppImage- Refer to How to Swap Out AppImages and Binaries for instructions
- Through
binupdate.shinEmulation/tools/binupdate, double click to launch
How to Launch Citra in Desktop Mode
How to Launch Citra in Desktop Mode
- Launch
Citrafrom the Applications Launcher (Steam Deck icon in the bottom left of the taskbar) - Launch the script from
Emulation/tools/launchers,citra.sh - Launch the emulator from
Steamafter adding it via theEmulatorsparser inSteam ROM Manager
Citra File Formats
- .3ds
- .3dsx
- .app
- .axf
- .cci
- .cxi
- .elf
IMPORTANT:
.ciacan only be used if you install it through Citra. Do not place your.ciaROMs in either theEmulation/roms/3dsor theEmulation/roms/n3dsfolders. The .cia file format is not compatible with Steam ROM Manager and EmulationStation-DE.
How to Manage DLC and Updates
Read: https://citra-emu.org/wiki/dumping-updates-and-dlcs/ to learn how to properly dump your DLC and update files from your 3DS.
DLC and update files typically are .CIAs, an installable file format through Citra. After installing your DLC or updates, you may discard these files.
How to Install DLC and Updates
- In Desktop Mode, open Citra
- Click
Filein the top left - Click
Install CIA... - Navigate to your DLC or update files
Citra Hotkeys
Citra comes with a Steam Input profile for Hotkeys. When playing Citra ROM shortcuts through Steam, the EmuDeck - Controller Hotkeys profile will automatically be applied so you may use the below hotkeys. For more info, see Emulator Button Combinations Profile.
When using a frontend (ES-DE, Pegasus, or the emulator itself), the EmuDeck - Frontend Controller Hotkeys will automatically be applied. Hold Start for a few seconds to switch to the action set required to use the below hotkeys. For more info, see Emulator Frontends Button Combinations Profile.
| Hotkey | Citra |
|---|---|
| Toggle Full Screen | Select + R3 |
| Save State | Select + R1 |
| Load State | Select + L1 |
| Fast Forward | Select + R2 |
| Pause/Play | Select + A |
| Reset Emulation | Select + L3 |
| Stop Emulation | Select + Start or hold L5 or hold R5 |
| Toggle Screen Layout | L4 or R4 or Start + DPad Left or Select + Y |
| Swap Screens | L5 or R5 or Start + DPad Down or Select + X |
| Load Amiibo | Start + DPad Right |
Note
- For a tutorial on how to select Steam Input Profiles, refer to: How to Select a Steam Input Profile.
- If you would like to use touch menus, apply the
EmuDeck - Steam Deck Radial Menusprofile instead. - Steam Deck Button Layout
Citra Common Issues
Why did my game suddenly stop working?
If your game ever crashes or you exit the game by pressing the STEAM button and clicking Exit Game instead of using the hotkey (Quit on the left trackpad), you may end up corrupting the shader cache.
To clear the shader cache:
- In Desktop Mode, open the
/home/deck/.local/share/citra-emufolder~/.localis a hidden folder by default. In Dolphin (file manager), click the hamburger menu in the top right, clickShow Hidden Filesto see these folders
- Delete the
shadersfolder - Try your game again
Note: Use the Select + Start hotkey to exit your game instead of using the STEAM button.
Citra Tips and Tricks
How to Configure Gyro
Gyro for Citra requires SteamDeckGyroDSU. SteamDeckGyroDSU can be installed via EmuDeck, or it can be installed manually.
Visit SteamDeckGyroDSU to learn how to install and utilize SteamDeckGyroDSU.
How to Configure Gyro With External Controllers
Desktop Mode
- Switch to Desktop Mode
- Exit out of Steam
- You may exit out of Steam a couple of different ways:
- Right click the
Steamicon in your taskbar and clickExit Steam - Open Steam, click the
Steambutton in the top left, clickExit - Open a terminal (Konsole) and enter
killall -9 steam - Do note that clicking the the
Xbutton in the top right of the Steam window will not exit out of Steam
- Right click the
- Your controls will switch to
Lizard Mode. UseL2to right click,R2to left click, and theRight Trackpadto move the mouse - You may also connect an external keyboard and mouse
- You may exit out of Steam a couple of different ways:
- Click the bluetooth icon in the bottom right of your taskbar and connect your controller
- Open Citra
- Click
Emulationat the top, clickConfigure - Click
Controlson the left - Click
Newto the right ofProfileand give it a unique name - Click
Motion / Touch..in the bottom left - To the right of
Motion Provider, selectSDLin the drop-down menu - Click
Configureand follow the instructions - Click
OK - Click
OKagain and exit out of Citra - Switch to
Game Mode
Game Mode
- In Game Mode, connect your controller
- Select your Nintendo 3DS game
- On the
Playscreen, select theControllericon to the right of the screen - Select your controller tab at the top
- Click the
Gearicon to the right, and clickDisable Steam Input- You may need to restart first for this setting to properly apply
- Your controller's gyro will now work for this selected game, repeat as needed for your other games
Post-Configuration
To restore the default Steam Deck controls:
- Open Citra
- Click
Emulationat the top, clickConfigure - Click
Controlson the left - To the right of
Profile, selectSD-Defaultin the drop-down menu - Click
OKand exit out of Citra
(Optional) To restore Steam Input:
- Select your Nintendo 3DS game
- On the
Playscreen, select theControllericon to the right of the screen - Select your controller tab at the top
- Click the
Gearicon to the right, and clickEnable Steam Input- You may need to restart first for this setting to properly apply
- The controls will be reverted to Steam Input and the Steam Deck controls will be restored
How to Optimize Performance (Power Tools)
Visit Power Tools to learn how to optimize performance using Power Tools.
How to Install Custom Textures
Here's how to install custom textures for Citra:
Citra Configuration
- In Desktop Mode, open Citra
- Click
Emulationin the top left. ClickConfiguration,Graphics, and check bothUse Custom TexturesandAsync Custom Texture Loading

Note: Preload Custom Textures is no longer recommended. Leave Preload Custom Textures off
How to Install Custom Textures
Note: Your texture pack may already come properly named and packaged with the correct TitleID and texture files. You may place the included texture pack folder directly into /home/deck/.local/share/citra-emu/textures/. You do not need the following section if this is the case.
- In Desktop Mode, open https://3ds.jdbye.com/?details=USA&split=0&display=0 in a browser
- Note down the
Title IDfor the game- For example, The Legend of Zelda: Majora's Mask 3D's (US) Title ID is:
0004000000125500
- For example, The Legend of Zelda: Majora's Mask 3D's (US) Title ID is:
- Open
/home/deck/.local/share/citra-emu/textures/~/.localis a hidden folder by default. In Dolphin (file manager), click the hamburger menu in the top right, clickShow Hidden Filesto see these folders
- In the
texturesfolder from Step 3, create a folder matching theTitleIDfrom Step 2 - Put your texture files directly into the
TitleIDfolder you created in Step 4 - Your texture pack should now be installed
Tip
Consider enabling Preload Custom Textures. This may help performance in some cases.
How to Use Cheats
Cheat Sources
This list is not exhaustive
How to Use Cheats
- In Desktop Mode, open Citra
- Right click a game of your choice, click
Properties - Click the
Cheatstab - Click
Add Cheat - Name the cheat and add the code to the box under
Code: - Click Save in the top right
- Check the box to the left of the cheat to enable it


How to Roll Back Citra to an Older Version
If you do not have access to a mouse and keyboard for the below section, use L2 to right click and R2 to left click. Alternatively, remote into your Steam Deck using one of the methods found in the FAQ, How do I remotely control my Steam Deck?.
- In Desktop Mode, open
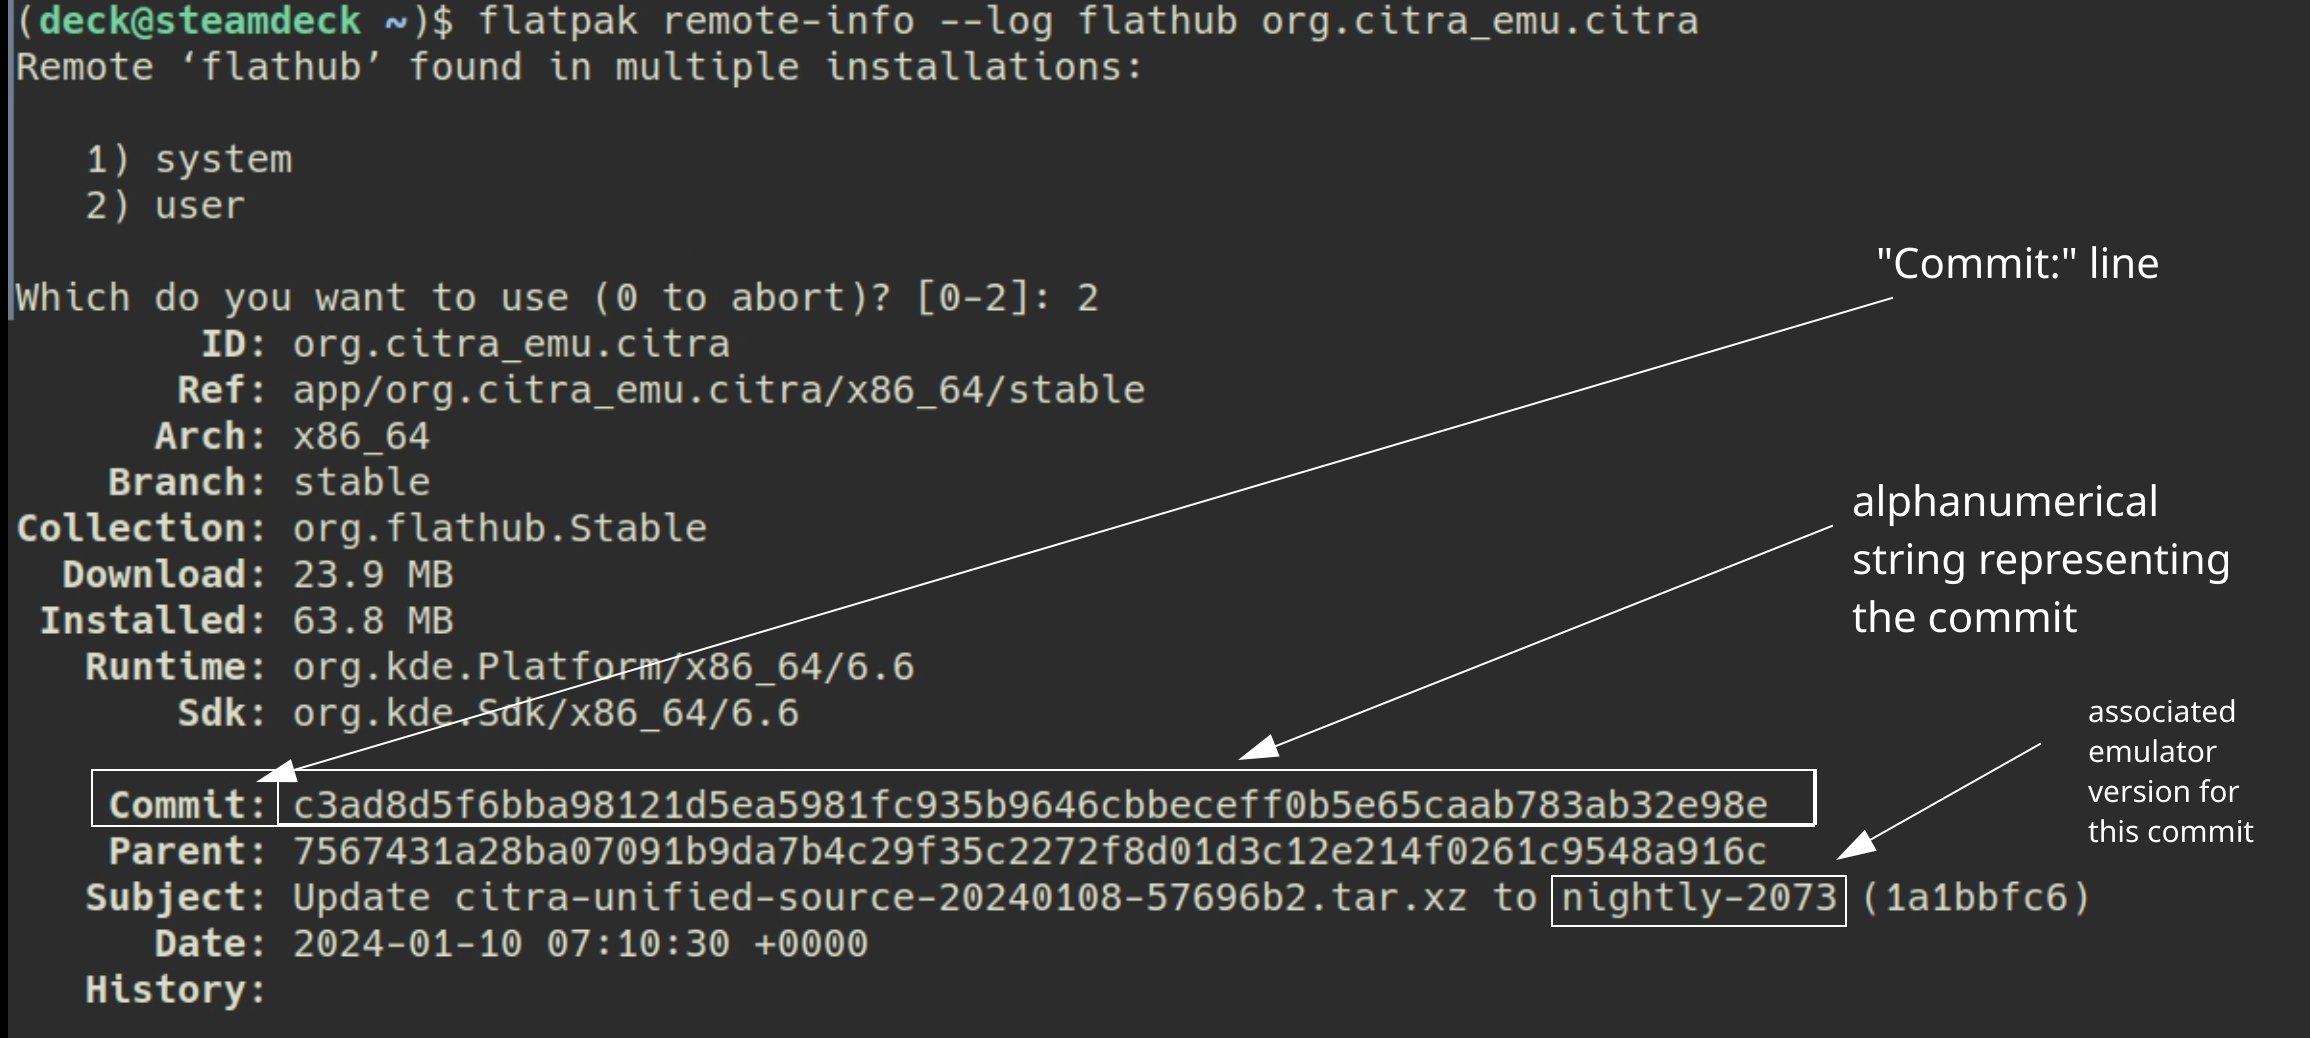
Konsole - To see a list of prior versions of the emulator, type:
flatpak remote-info --log flathub org.citra_emu.citra
- If Konsole prompts you to select
systemoruser, enter2to selectuser - Konsole will list a list of previous versions for the flatpak. The important line for each version is the
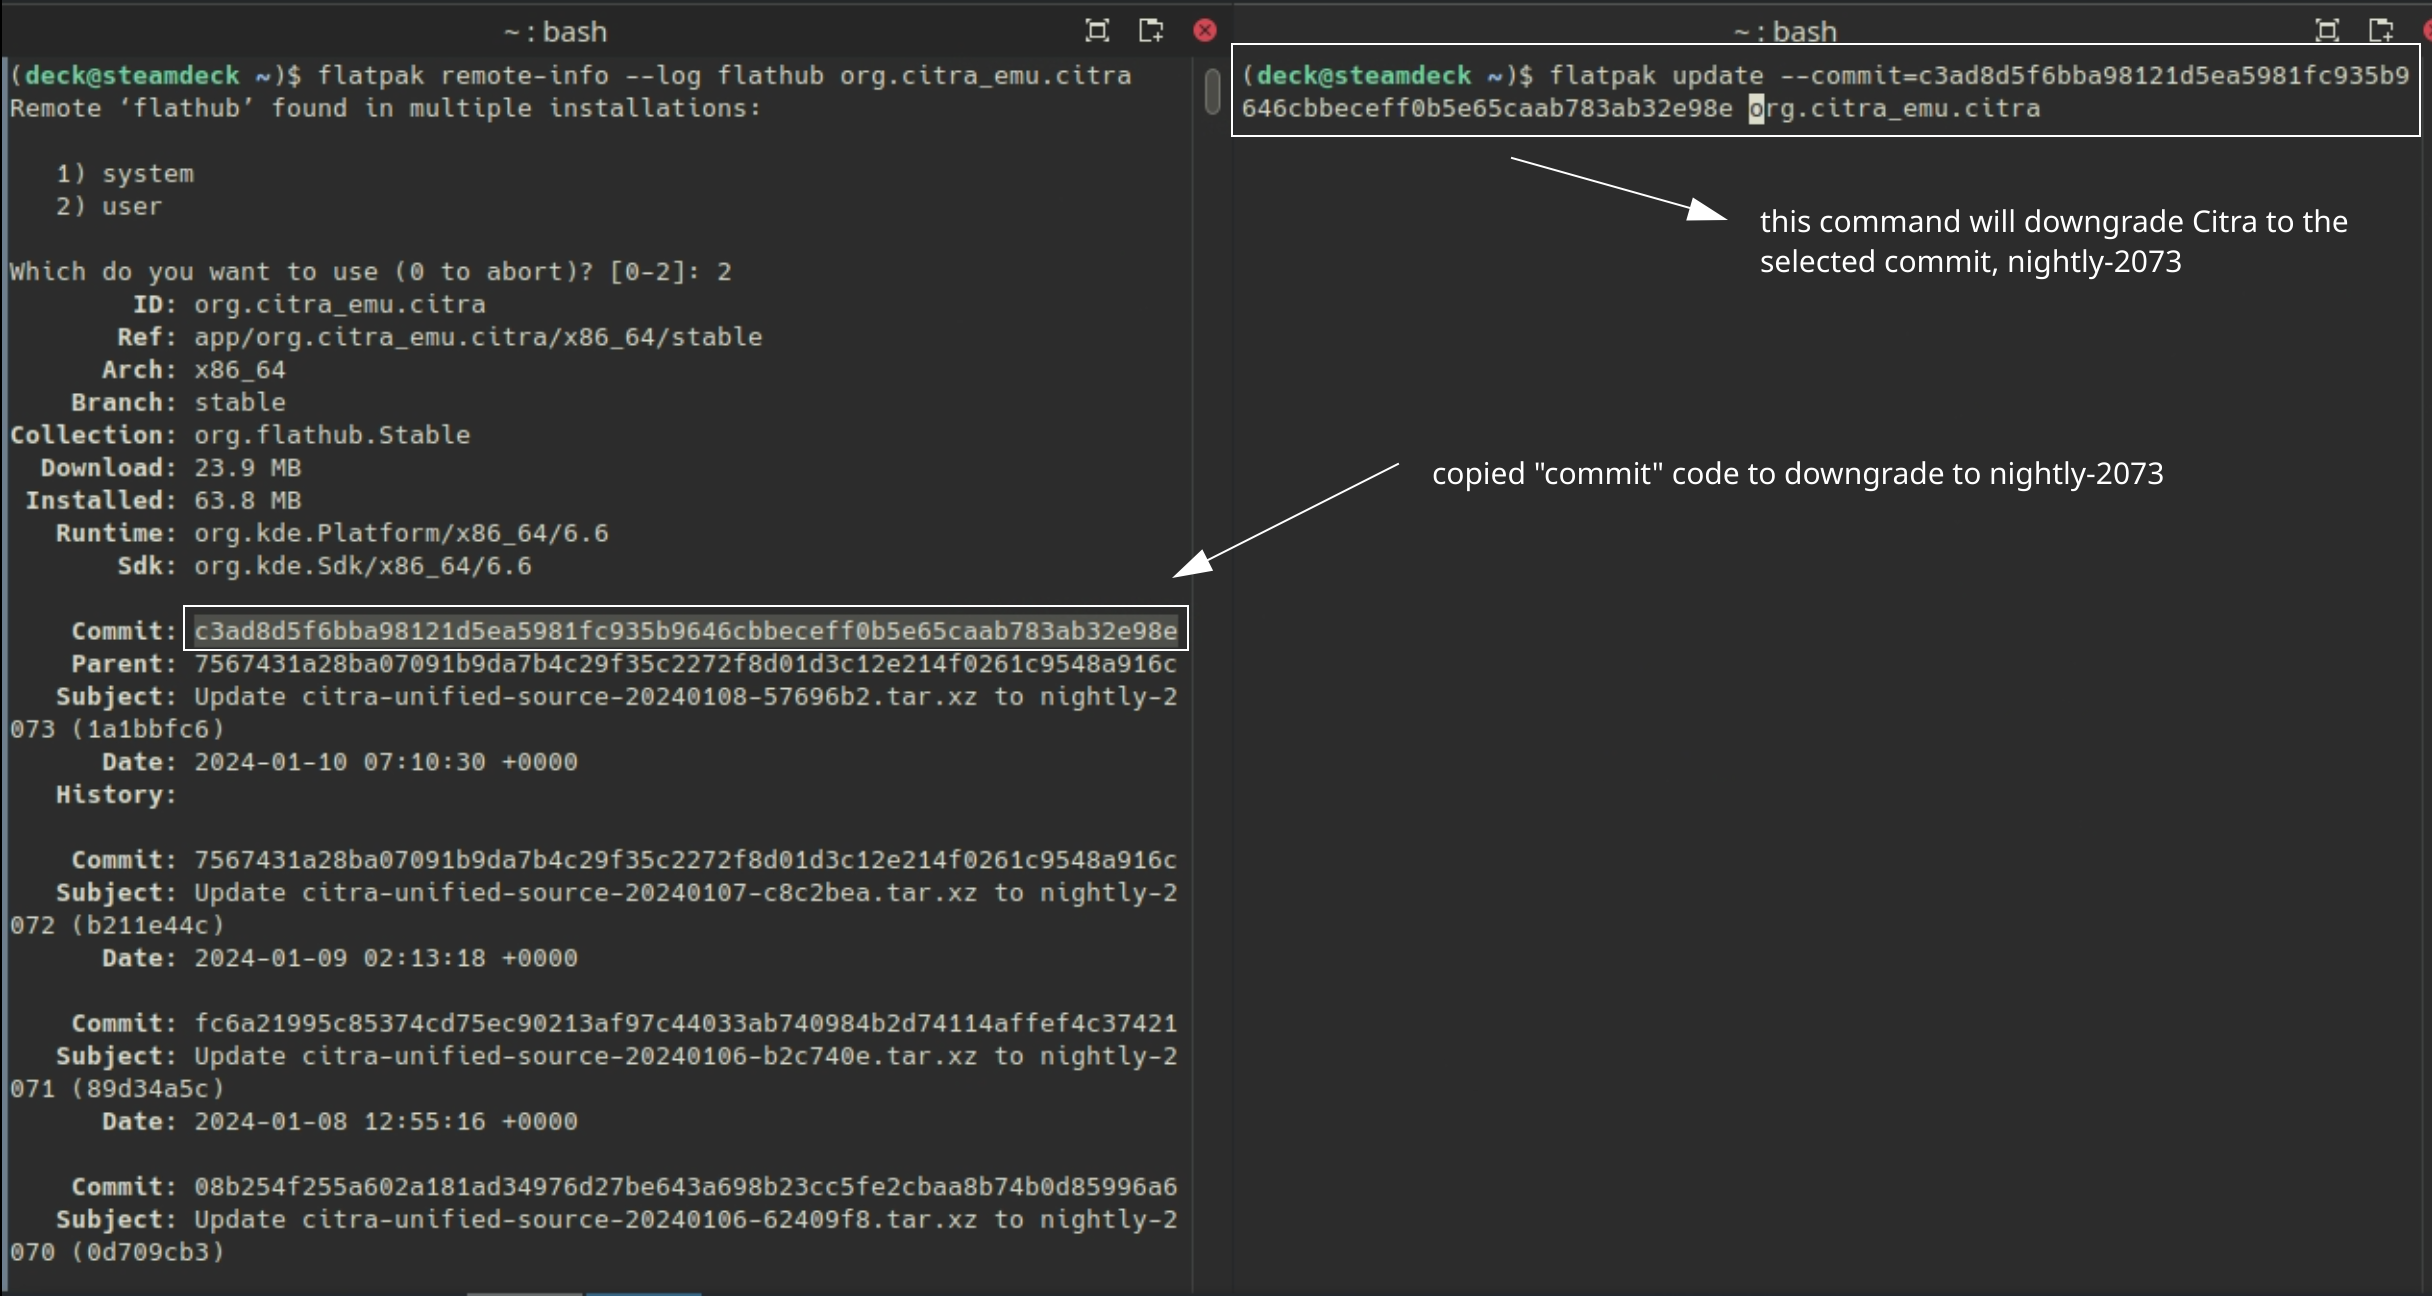
Commit:line. TheCommit:line will have a long accompanying alphanumeric string (the “commit” code). Copy the string for the version you want to downgrade to. - To downgrade to the version you want:
flatpak update --commit=put_commit_code_here org.citra_emu.citra- Replace
put_commit_code_herewith the actual code you located in Step 2.- For example:
- For example:
If the above steps did not work and you are getting an error message along the lines of Flatpak not installed, your Flatpak is likely installed at the system level instead. Select one of the below solutions:
Solution 1: Open the EmuDeck application, click the Manage Emulators page, select the emulator in question, and click Reinstall / Update.
Solution 2: Add sudo in front of the commands written in Step 2 and Step 5. In Step 2, write sudo flatpak remote-info --log flathub org.citra_emu.citra and in Step 5, write sudo flatpak update --commit=put_commit_code_here org.citra_emu.citra.
How to Configure Language Settings
UI
- In Desktop Mode, open Citra
- At the top, click
Emulation, clickConfigure - On the left hand-side of the screen, click
General - Click the
UItab - Under
General, select your preferred language in the drop-down menu
In-Game
- In Desktop Mode, open Citra
- At the top, click
Emulation, clickConfigure - On the left hand-side of the screen, click
System - Click the
Systemtab - Under
System Settings, select your preferred language in the drop-down menu
Custom Screen Layouts
How to Create Custom Screen Layouts
Use https://jesuscc1993.github.io/miscellaneous/citra-layout-generator/ to create custom layouts.
After you have created your custom layout, use the following steps to use it.
- Open the folder:
/home/deck/.config/citra-emu/~/.configis a hidden folder by default. In Dolphin (file manager), click the hamburger menu in the top right, clickShow Hidden Filesto see these folders
- Right click
qt-config.ini, and clickOpen with Kateor a text editor of your choice - Locate the
[Layout]section - Replace the content of the
[Layout]section with your newly created layout
How to Configure Bottom Screen as PiP
Credit: NexLevel
Citra allows you to configure the bottom screen as a sort of PiP (Picture in Picture) overlay on the top screen, by editing the qt-config file.
Here's How
- Open the folder:
/home/deck/.config/citra-emu/~/.configis a hidden folder by default. In Dolphin (file manager), click the hamburger menu in the top right, clickShow Hidden Filesto see these folders
- Right click
qt-config.ini, and clickOpen with Kateor a text editor of your choice - Locate the
[Layout]section -
Replace the content of the
[Layout]section with the below text:[Layout] anaglyph_shader_name=dubois (builtin) anaglyph_shader_name\default=true custom_bottom_bottom=800 custom_bottom_bottom\default=false custom_bottom_left=520 custom_bottom_left\default=false custom_bottom_right=760 custom_bottom_right\default=false custom_bottom_top=620 custom_bottom_top\default=false custom_layout=true custom_layout\default=false custom_second_layer_opacity=33 custom_second_layer_opacity\default=false custom_top_bottom=784 custom_top_bottom\default=false custom_top_left=0 custom_top_left\default=true custom_top_right=1280 custom_top_right\default=false custom_top_top=16 custom_top_top\default=false factor_3d=0 factor_3d\default=true filter_mode=true filter_mode\default=true large_screen_proportion=@Variant(\0\0\0\x87@\x80\0\0) large_screen_proportion\default=false layout_option=1 layout_option\default=false mono_render_option=0 mono_render_option\default=true pp_shader_name=none (builtin) pp_shader_name\default=true render_3d=0 render_3d\default=true swap_screen=false swap_screen\default=true upright_screen=false upright_screen\default=true -
(Optional) To move the PiP screen up, try setting
custom_top_top=0andcustom_top_bottom=768 - Save and exit out of the text file, Citra will now be using the bottom screen as PiP
Note: To revert back to defaults, the default [Layout] section is:
[Layout]
anaglyph_shader_name=dubois (builtin)
anaglyph_shader_name\default=true
custom_bottom_bottom=480
custom_bottom_bottom\default=true
custom_bottom_left=40
custom_bottom_left\default=true
custom_bottom_right=360
custom_bottom_right\default=true
custom_bottom_top=240
custom_bottom_top\default=true
custom_layout=false
custom_layout\default=true
custom_second_layer_opacity=100
custom_second_layer_opacity\default=true
custom_top_bottom=240
custom_top_bottom\default=true
custom_top_left=0
custom_top_left\default=true
custom_top_right=400
custom_top_right\default=true
custom_top_top=0
custom_top_top\default=true
factor_3d=0
factor_3d\default=true
filter_mode=true
filter_mode\default=true
large_screen_proportion=@Variant(\0\0\0\x87@\x80\0\0)
large_screen_proportion\default=true
layout_option=2
layout_option\default=false
mono_render_option=0
mono_render_option\default=true
pp_shader_name=none (builtin)
pp_shader_name\default=true
render_3d=0
render_3d\default=true
swap_screen=false
swap_screen\default=true
upright_screen=false
upright_screen\default=true
How to Configure Bottom Screen With PiP and Opacity
Credit: NexLevel
A recent update of Citra allows the ability to set the opacity on the bottom screen. In combination with setting the bottom screen as a PiP overlay, you can create a Citra layout that looks like the following:
Example 1: 
Example 2: 
Here's How
- Open the folder:
/home/deck/.config/citra-emu/~/.configis a hidden folder by default. In Dolphin (file manager), click the hamburger menu in the top right, clickShow Hidden Filesto see these folders
- Right click
qt-config.ini, and clickOpen with Kateor a text editor of your choice - Locate the
[Layout]section -
Replace the content of the
[Layout]section with the below text:[Layout] anaglyph_shader_name=dubois (builtin) anaglyph_shader_name\default=true custom_bottom_bottom=800 custom_bottom_bottom\default=false custom_bottom_left=520 custom_bottom_left\default=false custom_bottom_right=760 custom_bottom_right\default=false custom_bottom_top=620 custom_bottom_top\default=false custom_layout=true custom_layout\default=false custom_second_layer_opacity=33 custom_second_layer_opacity\default=false custom_top_bottom=784 custom_top_bottom\default=false custom_top_left=0 custom_top_left\default=true custom_top_right=1280 custom_top_right\default=false custom_top_top=16 custom_top_top\default=false factor_3d=0 factor_3d\default=true filter_mode=true filter_mode\default=true large_screen_proportion=@Variant(\0\0\0\x87@\x80\0\0) large_screen_proportion\default=false layout_option=1 layout_option\default=false mono_render_option=0 mono_render_option\default=true pp_shader_name=none (builtin) pp_shader_name\default=true render_3d=0 render_3d\default=true swap_screen=false swap_screen\default=true upright_screen=false upright_screen\default=true -
To adjust the PiP opacity, the opacity can be any integer between 1-100
- Save and exit out of the text file, Citra will now be using the bottom screen as PiP with custom opacity
Note: To revert back to defaults, the default [Layout] section is:
[Layout]
anaglyph_shader_name=dubois (builtin)
anaglyph_shader_name\default=true
custom_bottom_bottom=480
custom_bottom_bottom\default=true
custom_bottom_left=40
custom_bottom_left\default=true
custom_bottom_right=360
custom_bottom_right\default=true
custom_bottom_top=240
custom_bottom_top\default=true
custom_layout=false
custom_layout\default=true
custom_second_layer_opacity=100
custom_second_layer_opacity\default=true
custom_top_bottom=240
custom_top_bottom\default=true
custom_top_left=0
custom_top_left\default=true
custom_top_right=400
custom_top_right\default=true
custom_top_top=0
custom_top_top\default=true
factor_3d=0
factor_3d\default=true
filter_mode=true
filter_mode\default=true
large_screen_proportion=@Variant(\0\0\0\x87@\x80\0\0)
large_screen_proportion\default=true
layout_option=2
layout_option\default=false
mono_render_option=0
mono_render_option\default=true
pp_shader_name=none (builtin)
pp_shader_name\default=true
render_3d=0
render_3d\default=true
swap_screen=false
swap_screen\default=true
upright_screen=false
upright_screen\default=true
How to Configure Bottom Screen as PiP in the Top Right Corner
Picture:
Credit: busywait
- Open the folder:
/home/deck/.config/citra-emu/~/.configis a hidden folder by default. In Dolphin (file manager), click the hamburger menu in the top right, clickShow Hidden Filesto see these folders
- Right click
qt-config.ini, and clickOpen with Kateor a text editor of your choice - Locate the
[Layout]section -
Replace the content of the
[Layout]section with the below text:[Layout] anaglyph_shader_name=dubois (builtin) anaglyph_shader_name\default=true custom_bottom_bottom=240 custom_bottom_bottom\default=false custom_bottom_left=960 custom_bottom_left\default=false custom_bottom_right=1280 custom_bottom_right\default=false custom_bottom_top=0 custom_bottom_top\default=false custom_layout=true custom_layout\default=false custom_second_layer_opacity=80 custom_second_layer_opacity\default=false custom_top_bottom=800 custom_top_bottom\default=false custom_top_left=0 custom_top_left\default=true custom_top_right=1200 custom_top_right\default=false custom_top_top=80 custom_top_top\default=false factor_3d=0 factor_3d\default=true filter_mode=true filter_mode\default=true large_screen_proportion=4 large_screen_proportion\default=true layout_option=1 layout_option\default=false mono_render_option=0 mono_render_option\default=true pp_shader_name=none (builtin) pp_shader_name\default=true render_3d=0 render_3d\default=true swap_screen=false swap_screen\default=true upright_screen=false upright_screen\default=true -
Save and close out of the text file
- Citra will now apply your custom layout
Note: To revert back to defaults, the default [Layout] section is:
[Layout]
anaglyph_shader_name=dubois (builtin)
anaglyph_shader_name\default=true
custom_bottom_bottom=480
custom_bottom_bottom\default=true
custom_bottom_left=40
custom_bottom_left\default=true
custom_bottom_right=360
custom_bottom_right\default=true
custom_bottom_top=240
custom_bottom_top\default=true
custom_layout=false
custom_layout\default=true
custom_second_layer_opacity=100
custom_second_layer_opacity\default=true
custom_top_bottom=240
custom_top_bottom\default=true
custom_top_left=0
custom_top_left\default=true
custom_top_right=400
custom_top_right\default=true
custom_top_top=0
custom_top_top\default=true
factor_3d=0
factor_3d\default=true
filter_mode=true
filter_mode\default=true
large_screen_proportion=@Variant(\0\0\0\x87@\x80\0\0)
large_screen_proportion\default=true
layout_option=2
layout_option\default=false
mono_render_option=0
mono_render_option\default=true
pp_shader_name=none (builtin)
pp_shader_name\default=true
render_3d=0
render_3d\default=true
swap_screen=false
swap_screen\default=true
upright_screen=false
upright_screen\default=true