melonDS is a Nintendo DS emulator.
Website: https://melonds.kuribo64.net/
melonDS' FAQ: https://melonds.kuribo64.net/faq.php
GitHub: https://github.com/melonDS-emu/melonDS
Compatibility List: https://melonds.kuribo64.net/board/forum.php?id=3
This page is for melonDS, a standalone NDS emulator. This page is not for the melonDS RetroArch core. For more information on RetroArch and the melonDS RetroArch core, visit the RetroArch Page.
melonDS Table of Contents
-
- Open Source BIOS
- How to Configure Multiplayer
- How to Configure Settings
- How to Use Cheats
- How to Set up DSIWare
- How to Play Nintendo DS Games in Book Mode
- How to Customize the Screen Layout
- How to Roll Back melonDS to an Older Version
- How to Configure Language Settings
- How to Set Up PKHeX
- How to Install the Universal Pokemon Randomizer
- How to Use ROM Hacks
Getting Started with melonDS
melonDS is a fairly straight-forward emulator to set up. Place your ROMs in Emulation/roms/nds. No additional setup is required. Read the Configuration section to learn more about melonDS and its folder locations. BIOS are optional for both the Nintendo DS and Nintendo DSI.
To launch your ROMs in game mode, use Steam ROM Manager and use one of the following parsers to play your NDS ROMs:
ES-DENintendo DS - melonDSEmulators
melonDS Configuration
- Type of Emulator: Flatpak
- Config Location:
/home/deck/.var/app/net.kuribo64.melonDS - ROM Location:
Emulation/roms/nds - BIOS Location:
Emulation/bios- Optional BIOS (Nintendo DS):
bios7.bin,bios9.bin,firmware.bin - Optional BIOS (Nintendo DSI):
dsi_bios9.bin,dsi_bios7.bin,dsi_firmware.bin,dsi_nand.bin
- Optional BIOS (Nintendo DS):
- Saves:
Emulation/saves/melonds/saves - Save States:
Emulation/saves/melonds/states - Cheats Location:
Emulation/storage/melonds/cheats
Note: ~/.var is an invisible folder by default. In Dolphin (file manager), click the hamburger menu in the top right, click Show hidden files to see these folders.
Works With
- Steam ROM Manager
- ES-DE
melonDS Folder Locations
These file locations apply regardless of where you chose to install EmuDeck (to your internal SSD, to your SD Card, or elsewhere). Some emulator configuration files will be located on the internal SSD as listed below.
$HOME refers to your home folder. If you are on a Steam Deck, this folder will be named /home/deck (you will likely not see deck in the file path when navigating using the file manager).
Paths beginning with Emulation/.. correspond to your EmuDeck install location. If you installed on an SD Card, your path may be /run/media/mmcblk0p1/Emulation/roms/... If you installed on your internal SSD, your path may be /home/deck/Emulation/roms/..
Note: Folders with a . (.var, .local, .config, etc.) at the beginning are hidden by default. In Dolphin (file manager), click the hamburger menu in the top right, click Show Hidden Files to see these folders.
$HOME/.var/app/net.kuribo64.melonDS
net.kuribo64.melonDS
├── cache
├── config
│   ├── kdeglobals
│   ├── melonDS
│   │   ├── melonDS.ini
│   │   ├── melonDS.ini.bak
│   │   ├── timewarp.mln
│   │   └── wfcsettings.bin
│   ├── pulse
│   │   └── cookie
│   ├── QtProject.conf
│   └── user-dirs.dirs
└── data
    ├── user-places.xbel
    ├── user-places.xbel.bak
    └── user-places.xbel.tbcache
How to Download melonDS (Standalone)
- In Desktop Mode, open the EmuDeck application
- Click the
Manage Emulatorsbutton - Click
melonDS - Click
Install - melonDS (Standalone) will be installed
- To open melonDS in Desktop Mode, see How to Launch melonDS in Desktop Mode
To use melonDS (Standalone) to launch your ROMs in Game Mode:
- Use Steam ROM Manager and select the
Nintendo DS - melonDSparser- The RetroArch parser is named:
Nintendo DS - Retroarch - melonDS - The melonDS (Standalone) parser is named:
Nintendo DS - melonDS
- The RetroArch parser is named:
- Use Steam ROM Manager and select the
ES-DEparser- To switch to melonDS (Standalone) in ES-DE, see ES-DE: How to Select a Different Emulator for a System
No additional setup is required with Steam ROM Manager and ES-DE. If you do not have the latest Steam ROM Manager configurations, either run a Custom Reset or click the Reset configuration button on the Steam ROM Manager page within the EmuDeck application.
How to Update melonDS
How to Update melonDS
- Update through
Discover(Shopping bag icon) - Through the
Update your Emulators & Toolssection on theManage Emulatorspage in theEmuDeckapplication
How to Launch melonDS in Desktop Mode
How to Launch melonDS in Desktop Mode
- Launch
melonDSfrom the Applications Launcher (Steam Deck icon in the bottom left of the taskbar) - Launch the script from
Emulation/tools/launchers,melonds.sh - Launch the emulator from
Steamafter adding it via theEmulatorsparser inSteam ROM Manager
melonDS File Formats
- .nds
- .app
melonDS Hotkeys
melonDS comes with a Steam Input profile for Hotkeys. When playing melonDS ROM shortcuts through Steam, the EmuDeck - Controller Hotkeys profile will automatically be applied so you may use the below hotkeys. For more info, see Emulator Button Combinations Profile.
When using a frontend (ES-DE, Pegasus, or the emulator itself), the EmuDeck - Frontend Controller Hotkeys will automatically be applied. Hold Start for a few seconds to switch to the action set required to use the below hotkeys. For more info, see Emulator Frontends Button Combinations Profile.
| Hotkey | melonDS |
|---|---|
| Toggle Full Screen | Select + R3 |
| Save State | Select + R1 |
| Load State | Select + L1 |
| Fast Forward | Select + R2 |
| Pause/Play | Select + A |
| Reset Emulation | Select + L3 |
| Stop Emulation | Select + Start or hold L5 or hold R5 |
| Close/Open Lid | Start + DPad Up |
| Swap Screens | L4 or R4 or Start + DPad Left or Select + Y |
| Toggle FPS Limit | Start + DPad Right |
Note
- For a tutorial on how to select Steam Input Profiles, refer to: How to Select a Steam Input Profile.
- If you would like to use touch menus, apply the
EmuDeck - Steam Deck Radial Menusprofile instead. - Steam Deck Button Layout
melonDS Tips and Tricks
Open Source BIOS
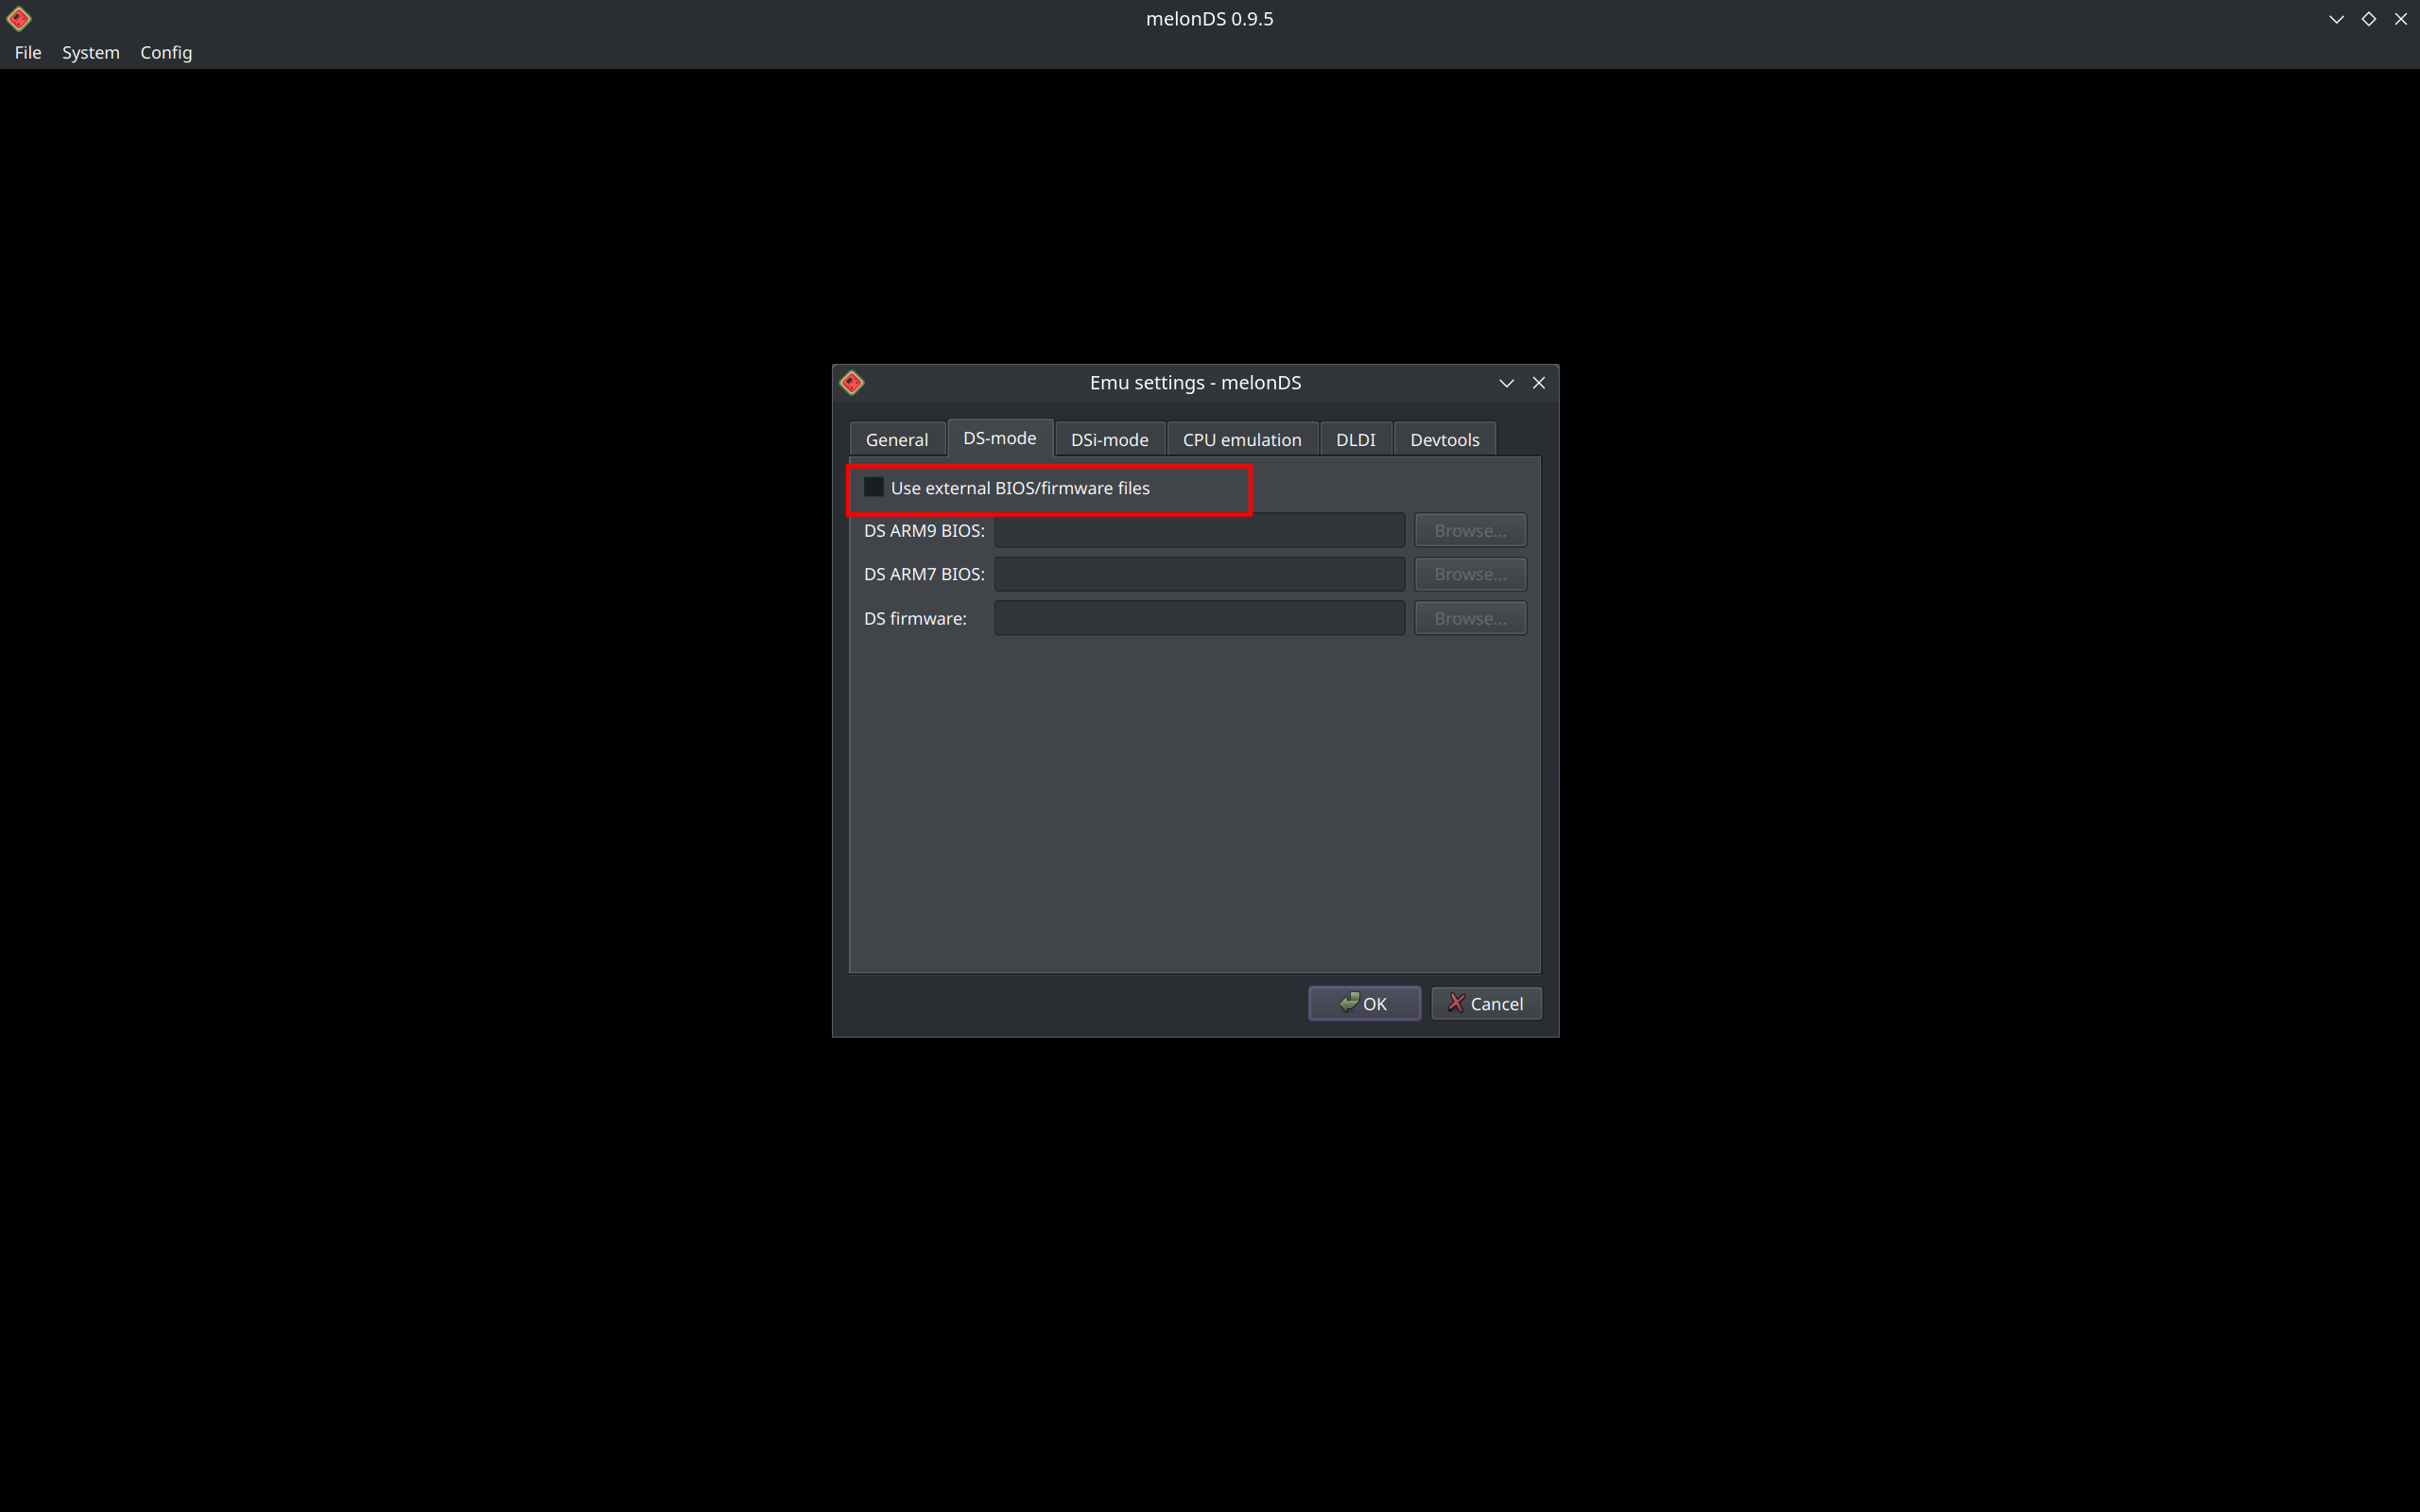
The open source BIOS is enabled by default for melonDS. This means that BIOS for Nintendo DS games is optional. However, some games may not perform as expected with the open source BIOS or you may need additional features provided by console dumped BIOS. You may also prefer to use DSI BIOS which allow you to play DSIWare games.
In order to use console dumped BIOS, you may place the files required into the Emulation/bios folder. You will also need to enable Use external BIOS/firmware files in the melonDS GUI.
How to Configure Multiplayer
This section is strictly referring to local multiplayer. melonDS multiplayer on the Steam Deck can only be done in Desktop Mode.
- In Desktop Mode, open melonDS
- Click
System, clickMultiplayer,Launch new instance - On each window of melonDS, click
Config,Input and hotkeys - In the drop-down menu to the right of
Joystick, select your controller- Steam Deck/Player 1:
Microsoft X-Box 360 pad 0 - Player 2:
Microsoft X-Box 360 pad 1 - Player 3:
Microsoft X-Box 360 pad 2 - Player 4:
Microsoft X-Box 360 pad 3
- Steam Deck/Player 1:
- Open the game in each melonDS window and you will be able to play multiplayer
You can determine which melonDS window corresponds to what player by looking at the menu bar at the top. Each new melonDS window will have a corresponding (#).
How to Configure Settings
Game Mode
If you are playing in Game Mode, make sure you have the correct "Steam Input" profile applied. For more information, see the Hotkeys section.
While in game, press Select + R3 to exit full screen. While melonDS is windowed, you will have access to the settings at the top of the screen. Adjust these options to your liking. After you have made your changes, press Select + R3 again to switch melonDS back to full screen.
After you have made your changes and you are ready to exit your game, do not use the STEAM butto to exit out of the game. If you use the STEAM button, any changes you have made will be reverted.
Press Select + R3 again to exit full screen. In the top right, click File, click Quit. You will only need to do this when you are changing settings. Otherwise, you may simply use the STEAM button as usual.
Desktop Mode
In Desktop Mode, open melonDS. Adjust any options to your liking. In the top right, click File, click Quit.
Do not click the X button in the top right to exit out of melonDS. If you use the X button, any changes will be reverted.
How to Use Cheats
Note: melonDS does not currently support importing cheats from a database file.
How to Enable Cheats in melonDS
- Open melonDS
- Click
Systemat the top - Check
Enable cheats

How to Download the Cheats Database
- Open https://db.universal-team.net/ds/ndsi-cheat-databases, right click
cheats.xml, and clickSave As - Place it in
Emulation/storage/melonds/cheats- This folder placement is optional, you may place it wherever you want
- To view, right click
cheats.xml, open with a text editor of your choice
How to Use the Cheats Database
Note: It's recommended you do this in Desktop mode so you can easily copy from the cheats database into MelonDS. After adding cheats, you can use MelonDS in Game Mode.
- Open the
cheats.xmlyou downloaded from theHow to Download the Cheats Databasesection CTRL+Fthe game you are adding cheats to- Copy the blocks of alphanumerical strings between the two
<codes> <codes>for your respective cheat- Example:

- Example:
- Open MelonDS
- Open a ROM
- Click
Systemat the top - Click
Setup cheat codes - Create a
New Category, you may name it whatever you would like - Click
New AR Code - Match the name of the AR Code to the cheat you located in Step 3 * The name is flexible, you may name it whatever you would like
- Paste the code you copied from Step 3, it will appear as red text
- Format the cheat so there are two blocks of code per line
- Original:

- Corrected:

- Original:
- Some cheats are automatically activated, others will require a button combo. Look at the
cheats.xmlfile to see if a button combo is required to activate your cheat
How to Set Up DSIWare
The Nintendo DSI requires DSI specific BIOS. Place all of the files from the list below directly in Emulation/bios.
dsi_bios9.bindsi_bios7.bindsi_firmware.bindsi_nand.bin
Note:
- The BIOS must be named exactly as above. BIOS with any deviations from the above will not work. Make sure you have the proper casing, characters, and spelling.
- BIOS must be placed in
Emulation/bios. If you create a sub-folder, the BIOS will not be picked up and Nintendo DSI games will not work.
Preface: Generally, DSIWare games are named 00000000 with no file extension. This section assumes you have these types of DSIWare ROMs.
- Place your DSI BIOS in
Emulation/bios - Place your DSIWare ROMs in
Emulation/roms/nds - Right click the DSIWare ROM in
Emulation/roms/nds, clickRename, rename it from00000000toGAMENAME.app- Replace
GAMENAMEwith the name of the DSIWare game - For example:
- Original file name:
00000000 - Updated file name:
X-Scape.app
- Original file name:
- Replace
- In Desktop Mode, open melonDS
- At the top, select
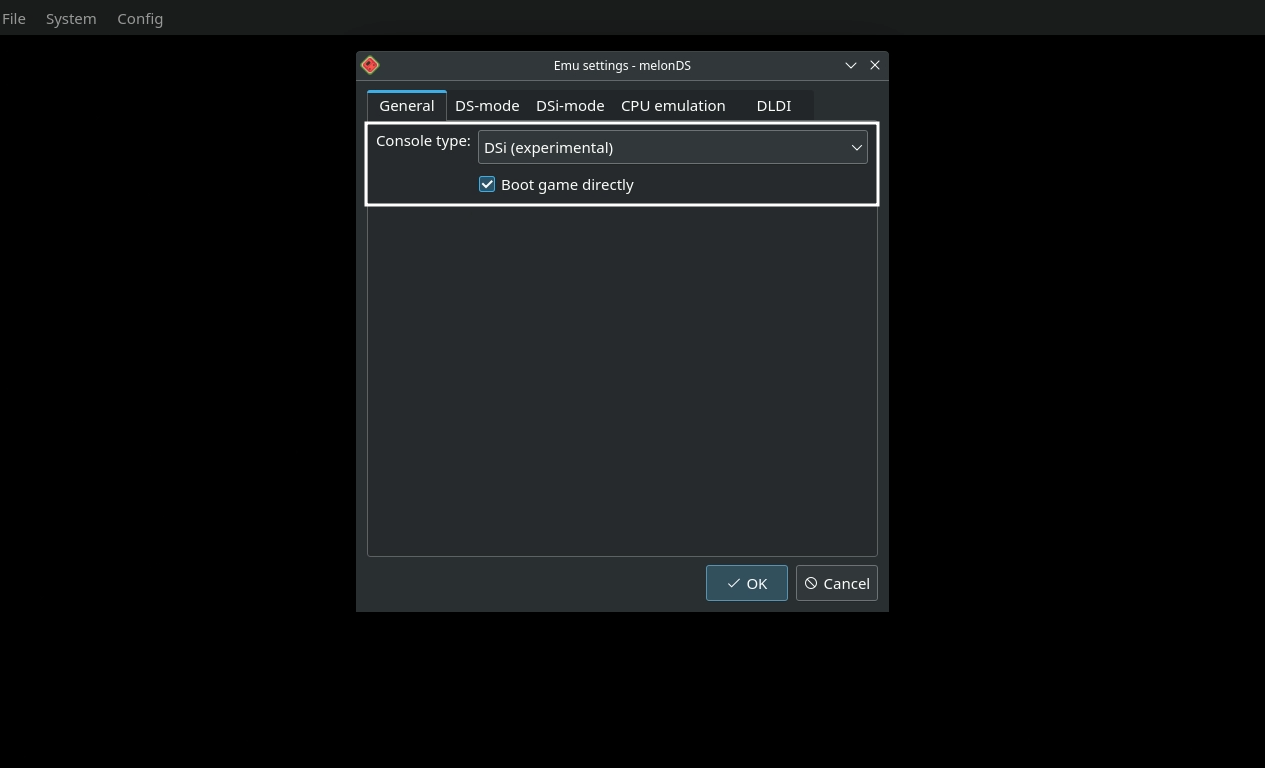
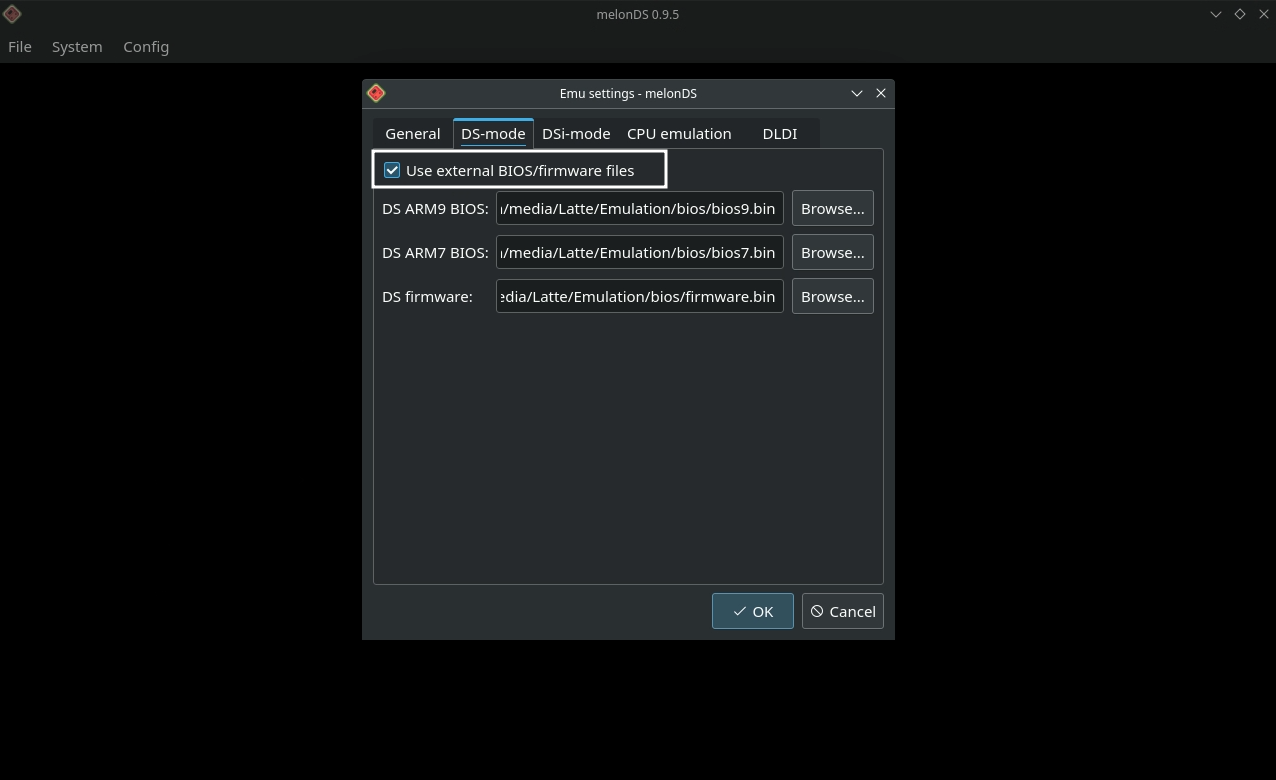
Config,Emu Settings - On the
Generaltab, change theConsole typetoDSi (experimental) - On the
DS-modetab, checkUse external BIOS/firmware files, close out of this menu - At the top, select
System,Manage DSi titles - On the
DSi Title Managerscreen, selectImport title - Select your
GAMENAME.appas theExecutable - Under
Metadata, selectDownload from NUS, close out of this menu - Select
File,Boot Firmware - Select your newly-installed DSiWare game and start playing
Steam ROM Manager and ES-DE
Both EmuDeck's Steam ROM Manager parser for melonDS (Standalone) and ES-DE support the .app file extension. As long as your DSIWare ROMs are in Emulation/roms/nds, you may use either option to play your DSIWare ROMs in Game Mode.
Do note that your ROM may not have art on SteamGridDB or metadata on ES-DE's scraping websites. Follow the links below if you would like to add art or metadata to one of these websites.
- Steam ROM Manager
- SteamGridDB
- You may request a game page here: https://www.steamgriddb.com/request-game
- You will need to login to view this page
- You may request a game page here: https://www.steamgriddb.com/request-game
- SteamGridDB
- ES-DE
How to Play Nintendo DS Games in Book Mode
A handful of Nintendo DS games require portrait orientation. For these games, you will need to rotate the Steam Deck screen in order to play them. Fortunately, it's a simple process.
Here's How
- In Game Mode, select the
EmuDeck - Controller Hotkeysprofile if you are playing a game directly from Game Mode or theEmuDeck - Frontend Controller Hotkeysprofile if you are playing through ES-DE or Pegasus - Open the game, use the Steam Input profile and select the
Fullscreenhotkey - At the top, press
Config,Screen Rotation,270


Original: 
Rotated: 
How to Customize the Screen Layout
By default, EmuDeck configures melonDS' screens to use a hybrid layout, meaning there is a large top screen on the left side of the screen and a mini top and bottom screen of the Nintendo DS on the right. If you would rather a different layout, it is fairly easy to customize.
Here's How
- In Game Mode, select the
EmuDeck - Controller Hotkeysprofile if you are playing a game directly from Game Mode or theEmuDeck - Frontend Controller Hotkeysprofile if you are playing through ES-DE or Pegasus - Open the game, use the Steam Input profile, and click
Select+R3 - At the top, press
Config, and useScreen size,Screen rotation,Screen layout,Screen sizing, andAspect Ratioto customize your layout - When you are finished playing your game, click
Select+R3again. In the top right, clickFile, clickQuit. If you use theSTEAMbutton to exit out of the game, any changes you have made will not be saved
The Screen layout is where you can find the Hybrid layout option. Here, you can swap to Natural, Vertical, Horizontal, and Hybrid.
How to Reset to EmuDeck Defaults
If you configured the settings and you decide you would like to reset to EmuDeck's defaults, you can do so by following the below:
- Open the EmuDeck application in Desktop Mode
- Click the
Manage Emulatorspage - Click
melonDSand clickReset Configurations
How to Back Up your Screen Layout Configuration
- In Desktop Mode, open
/home/deck/.var/app/net.kuribo64.melonDS/config/melonDS~/.varis an invisible folder by default. In Dolphin (file manager), click the hamburger menu in the top right, clickShow hidden filesto see these folders
- Open
melonDS.iniin Kate or a text editor of your choice -
Copy the following section to another file:
WindowWidth=1280 WindowHeight=771 WindowMax=0 ScreenRotation=0 ScreenGap=0 ScreenLayout=3 ScreenSwap=0 ScreenSizing=3 IntegerScaling=0 ScreenAspectTop=4 ScreenAspectBot=4 -
Back up this file to a secure location. If/when your melonDS configs are reset on an EmuDeck update, you may paste this section into the
melonDS.inito restore your custom layout
How to Roll Back melonDS to an Older Version
If you do not have access to a mouse and keyboard for the below section, use L2 to right click and R2 to left click. Alternatively, remote into your Steam Deck using one of the methods found in the FAQ, How do I remotely control my Steam Deck?.
- In Desktop Mode, open
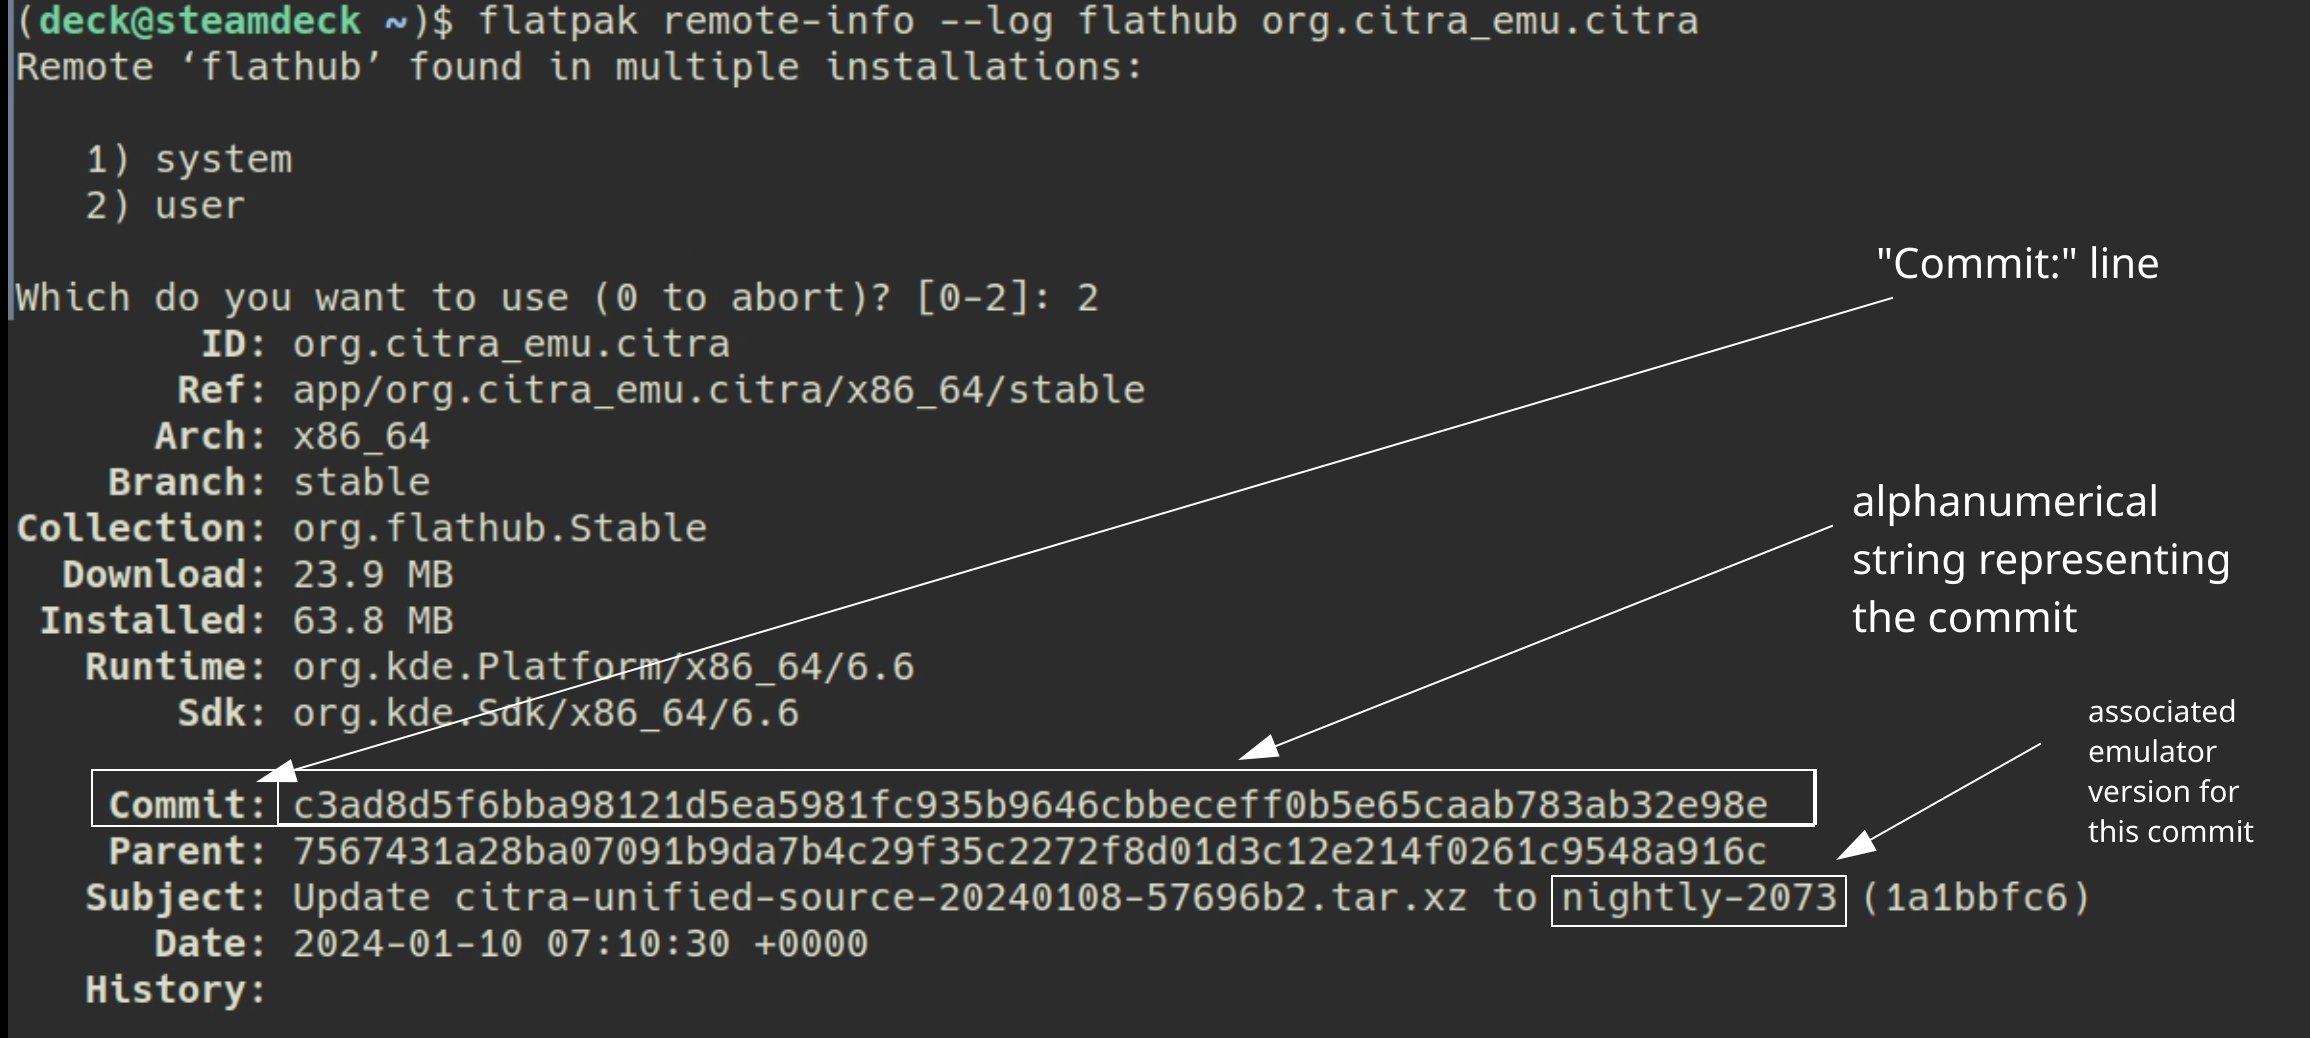
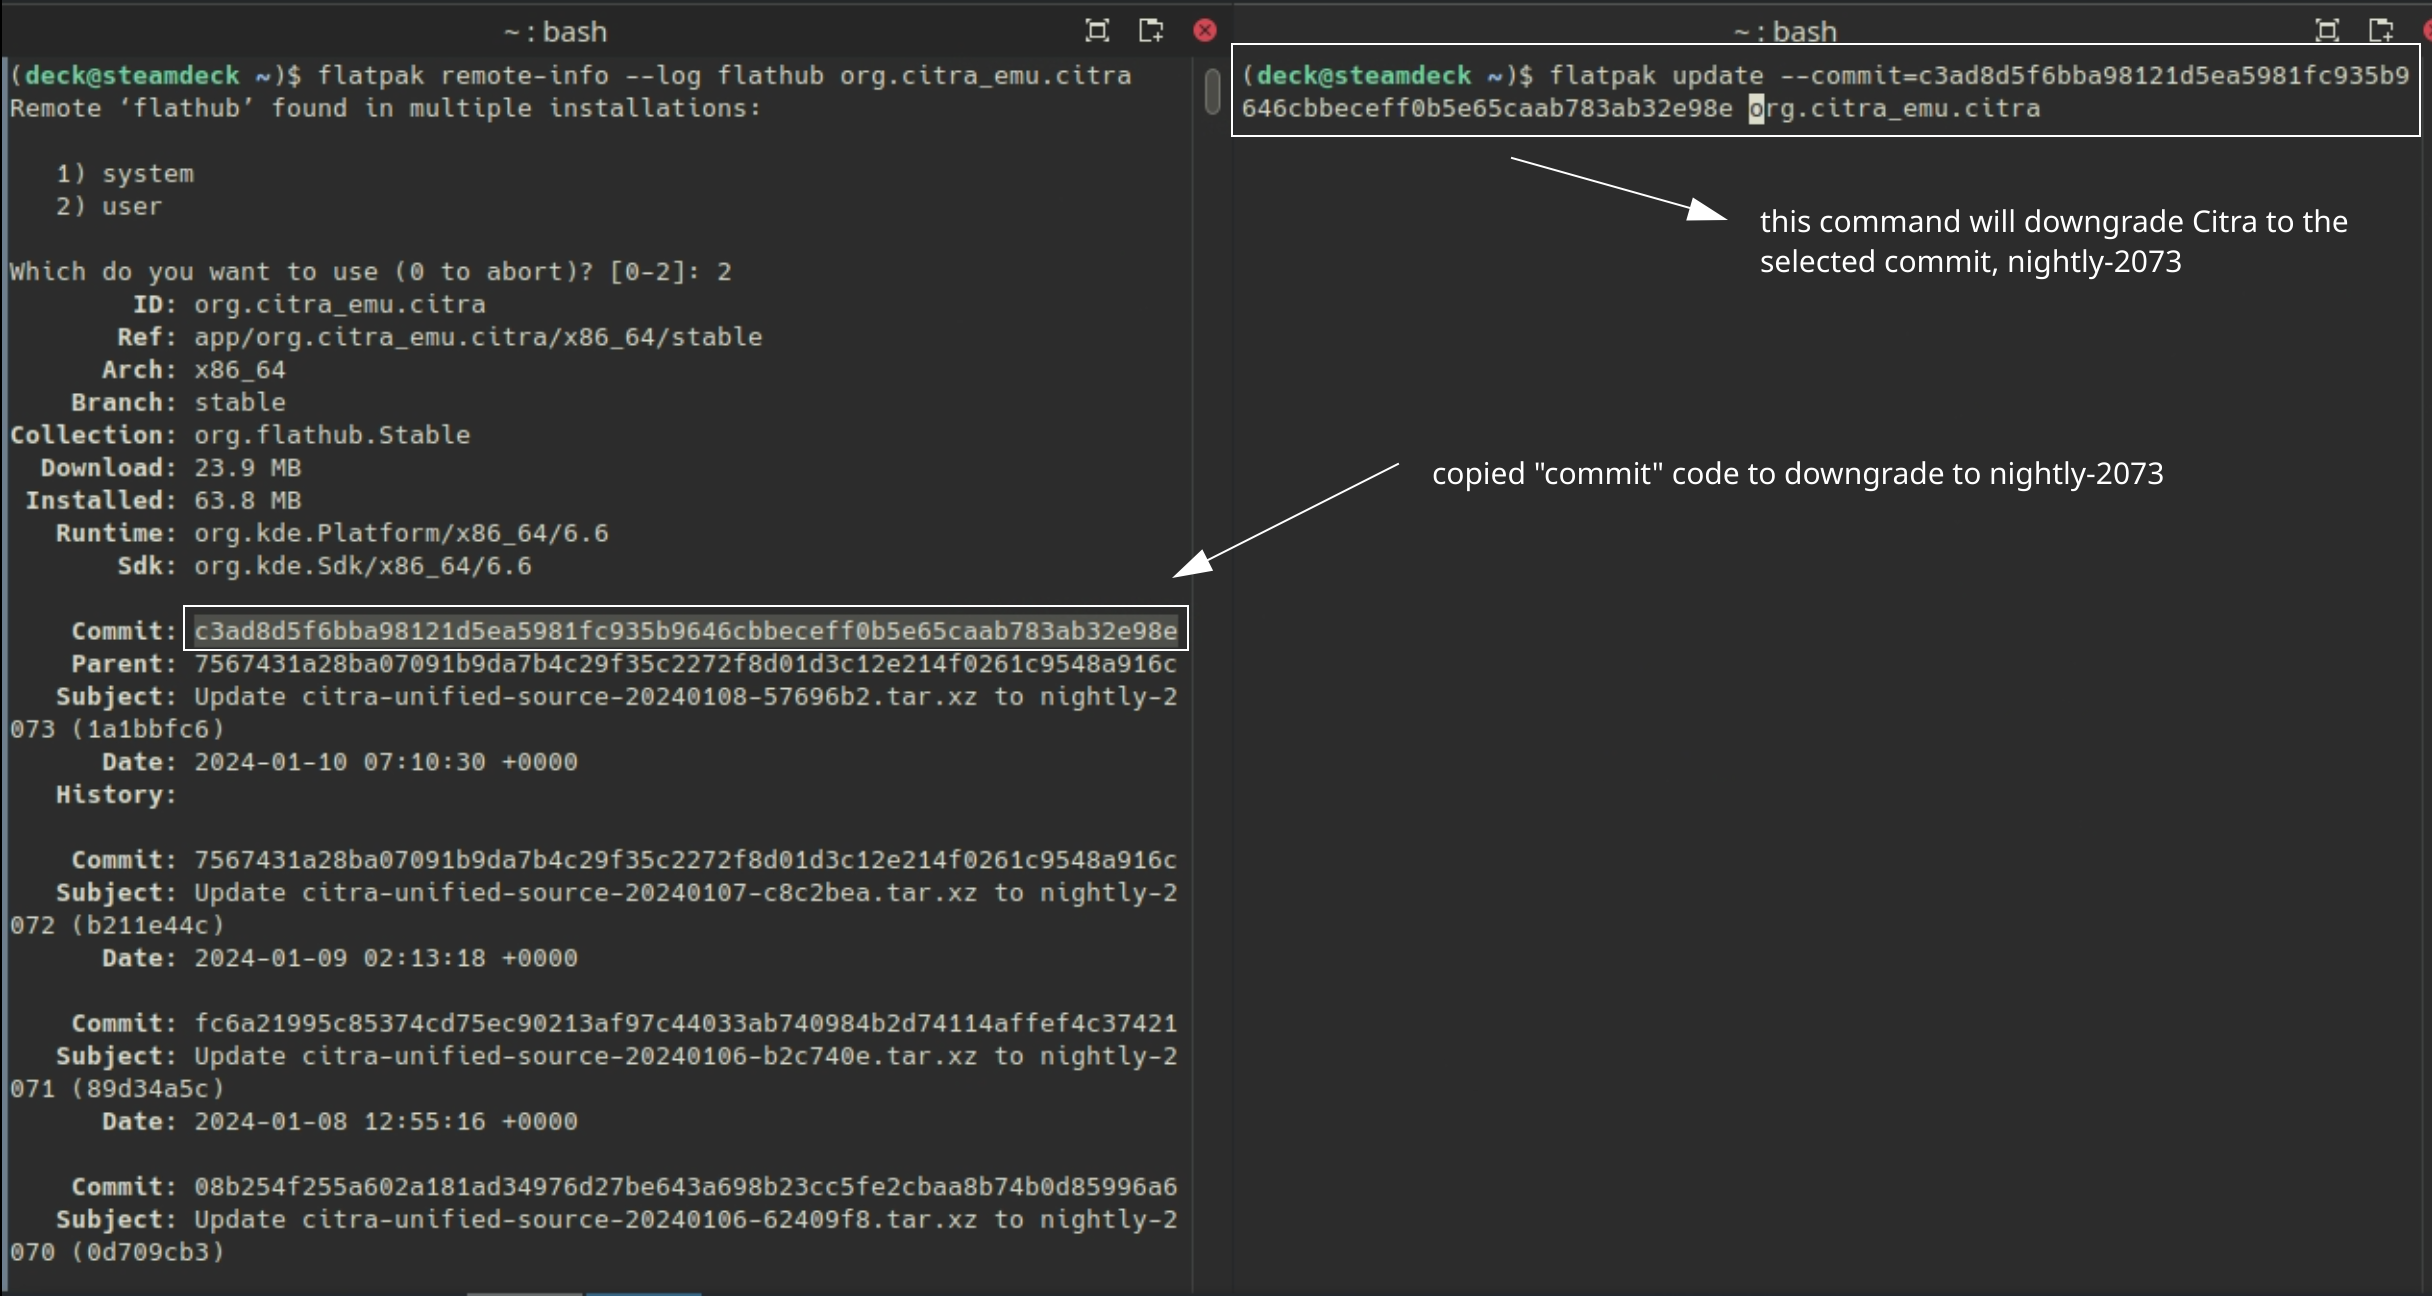
Konsole - To see a list of prior versions of the emulator, type:
flatpak remote-info --log flathub net.kuribo64.melonDS
- If Konsole prompts you to select
systemoruser, enter2to selectuser - Konsole will list a list of previous versions for the flatpak. The important line for each version is the
Commit:line. TheCommit:line will have a long accompanying alphanumeric string (the “commit” code). Copy the string for the version you want to downgrade to.- Using Citra as an example:
- Using Citra as an example:
- To downgrade to the version you want:
flatpak update --commit=put_commit_code_here net.kuribo64.melonDS- Replace
put_commit_code_herewith the actual code you located in Step 2.- Using Citra as an example:
- Using Citra as an example:
If the above steps did not work and you are getting an error message along the lines of Flatpak not installed, your Flatpak is likely installed at the system level instead. Select one of the below solutions:
Solution 1: Open the EmuDeck application, click the Manage Emulators page, select the emulator in question, and click Reinstall / Update.
Solution 2: Add sudo in front of the commands written in Step 2 and Step 5. In Step 2, write sudo flatpak remote-info --log flathub net.kuribo64.melonDS and in Step 5, write sudo flatpak update --commit=put_commit_code_here net.kuribo64.melonDS.
How to Configure Language Settings
In-Game
Some games may not have language options. For a full list of which games have language options, download the DS Database from GamesTDB, https://www.gametdb.com/DS/Downloads and open it in a text editor of your choice.
Before proceeding with the below section, you will need to place Nintendo DS BIOS in the Emulation/bios folder.
- In Desktop Mode, open melonDS
- At the top, click
Config - Click
Emu settings - Click
DS-Mode, checkUse external BIOS/firmware files - Close out of the
Emu settingswindow - Click
File, clickBoot firmware - Click the DS icon at the bottom of the screen
- Click the gear icon
- Click the globe icon
- Select your preferred language