DuckStation is a Sony PlayStation 1 emulator.
Website: https://www.duckstation.org/
GitHub: https://github.com/stenzek/duckstation
Compatibility List: https://docs.google.com/spreadsheets/d/e/2PACX-1vRE0jjiK_aldpICoy5kVQlpk2f81Vo6P4p9vfg4d7YoTOoDlH4PQHoXjTD2F7SdN8SSBLoEAItaIqQo/pubhtml
DuckStation Table of Contents
Getting Started with DuckStation
DuckStation is a fairly straight-forward emulator to set up. Place your ROMs in Emulation/roms/psx. Place your BIOS directly in Emulation/bios. Read the Configuration section to learn more about DuckStation and its folder locations.
To launch your ROMs in game mode, use Steam ROM Manager and use one of the following parsers to play your PlayStation 1 ROMs:
ES-DESony PlayStation - DuckStationEmulators
DuckStation Configuration
- Type of Emulator: Flatpak
- Config Location:
/home/deck/.var/app/org.duckstation.DuckStation - ROM Location:
Emulation/roms/psx - BIOS Location:
Emulation/bios- Files go directly in this folder. Do not make or use a
PSX,PS1, or any sort of folder here. DuckStation will not be able to find your bios files if they are in a folder. - Required BIOS (Example set, one per region - US, Europe, Japan):
scph5500.bin,scph5501.bin,scph5502.bin
- Files go directly in this folder. Do not make or use a
- Saves:
Emulation/saves/duckstation/saves - Save States:
Emulation/saves/duckstation/states
Info
~/.var is an invisible folder by default. In Dolphin (file manager), click the hamburger menu in the top right, click Show Hidden Files to see these folders.
Refer to https://en.wikipedia.org/wiki/PlayStation_models#Comparison_of_models, for a full list of PSX bios. System Models and PSX BIOS have matching names.
Works With
- Steam ROM Manager
- ES-DE
DuckStation Folder Locations
These file locations apply regardless of where you chose to install EmuDeck (to your internal SSD, to your SD Card, or elsewhere). Some emulator configuration files will be located on the internal SSD as listed below.
$HOME refers to your home folder. If you are on a Steam Deck, this folder will be named /home/deck (you will likely not see deck in the file path when navigating using the file manager).
Paths beginning with Emulation/.. correspond to your EmuDeck install location. If you installed on an SD Card, your path may be /run/media/mmcblk0p1/Emulation/roms/... If you installed on your internal SSD, your path may be /home/deck/Emulation/roms/..
Note: Folders with a . (.var, .local, .config, etc.) at the beginning are hidden by default. In Dolphin (file manager), click the hamburger menu in the top right, click Show Hidden Files to see these folders.
$HOME/.var/app/org.duckstation.DuckStation
org.duckstation.DuckStation/
├── cache
├── config
│   ├── duckstation
│   │   ├── cache
│   │   ├── cheats
│   │   ├── covers
│   │   ├── dump
│   │   ├── gamesettings
│   │   ├── inputprofiles
│   │   ├── playtime.dat
│   │   ├── screenshots
│   │   ├── settings.ini
│   │   ├── settings.ini.bak
│   │   ├── shaders
│   │   └── textures
│   ├── kdeglobals
│   ├── pulse
│   │   └── cookie
│   ├── QtProject.conf
│   └── user-dirs.dirs
└── data
    └── duckstation
        ├── settings.ini
        └── settings.ini.bak
How to Update DuckStation
How to Update DuckStation
- Through the
Update your Emulators & Toolssection on theManage Emulatorspage in theEmuDeckapplication - Run
Update Emulators & ToolsinEmuDeck - Launch the emulator from
Steamafter adding it via theEmulatorsparser inSteam ROM Manager
How to Launch DuckStation in Desktop Mode
How to Launch DuckStation in Desktop Mode
- Launch
DuckStationfrom the Applications Launcher (Steam Deck icon in the bottom left of the taskbar) - Launch the script from
Emulation/tools/launchers,duckstation.sh - Launch the emulator from
Steamafter adding it to Steam via theEmulatorsparser inSteam ROM Manager
DuckStation File Formats
- .cue and .bin
- .chd
- .ecm
- .iso
- .m3u
- .mds
- .pbp
DuckStation and RetroArch PlayStation 1 Cores BIOS Information
- ROM files for RetroArch's PlayStation 1 cores are shared with DuckStation in
Emulation/roms/psx. - BIOS files for RetroArch's PlayStation 1 cores are shared with DuckStation in
Emulation/bios(no subfolders). - As long as you name your BIOS files in this format:
scph####.bin(####'s are a placeholder), RetroArch's PlayStation 1 cores will work alongside DuckStation. - Be sure to rename your BIOS files and note the lowercase
scph, lowercasebinin the example above.
DuckStation and RetroArch PlayStation 1 Cores ES-DE Information
By default, ES-DE uses Retroarch's Beetle HW PSX core. Both Retroarch's Beetle HW PSX core and DuckStation will work if you have set everything up properly.
To switch between the two in ES-DE, you can use the Alternative Emulators feature. See ES-DE: How to Select a Different Emulator for a System for instructions.
DuckStation Hotkeys
| Hotkey | DuckStation |
|---|---|
| Quick Menu | Select + R3 |
| Toggle Full Screen | Start + L3 |
| Save State | Select + R1 |
| Load State | Select + L1 |
| Next Save State Slot | Start + R1 |
| Previous Save State Slot | Start + L1 |
| Fast Forward | Select + R2 |
| Rewind | Select + L2 |
| Pause/Play | Select + A |
| Screenshot | Select + B |
| Swap Disc | Select + X |
| Reset Emulation | Select + L3 |
| Stop Emulation | Select + Start |
| Toggle PGXP | Select + Y |
| Increase Resolution Scale | Start + DPad Up |
| Decrease Resolution Scale | Start + DPad Down |
| Toggle Software Rendering | Start + DPad Left |
| Toggle Widescreen | Start + DPad Right |
DuckStation Tips and Tricks
How to Optimize Storage (Compression Tool)
To optimize storage, you can use the EmuDeck Compressor within EmuDeck.
The EmuDeck Compressor will compress your Playstation 1 ROMs from ISO or BIN/CUE to CHD. If your ROM is a BIN/CUE, the Compression Tool will only compress it if you have both the BIN and the CUE files for a ROM. If the ROM is in a zip file or is missing a paired BIN or CUE file, the Compression Tool will not detect the ROM.
After running the EmuDeck Compression Tool, re-run Steam ROM Manager to update your ROM shortcuts to the newly compressed ROM.
Visual Reference: 
How to Manage Multiple Discs
M3U files can be used to manage multiple discs for DuckStation. When the time comes to switch discs, use the Left Trackpad Touch Menu Hotkey. A full list of hotkeys and a tutorial on how to use Steam Input profiles can be found here: #hotkeys.
Learn how to create an M3U File
How to Use Cheats
- While in game, either: press
StartandR2or use the left Trackpad and select theQuick Menuicon- Steam Input profiles for PlayStation 1 ROMs and ES-DE are enabled by default. However, if you do not see the Trackpad menu, see How to Select a Steam Input Profile
- Click
Cheat List - Select which cheats you would like to use
How to Configure Multiplayer
Multiplayer for DuckStation is configured out of the box, no additional configuration is needed.
You may need to re-arrange the controller order in Game Mode for your controllers to function as expected. See How to Re-Arrange the Controller Order for more information.
How to Roll Back DuckStation to an Older Version
If you do not have access to a keyboard for the below section, use L2 to right click and R2 to left click. Alternatively, remote into your Steam Deck using one of the methods found in the FAQ, How do I remotely control my Steam Deck?.
- In Desktop Mode, open
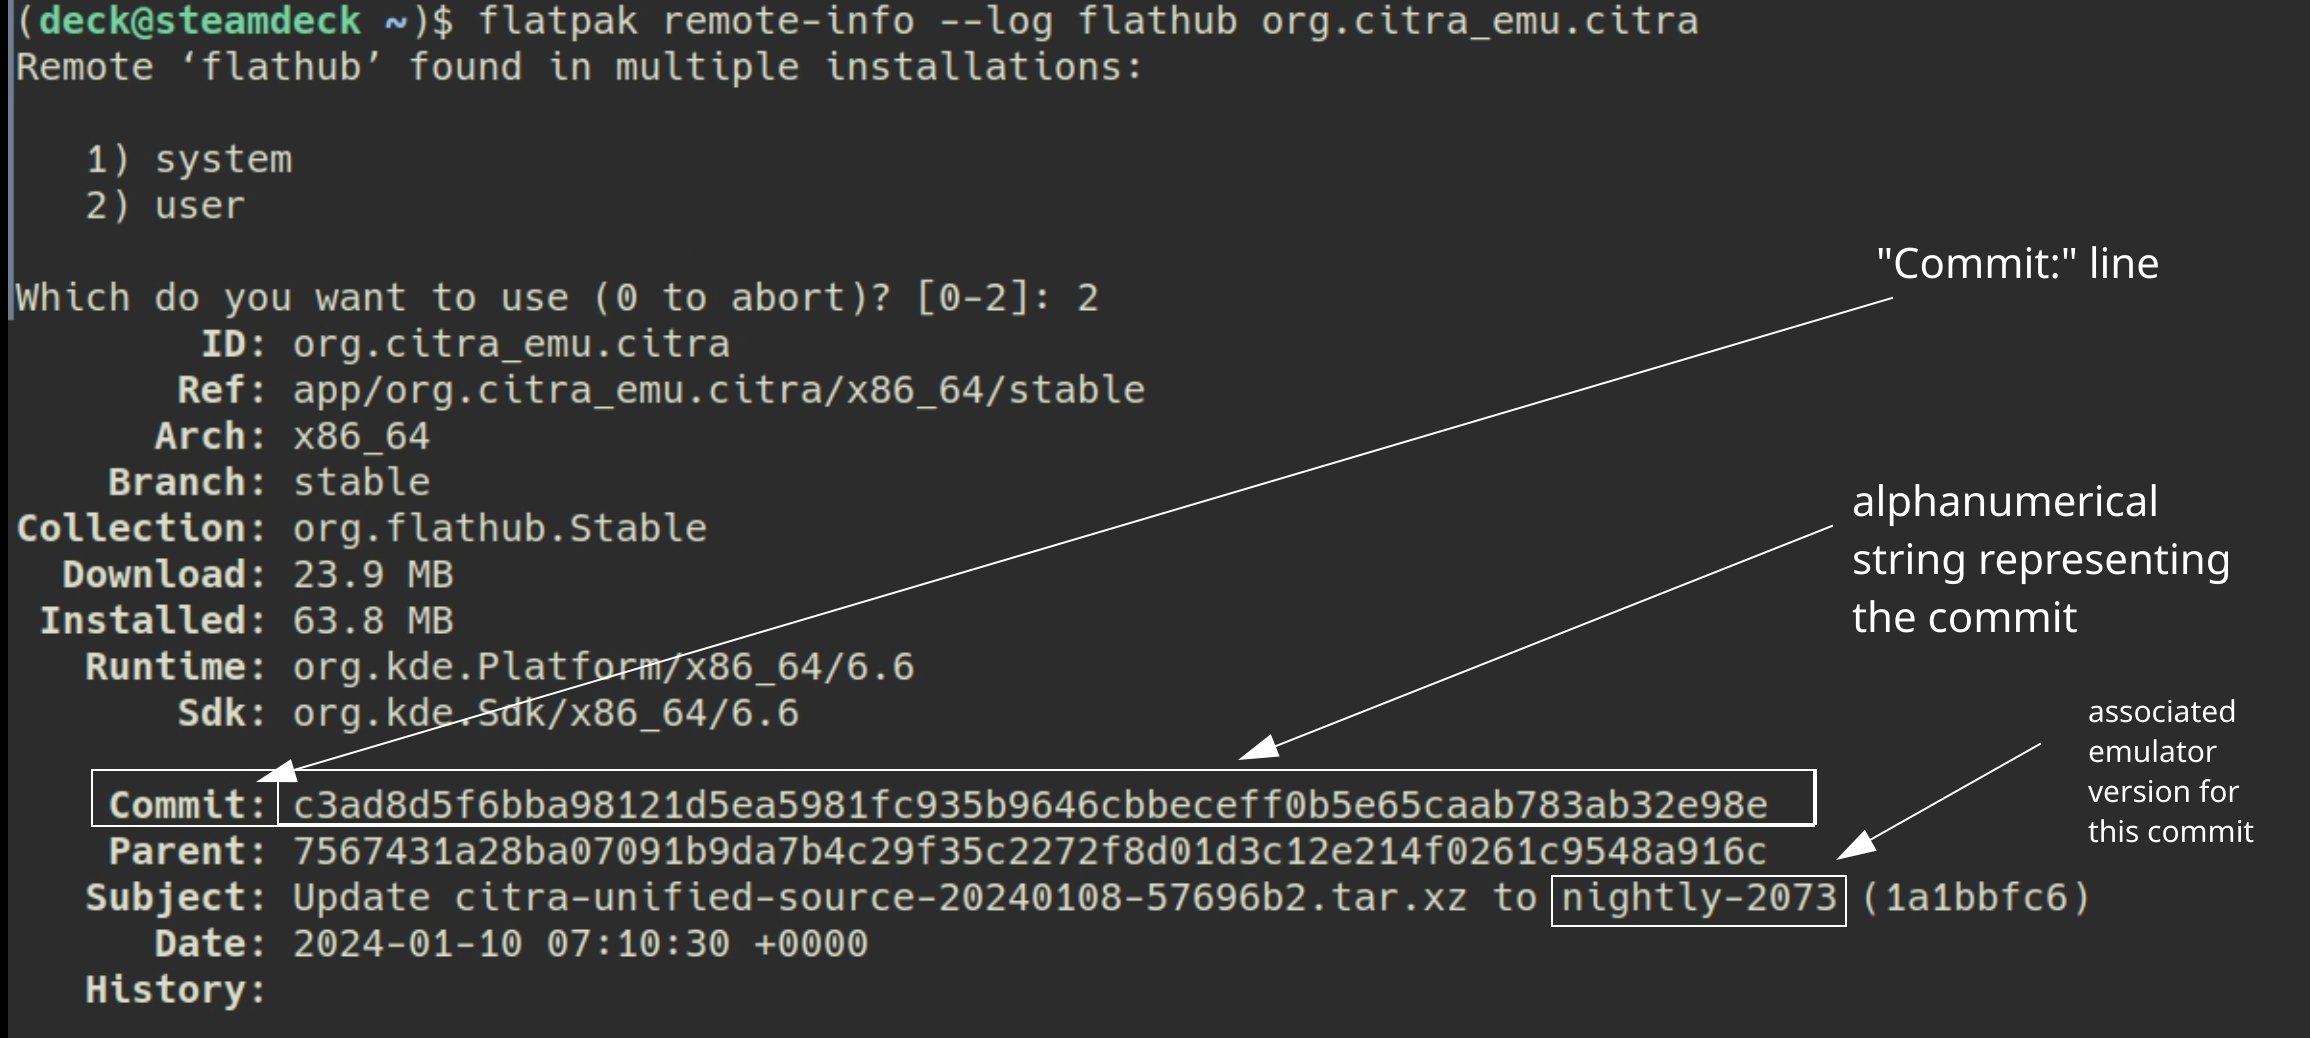
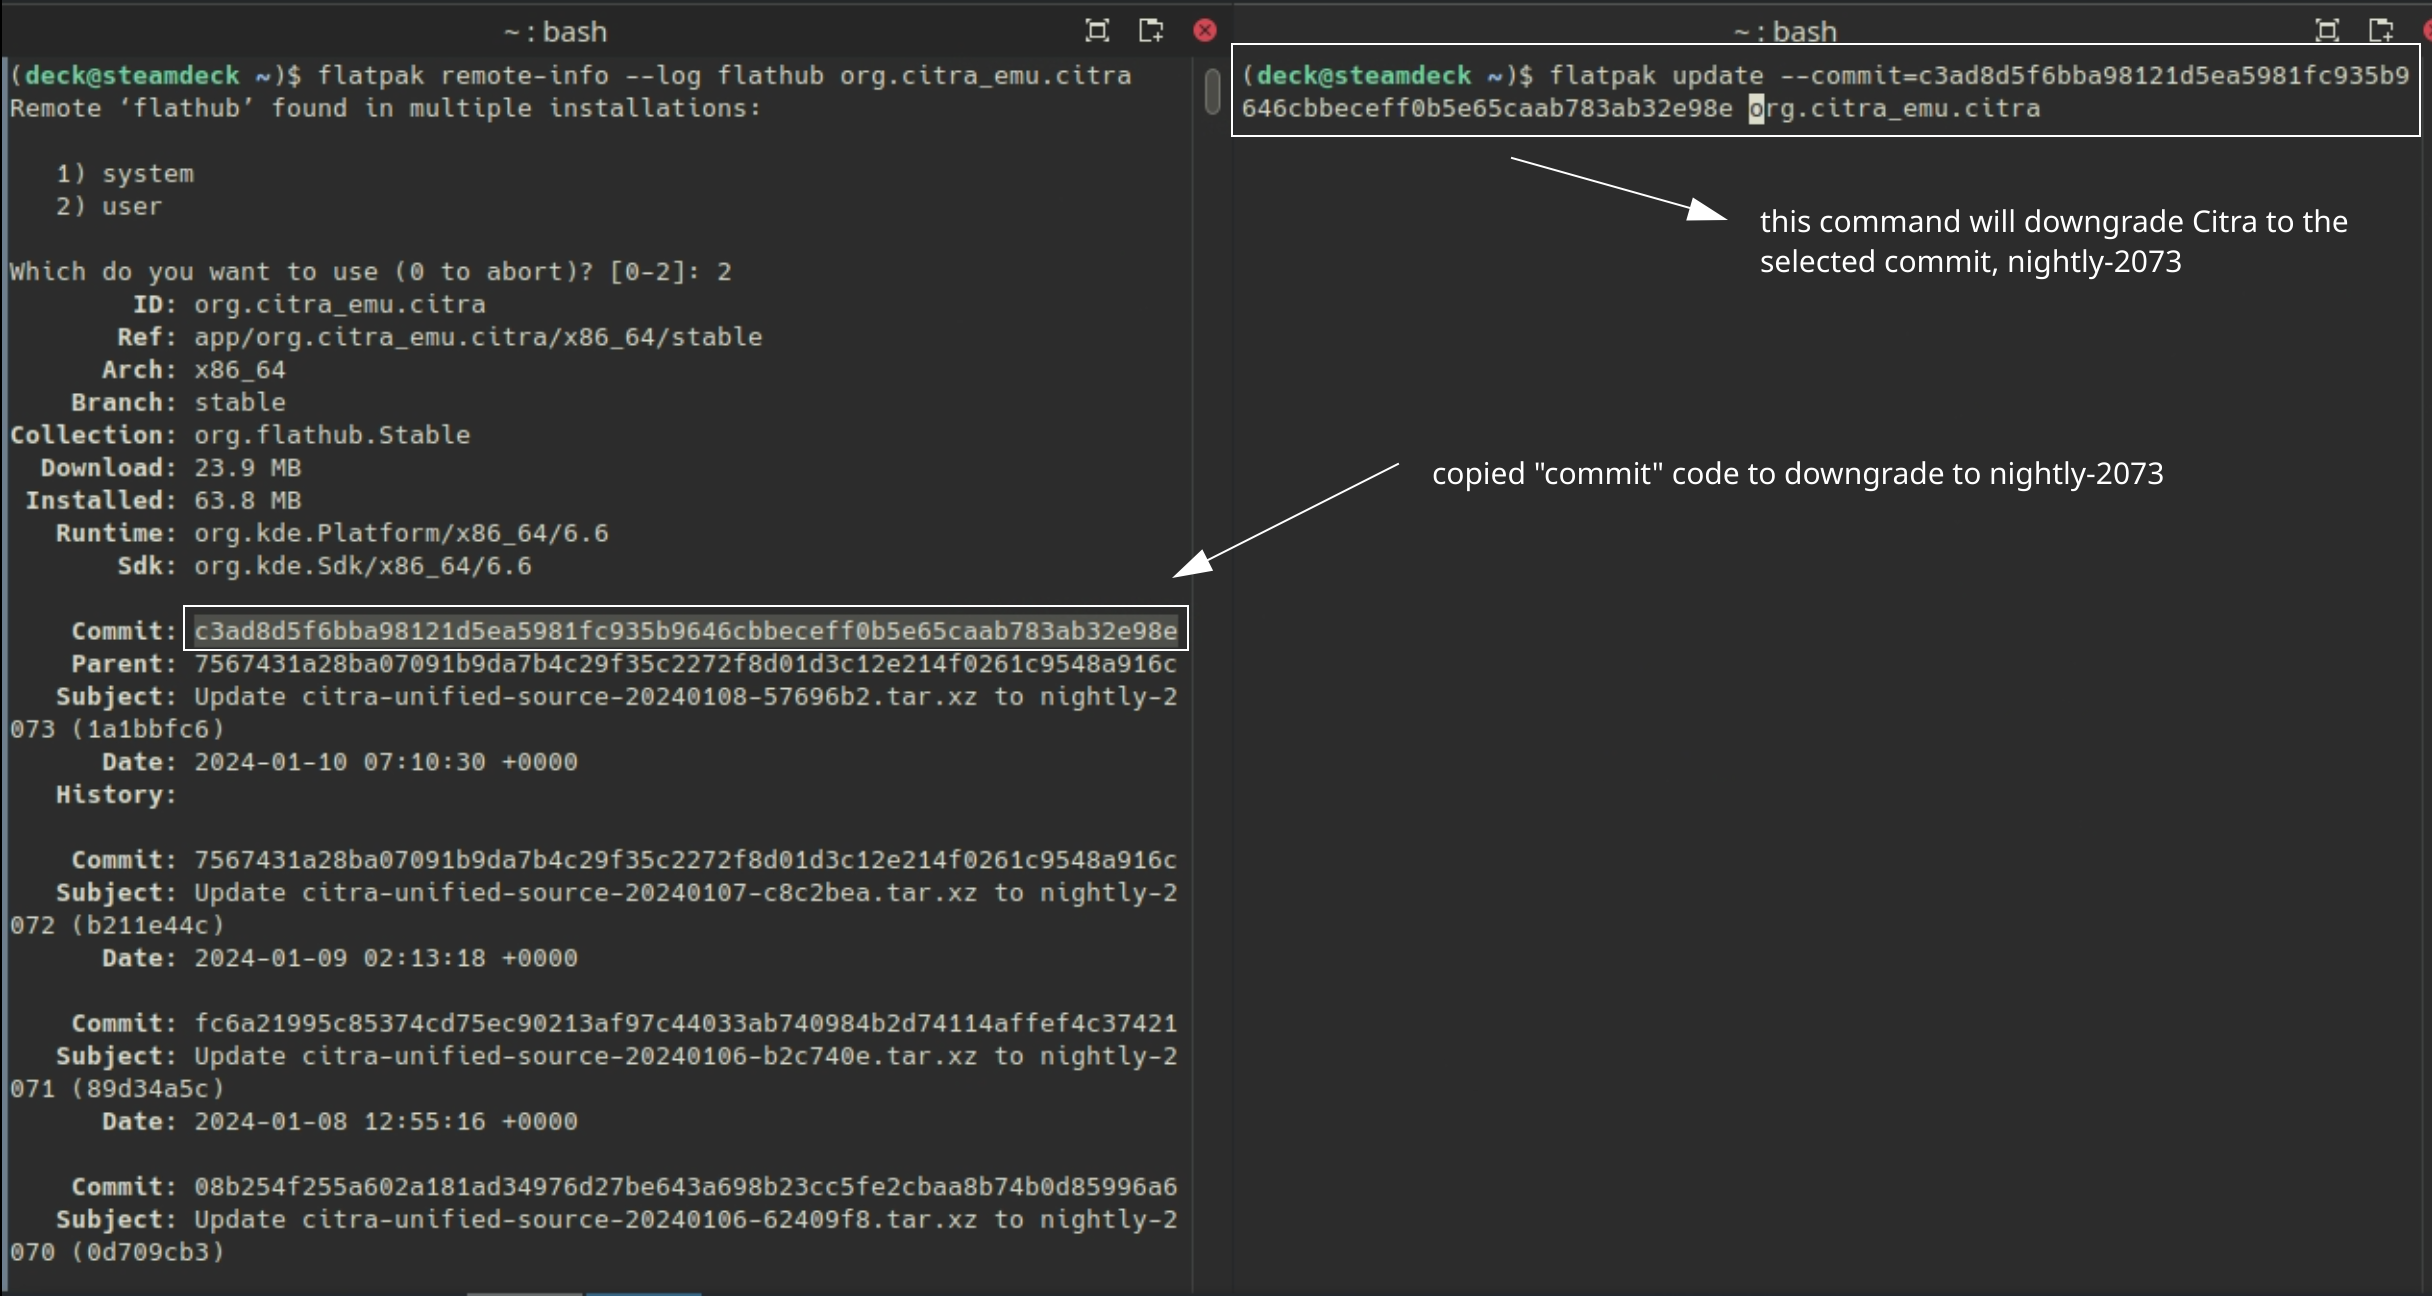
Konsole - To see a list of prior versions of the emulator, type:
flatpak remote-info --log flathub org.duckstation.DuckStation
- If Konsole prompts you to select
systemoruser, enter2to selectuser - Konsole will list a list of previous versions for the flatpak. The important line for each version is the
Commit:line. TheCommit:line will have a long accompanying alphanumeric string (the “commit” code). Copy the string for the version you want to downgrade to.- Using Citra as an example:
- Using Citra as an example:
- To downgrade to the version you want:
flatpak update --commit=put_commit code_here org.duckstation.DuckStation- Replace
put_commit code_herewith the actual code you located in Step 2.- Using Citra as an example:
- Using Citra as an example:
If the above steps did not work and you are getting an error message along the lines of Flatpak not installed, your Flatpak is likely installed at the system level instead. Select one of the below solutions:
Solution 1: Open the EmuDeck application, click the Manage Emulators page, select the emulator in question, and click Reinstall / Update.
Solution 2: Add sudo in front of the commands written in Step 2 and Step 5. In Step 2, write sudo flatpak remote-info --log flathub org.duckstation.DuckStation and in Step 5, write sudo flatpak update --commit=put_commit_code_here org.duckstation.DuckStation.
How to Configure Language Settings
UI
- In Desktop Mode, open DuckStation
- At the top, click
Settings - Click
Language - Select your preferred language in the drop-down menu
In-Game
Some games may not have language options. For a full list of which games have language options, click one of the below links.
- PAL: https://psxdatacenter.com/pal_list.html
- United States: https://psxdatacenter.com/ntsc-u_list.html
- Japan: https://psxdatacenter.com/ntsc-j_list.html
- Launch a game that supports your preferred language
- Depending on the game:
- Select your preferred language on the initial launch of the game
- In the main menu of the game, open the Options menu and select your preferred language