PPSSPP is a Playstation Portable emulator.
Website: https://www.ppsspp.org/
GitHub: https://github.com/hrydgard/ppsspp
Compatibility List: https://forums.ppsspp.org/showthread.php?tid=1473
This page is for PPSSPP, a standalone emulator. This page is not for the PPSSPP RetroArch core. For more information on RetroArch and the PPSSPP RetroArch core, visit the RetroArch Page.
PPSSPP Table of Contents
-
- How to Install Custom Textures
- How to Install Custom Shaders
- How to Use Cheats
- How to Roll Back PPSSPP to an Older Version
- How to Use the Original PSP Font
- How to Configure Language Settings
- How to Use ROM Hacks
- How to Apply the Universal Slowdown Removal Patch for Final Fantasy Tactics: The War of the Lions
Getting Started with PPSSPP
PPSSPP is a fairly straight-forward emulator to set up. Place your ROMs in Emulation/roms/psp. No additional setup is required. Read the Configuration section to learn more about PPSSPP and its folder locations.
To launch your ROMs in game mode, use Steam ROM Manager and use one of the following parsers to play your PSP ROMs:
EmulationStation-DESony PlayStation Portable - PPSSPPEmulators
PPSSPP Configuration
- Type of Emulator: Flatpak
- Config Location:
/home/deck/.var/app/org.ppsspp.PPSSPP - Memstick Location:
/home/deck/.var/app/org.ppsspp.PPSSPP/config/ppsspp/PSP- The
PSPfolder at the end of this path is equivalent to theMemstickfolder
- The
- ROM Location:
Emulation/roms/psp - PPSSPP does not require any additional BIOS or firmware
- Saves:
- Symlink:
Emulation/saves/ppsspp/saves - Target:
/home/deck/.var/app/org.ppsspp.PPSSPP/config/ppsspp/PSP/SAVEDATA
- Symlink:
- Save States:
- Symlink:
Emulation/saves/ppsspp/states/ - Target:
/home/deck/.var/app/org.ppsspp.PPSSPP/config/ppsspp/PSP/PPSSPP_STATE
- Symlink:
Note: ~/.var is an invisible folder by default. In Dolphin (file manager), click the hamburger menu in the top right, click "view hidden files" to see these folders.
Works With
- Steam ROM Manager
- EmulationStation-DE
PPSSPP Folder Locations
These file locations apply regardless of where you chose to install EmuDeck (to your internal SSD, to your SD Card, or elsewhere). Some emulator configuration files will be located on the internal SSD as listed below.
$HOME refers to your home folder. If you are on a Steam Deck, this folder will be named /home/deck (you will likely not see deck in the file path when navigating using the file manager).
Paths beginning with Emulation/.. correspond to your EmuDeck install location. If you installed on an SD Card, your path may be /run/media/mmcblk0p1/Emulation/roms/... If you installed on your internal SSD, your path may be /home/deck/Emulation/roms/..
Note: Folders with a . (.var, .local, .config, etc.) at the beginning are hidden by default. In Dolphin (file manager), click the hamburger menu in the top right, click Show Hidden Files to see these folders.
$HOME/.var/app/org.ppsspp.PPSSPP
org.ppsspp.PPSSPP
├── cache
├── config
│   ├── ppsspp
│   │   └── PSP
│   │       ├── CHEATS
│   │       ├── GAME
│   │       ├── PPSSPP_STATE
│   │       ├── SAVEDATA
│   │       ├── SYSTEM
│   │       │   ├── controls.ini
│   │       │   └── ppsspp.ini
│   │       └── TEXTURES
│   ├── pulse
│   │   └── cookie
│   └── user-dirs.dirs
└── data
How to Update PPSSPP
How to Update PPSSPP
- Update through
Discover(Shopping bag icon) - Through the
Update your Emulators & Toolssection on theManage Emulatorspage in theEmuDeckapplication
How to Launch PPSSPP in Desktop Mode
How to Launch PPSSPP in Desktop Mode
- Launch
PPSSPPfrom the Applications Launcher (Steam Deck icon in the bottom left of the taskbar) - Launch the script from
Emulation/tools/launchers,ppsspp.sh - Launch the emulator from
Steamafter adding it via theEmulatorsparser inSteam ROM Manager
PPSSPP File Formats
- .elf
- .cso
- .iso
- .pbp
- .prx
How to Manage DLC
Preface
The PPSSPP Flatpak (installed by EmuDeck) does not use a named Memstick folder to manage its contents. Instead, the Memstick folder is located here: /home/deck/.var/app/org.ppsspp.PPSSPP/config/ppsspp/PSP.
How to Manage DLC
- In the Memstick folder, create two folders:
GAMEandSAVEDATA
- If these folders exist, skip this step
- Determine which type of DLC you have
- DLC Type 1:
GAMEDLC- If the DLC folder includes
PARAM.PBP, you haveGAMEDLC
- If the DLC folder includes
- DLC Type 2:
SAVEDATADLC- If the DLC folder includes
PARAM.SFO, you haveSAVEDATADLC
- If the DLC folder includes
- DLC Type 1:
- Place the DLC into the matching folder
GAMEDLC are placed here:/home/deck/.var/app/org.ppsspp.PPSSPP/config/ppsspp/PSP/GAME- Example (for the game
Persona 2: Innocent Sin):
SAVEDATADLC are placed here:/home/deck/.var/app/org.ppsspp.PPSSPP/config/ppsspp/PSP/SAVEDATA- Example (for the game
EXIT):
- Example (for the game
IMPORTANT
- Some DLC content cannot be accessed until finishing the game
- Some DLC content can be accessed in different or hidden parts of the settings menu
Rock Band Unplugged DLC and Music Management
Rock Band Unplugged requires additional configuration to enable DLC and additional music tracks properly.
How to Configure the Memstick Folder for Rock Band Unplugged
- In
/home/deck/.var/app/org.ppsspp.PPSSPP/config/ppsspp, create aGAMEfolder if one does not exist already - Place DLC folder (to enable additional music tracks) in
/home/deck/.var/app/org.ppsspp.PPSSPP/config/ppsspp/GAME - In
/home/deck/.var/app/org.ppsspp.PPSSPP/config/ppsspp, create asepluginsfolder if one does not exist already - In
/home/deck/.var/app/org.ppsspp.PPSSPP/config/ppsspp/seplugins, right click anywhere, clickCreate New,Text File, and name itgame.txt - Open
game.txtwith a text editor of your choice and writems0:/seplugins/nploader.prx 1, save and exit out ofgame.txt - Open https://github.com/codestation/nploader in a browser of your choice, click the green
Codebutton, clickDownload ZIP, extract to a folder of your choice - Move the contents of the extracted folder in Step 6 directly to
/home/deck/.var/app/org.ppsspp.PPSSPP/config/ppsspp/seplugins - Rock Band Unplugged DLC and additional music are now enabled
PPSSPP Hotkeys
| Hotkey | PPSSPP |
|---|---|
| Quick Menu | Steam + DPad Left |
| Quick Menu | Select + R3 |
| Save State | Select + R1 |
| Load State | Select + L1 |
| Next Save State Slot | Start + R1 |
| Previous Save State Slot | Start + L1 |
| Fast Forward | Select + R2 |
| Rewind | Select + R2 |
| Screenshot | Select + B |
| Stop Emulation | Start + Select |
PPSSPP Tips and Tricks
How to Install Custom Textures
Preface
The PPSSPP Flatpak (installed by EmuDeck) does not use a named Memstick folder to manage its contents. Instead, the Memstick folder is located here: /home/deck/.var/app/org.ppsspp.PPSSPP/config/ppsspp/PSP.
Texture Pack Sources
This list is not exhaustive
How to Install Custom Textures
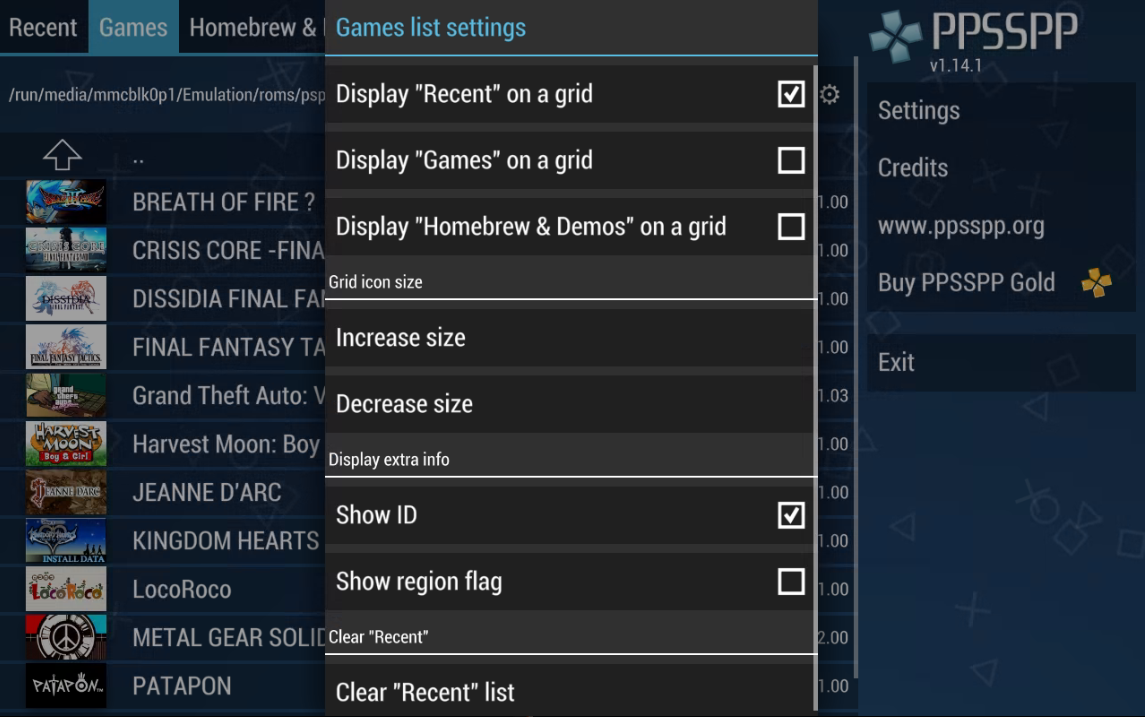
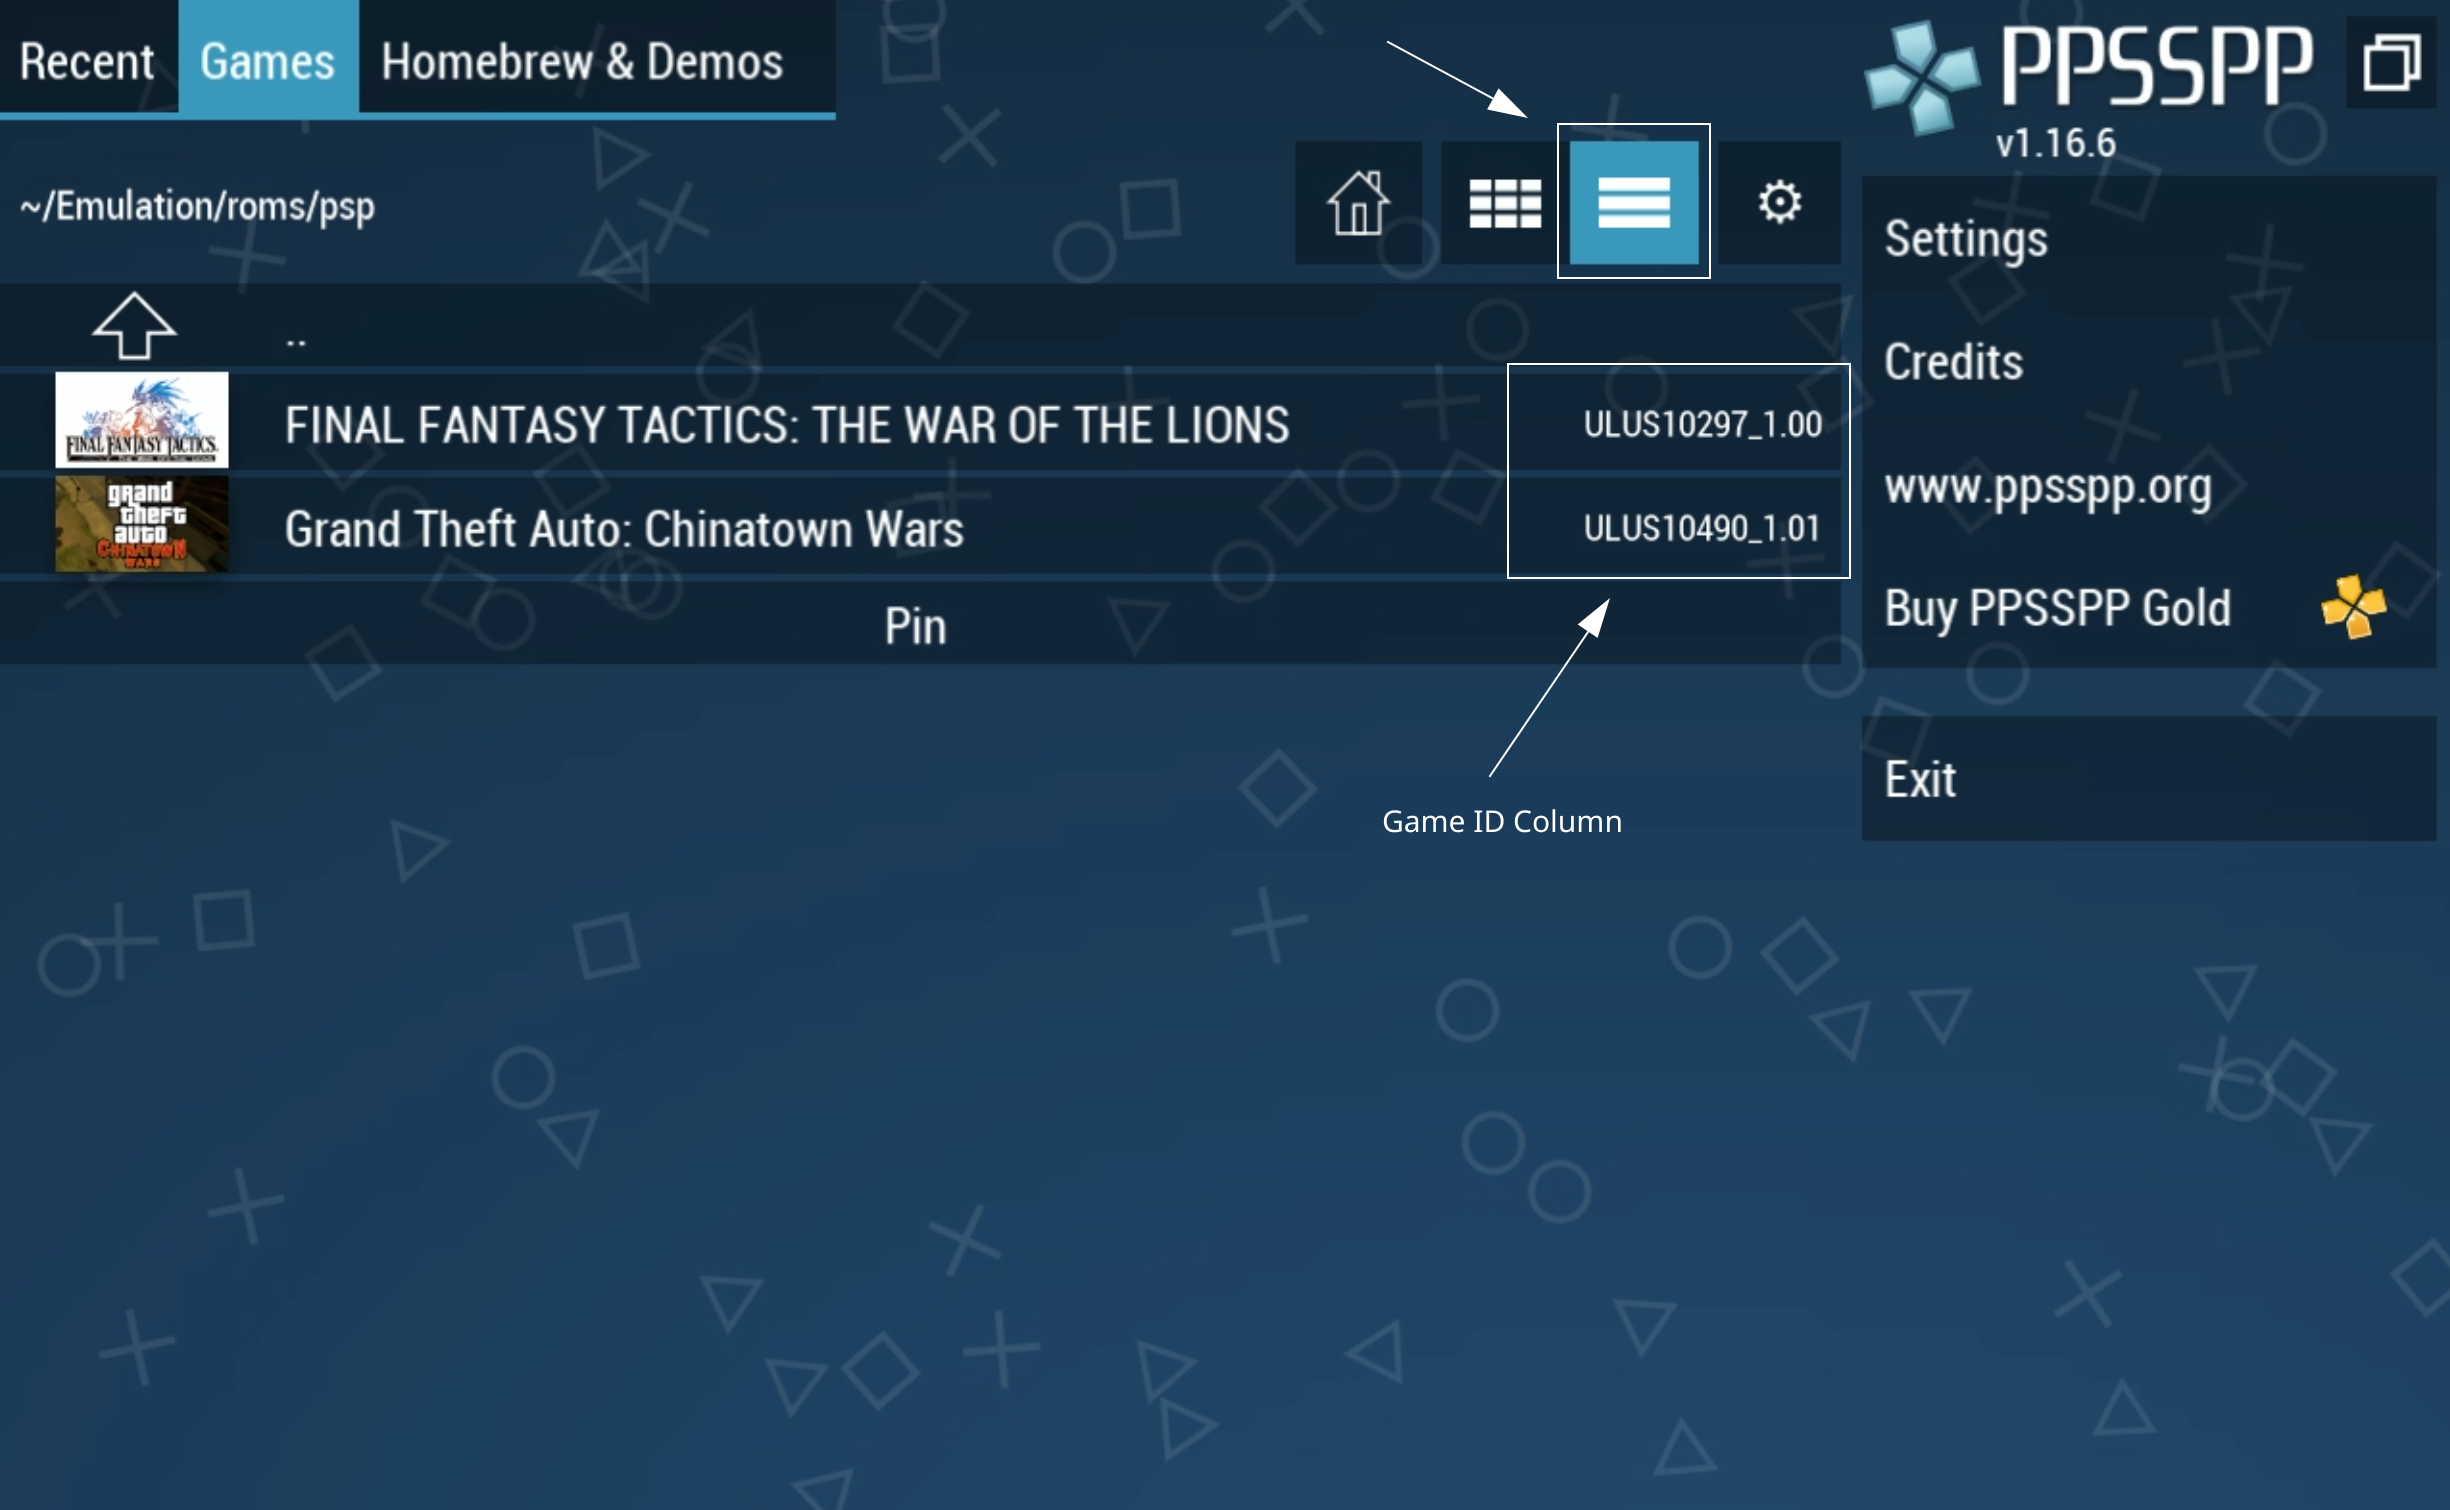
- In Desktop Mode, open PPSSPP, click the
Gamestab, click theGearicon, ToggleShow ID. - Click the "three lines" icon to the left of the
Gearicon. Note down the Game ID to the right of your game - In PPSSPP, click the
Settingsbutton, click theToolstab,, clickDeveloper tools, checkReplace textures- This option is enabled by default but if texture packs are not loading properly, you may want to double check that this setting is enabled
- In Desktop Mode, open the
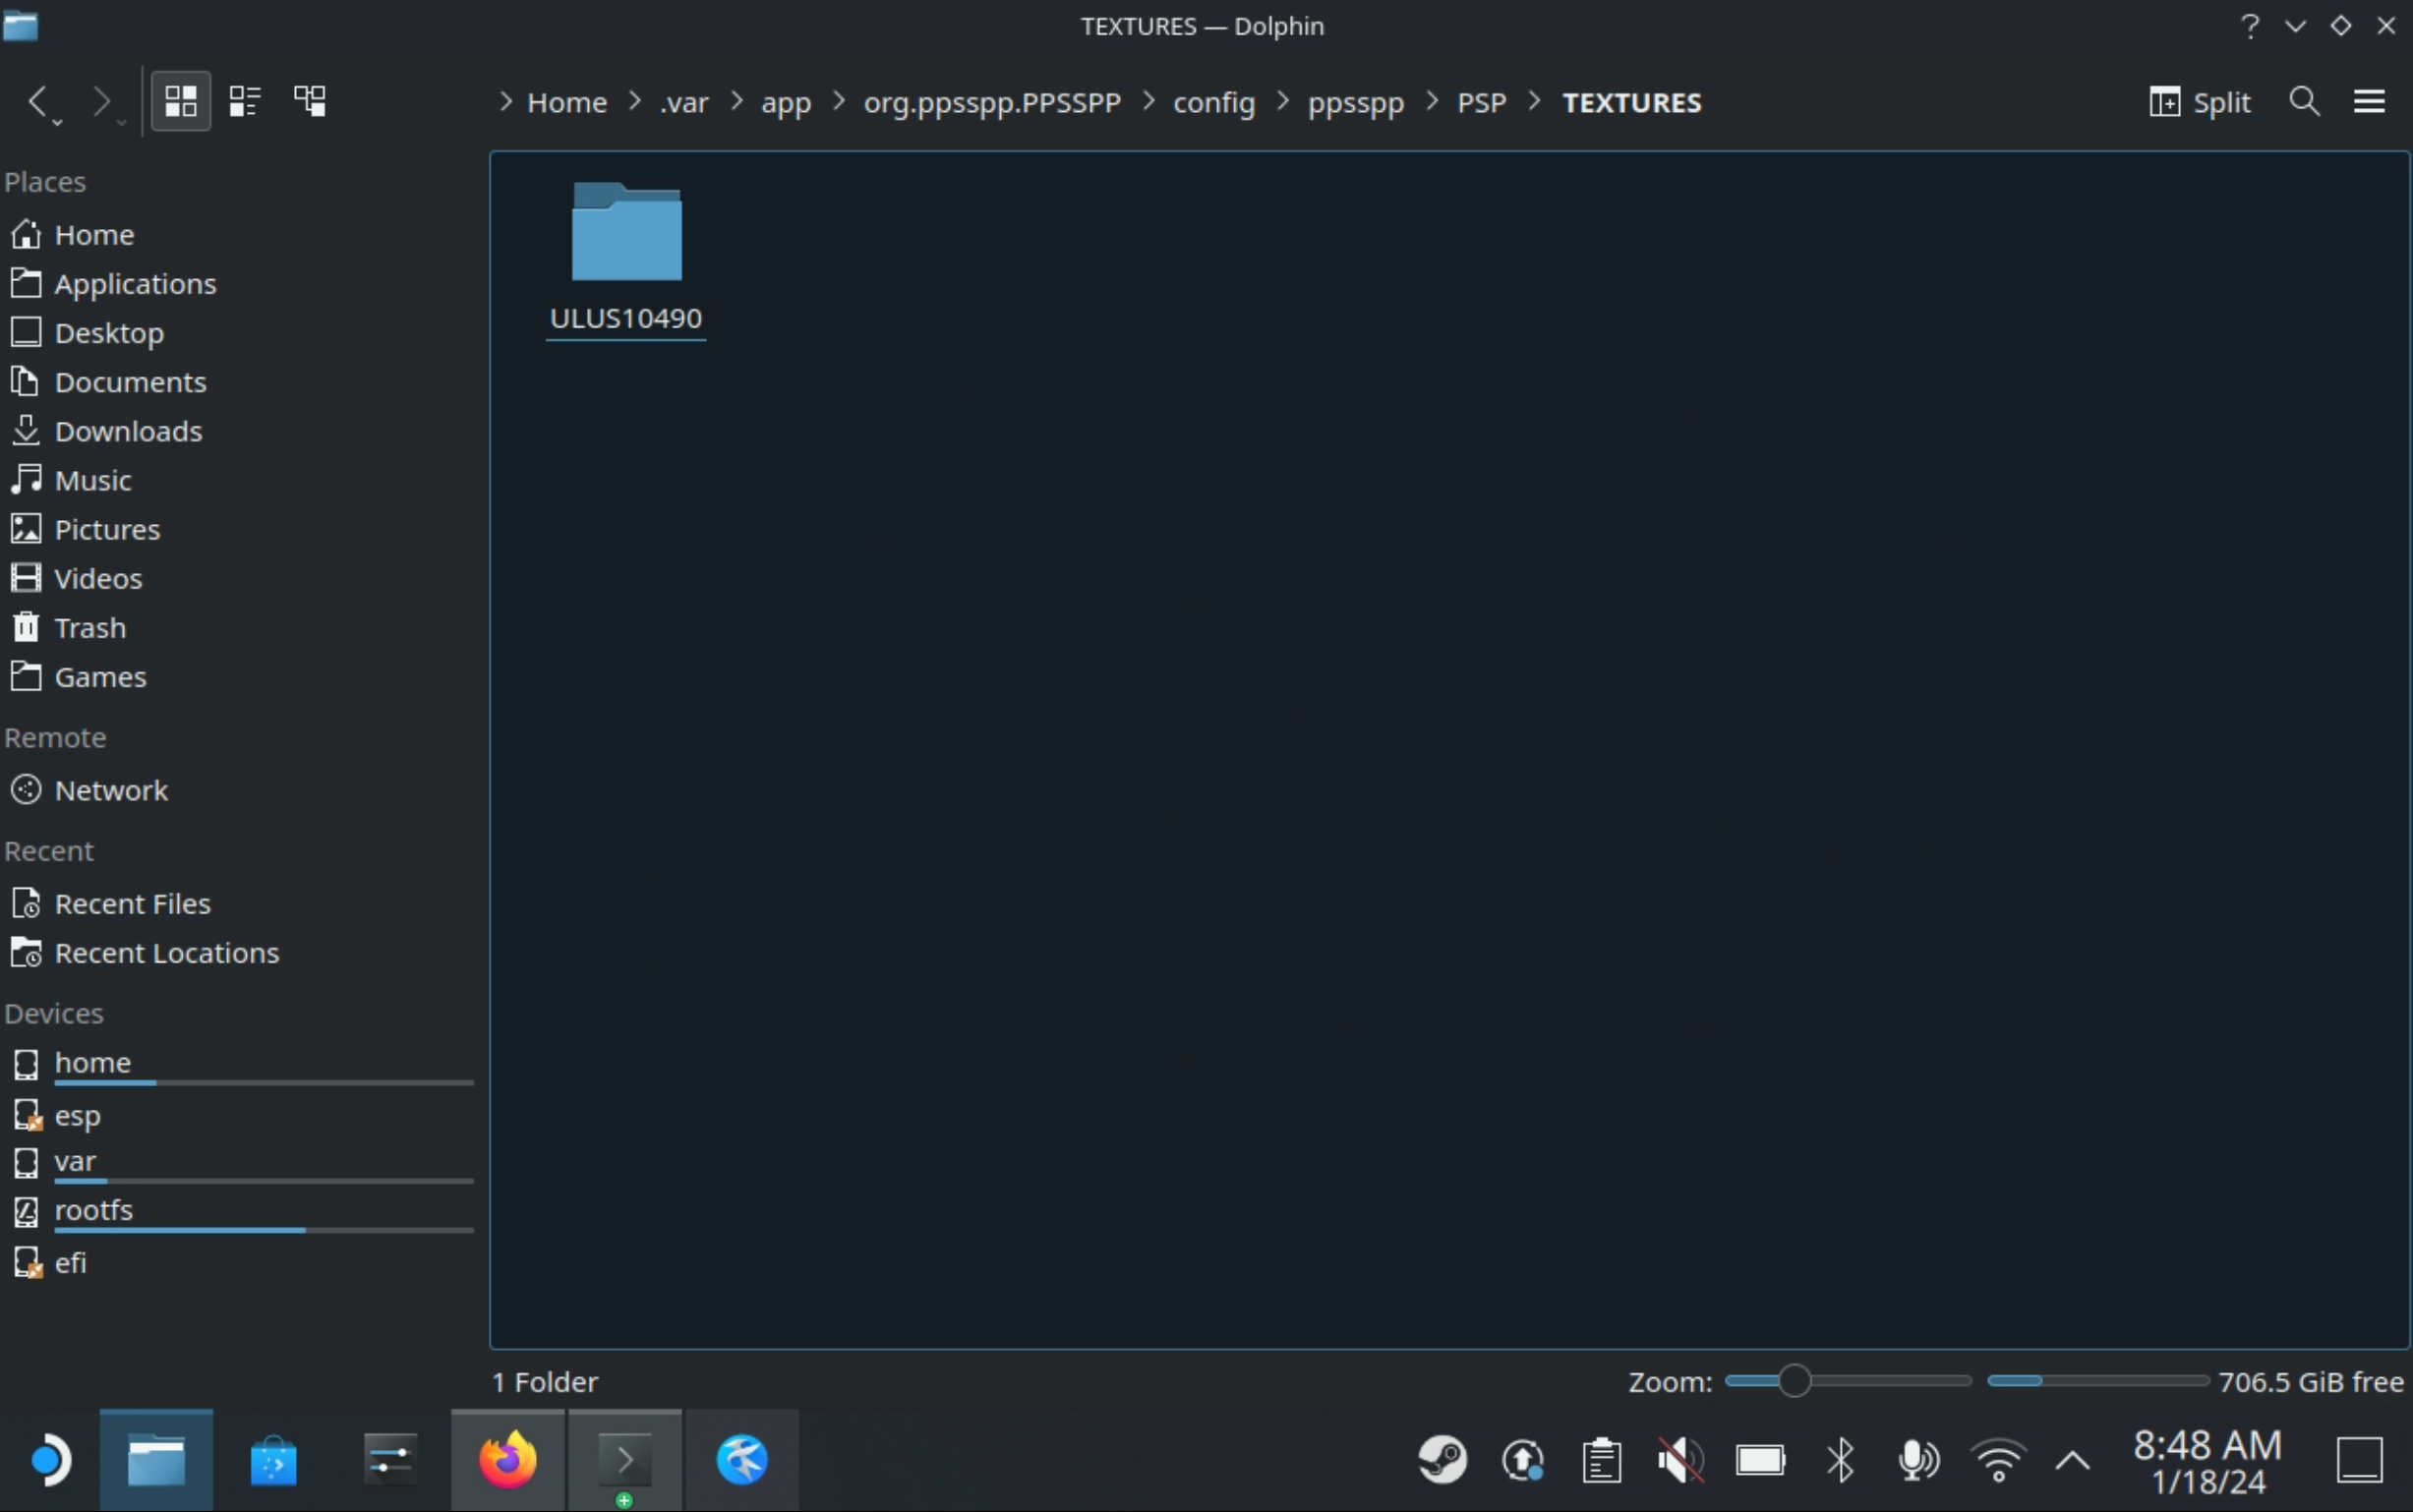
/home/deck/.var/app/org.ppsspp.PPSSPP/config/ppsspp/PSP/folder~/.varis a hidden folder by default, click theHamburgermenu in the top right of the file explorer, clickShow Hidden Files
- If one does not exist already, create a
TEXTURESfolder here, casing matters - In the
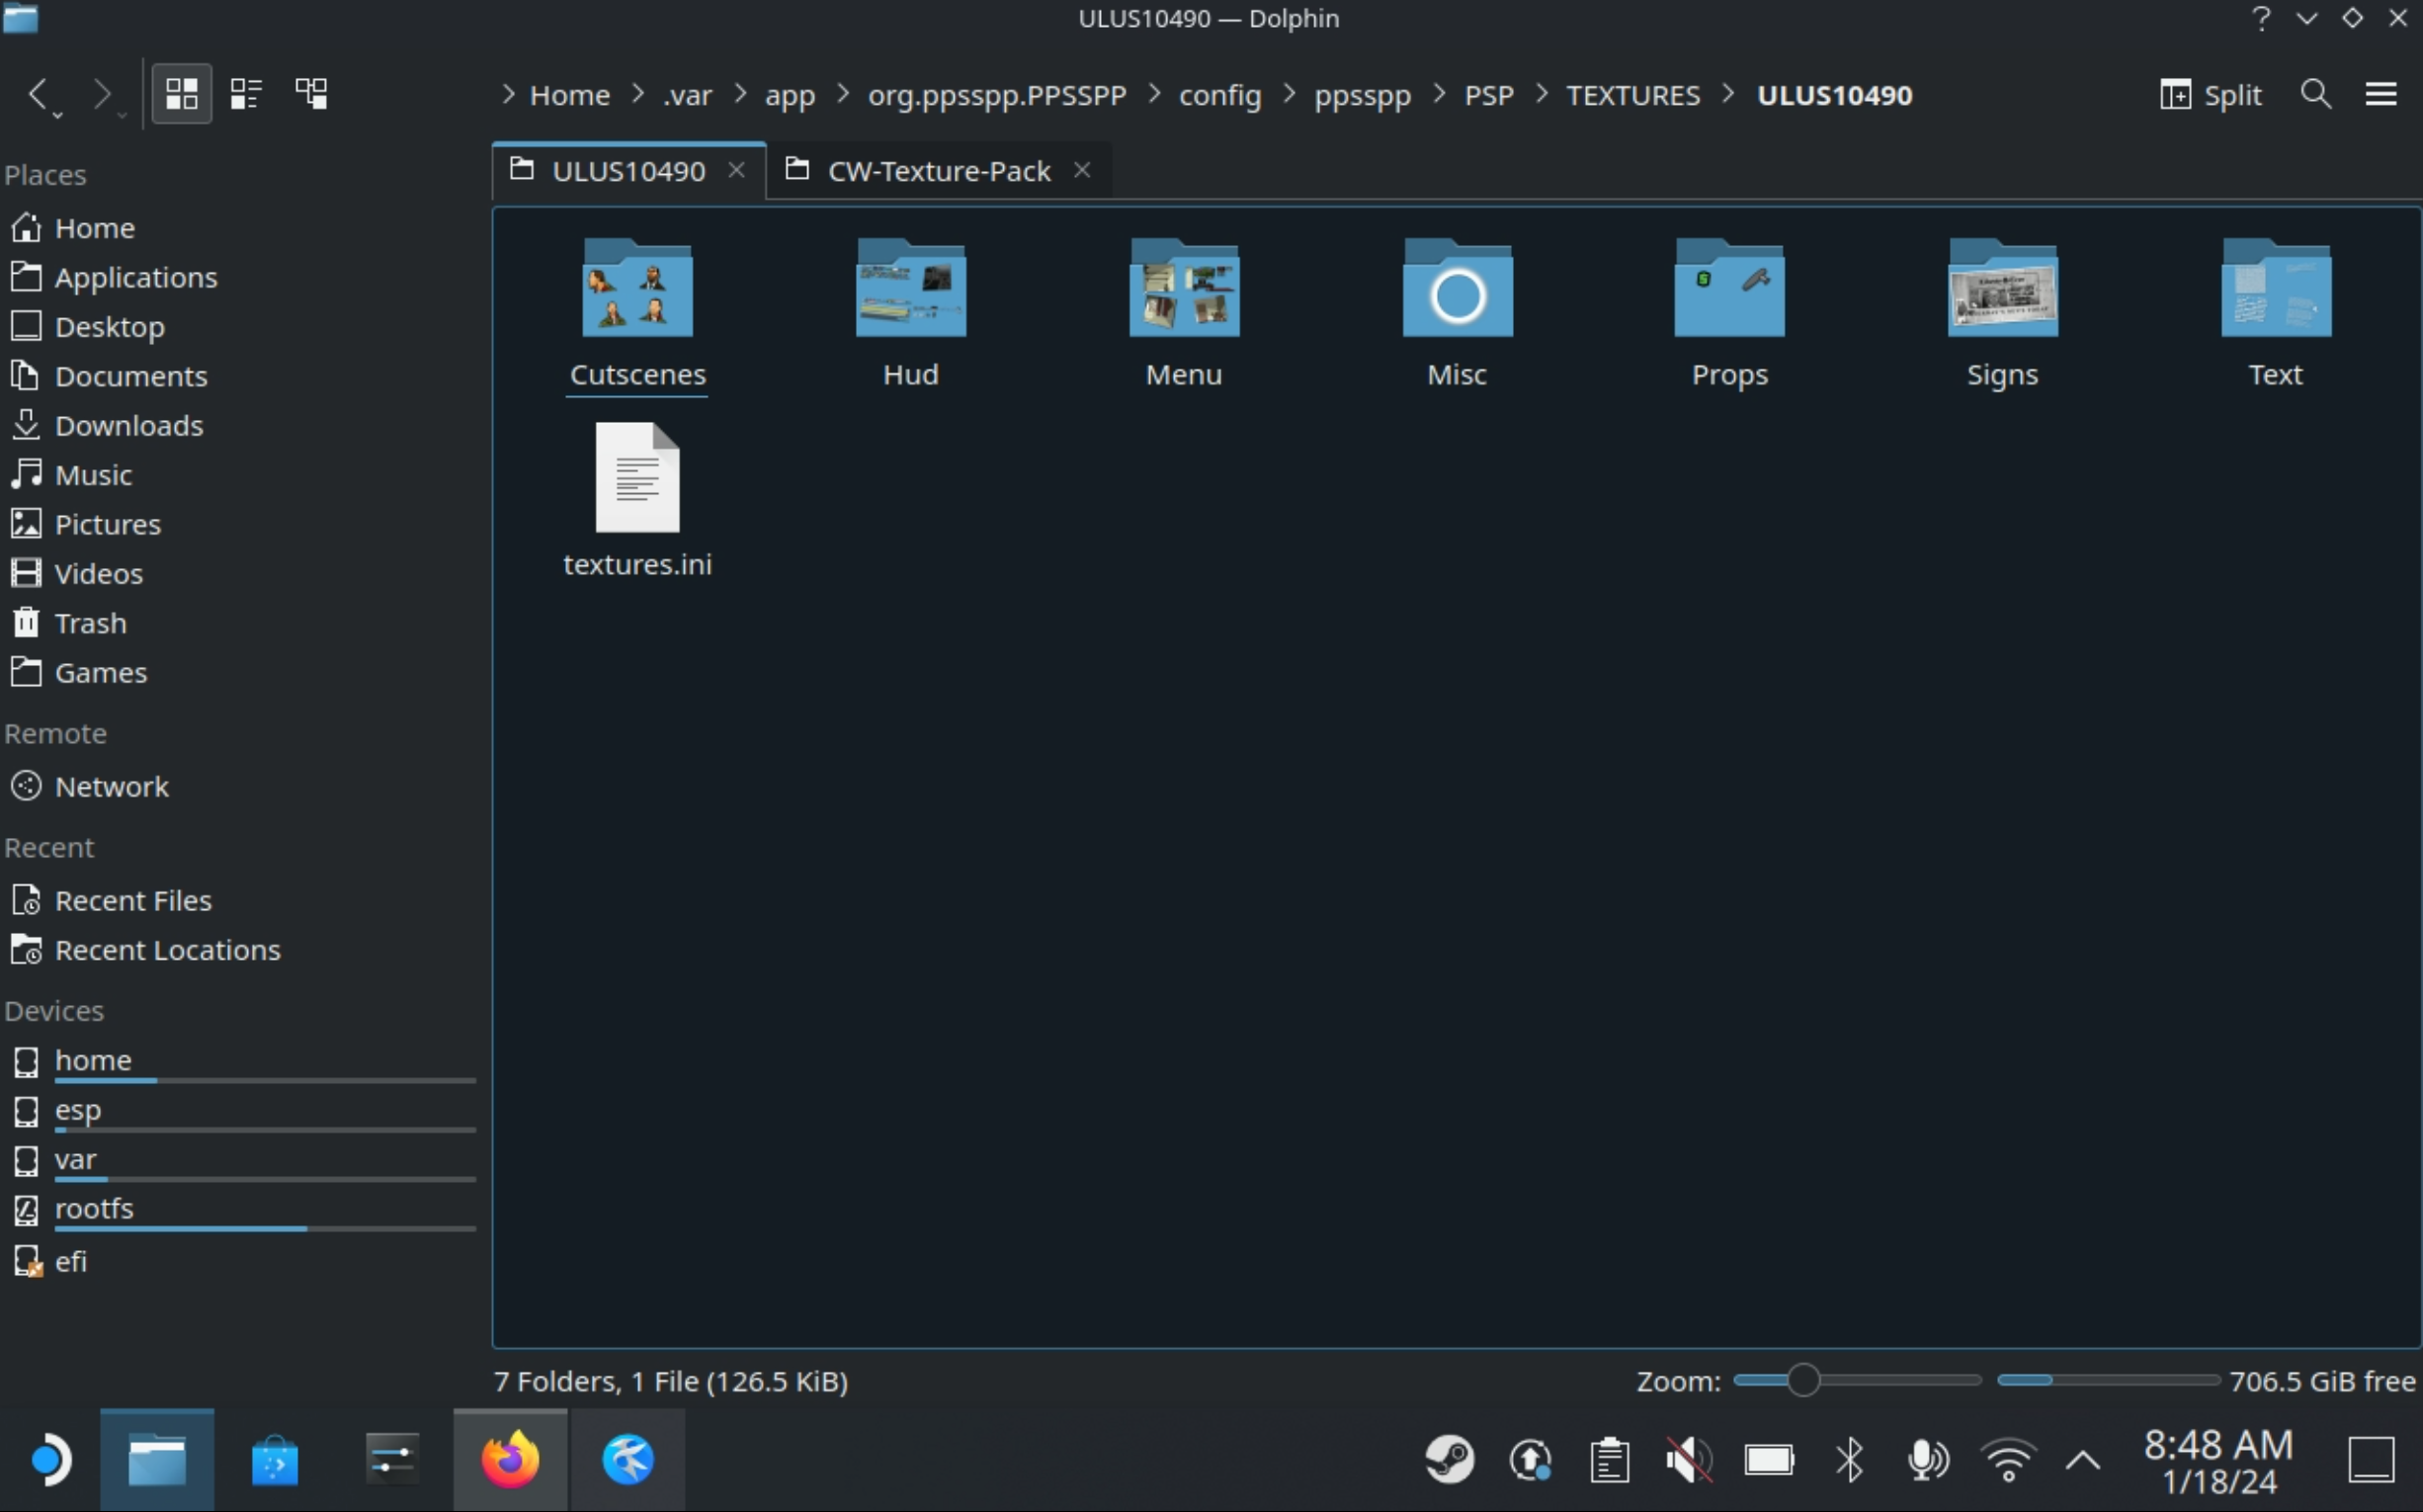
TEXTURESfolder, create a folder matching your Game ID- Using Grand Theft Auto: Chinatown Wars as an example:
- Using Grand Theft Auto: Chinatown Wars as an example:
- Place your texture folders and files directly in the newly created GAME ID folder
- Using Grand Theft Auto: Chinatown Wars as an example:
- Using Grand Theft Auto: Chinatown Wars as an example:
- Your texture pack will now be installed
How to Install Custom Shaders
Preface
The PPSSPP Flatpak (installed by EmuDeck) does not use a named Memstick folder to manage its contents. Instead, the Memstick folder is located here: /home/deck/.var/app/org.ppsspp.PPSSPP/config/ppsspp/PSP.
Shader Sources
This list is not exhaustive
- https://forums.ppsspp.org/showthread.php?tid=6594
- https://forums.ppsspp.org/showthread.php?tid=6594&pid=55390#pid55390
- https://forums.ppsspp.org/showthread.php?tid=6594&pid=124441#pid124441
- https://forums.ppsspp.org/showthread.php?tid=6594&pid=54841#pid54841
- https://forums.ppsspp.org/showthread.php?tid=6594&pid=112250#pid112250
- https://buildbot.libretro.com/assets/system/
- Download
PPSSPP.zipand use the contents of theshadersfolder in the extractedPPSSPP.zipfolder
- Download
How to Install Custom Shaders
- In Desktop Mode, open the
/home/deck/.var/app/org.ppsspp.PPSSPP/config/ppsspp/PSP/folder- Directories with a
.in front of their name, like/home/deck/.steam, are hidden by default. In Dolphin (a file manager), click the hamburger menu in the top right and toggle onShow Hidden Files. The setting may vary depending on which file manager you are using.
- Directories with a
- If one does not exist already, create a
shadersfolder here, casing mattersShadersorSHADERSwill not work, it must be namedshaders
- In the
shadersfolder, place your custom shader files - To enable the new custom shaders, open PPSSPP, click
Settings, click theGraphicstab on the left, clickDisplay layout & effects, click the+button underPostprocessing shadersand select your preferred custom shader
How to Create Custom Shader INI Files
Typically, the shader packs linked above will include a master INI file which will contain a set of good defaults that expand the repository of shaders you can use in PPSSPP. However, you can create custom INI files to mix and match shaders. This section will cover how to do that.
- Right click anywhere in the
shadersfolder, clickCreate New > Text File - Name the newly created text file matching your shader file or something descriptive (For example
CRT-Bloom.ini) - Right click the newly created text file, click
Open with Kateor a text editor of your choice -
Use the following format:
[SHADERNAME] Name=SHADERNAME Fragment=SHADER.FSH Vertex=VERTEX.FSH -
For example:
[CRT-Bloom] Name=CRT-Bloom Fragment=crt.fsh Vertex=aa2obl.vsh -
Your custom shader will now be created. To enable it, open PPSSPP, click
Settings, click theGraphicstab on the left, clickDisplay layout & effects, click the+button underPostprocessing shadersand select your newly created custom shader
How to Use Cheats
Preface
The PPSSPP Flatpak (installed by EmuDeck) does not use a named Memstick folder to manage its contents. Instead, the Memstick folder is located here: /home/deck/.var/app/org.ppsspp.PPSSPP/config/ppsspp/PSP.
Cheat Sources
This list is not exhaustive
- https://forums.ppsspp.org/showthread.php?tid=11961
- https://forums.ppsspp.org/showthread.php?tid=22800
How to Use a cheats.db File
- In Desktop Mode, open
/home/deck/.var/app/org.ppsspp.PPSSPP/config/ppsspp/PSP/~/.varis an invisible folder by default, click theHamburgermenu in the top right of the file explorer, clickShow Hidden Files
- Create a
Cheatsfolder here, casing matters- If one exists, skip this step
- Place a
cheat.dbfile in this folder - Open PPSSPP, click
Settings, selectSystem, scroll down and checkEnable cheats - In Game Mode, open a game and either press the
Escape Keyhotkey:Steam+DPad Leftor use thePPSSPP Steam Input Profileto open the Quick Menu - Select
Import from cheat.db, and check the cheat(s) you would like to enable - Return to game and your cheat(s) should now be enabled


How to use Cheat Codes
- In Desktop Mode, open
/home/deck/.var/app/org.ppsspp.PPSSPP/config/ppsspp/PSP/~/.varis an invisible folder by default, click theHamburgermenu in the top right of the file explorer, clickShow Hidden Files
- Create a
Cheatsfolder here, casing matters- If one exists, skip this step
- Locate your Game ID
- To find your Game ID, open PPSSPP, click the
Gamestab, click theGearicon, ToggleShow ID 
- Note down the Game ID to the right of your game
- To find your Game ID, open PPSSPP, click the
- In the
Cheatsfolder, create a file matching your Game ID with an.inifile extension- Skip this step if an
.inifile already exists matching your Game ID - Example (Using Grand Theft Auto: Liberty City Stories -
ULUS10160.ini):
- Skip this step if an
- Open the
.inifile and add your cheat to the bottom of the file- Example (Using a 60 FPS cheat for Grand Theft Auto: Liberty City Stories):

- Example (Using a 60 FPS cheat for Grand Theft Auto: Liberty City Stories):
- Save and close out of the
.inifile - In Game Mode, open a game and either press the
Escape Keyhotkey:Steam+DPad Leftor use thePPSSPP Steam Input Profileto open the Quick Menu - Select
Cheatson the right - scroll down the list of cheats and enable the cheat(s) you added to the
.inifile - Return to game and your cheat(s) should now be enabled

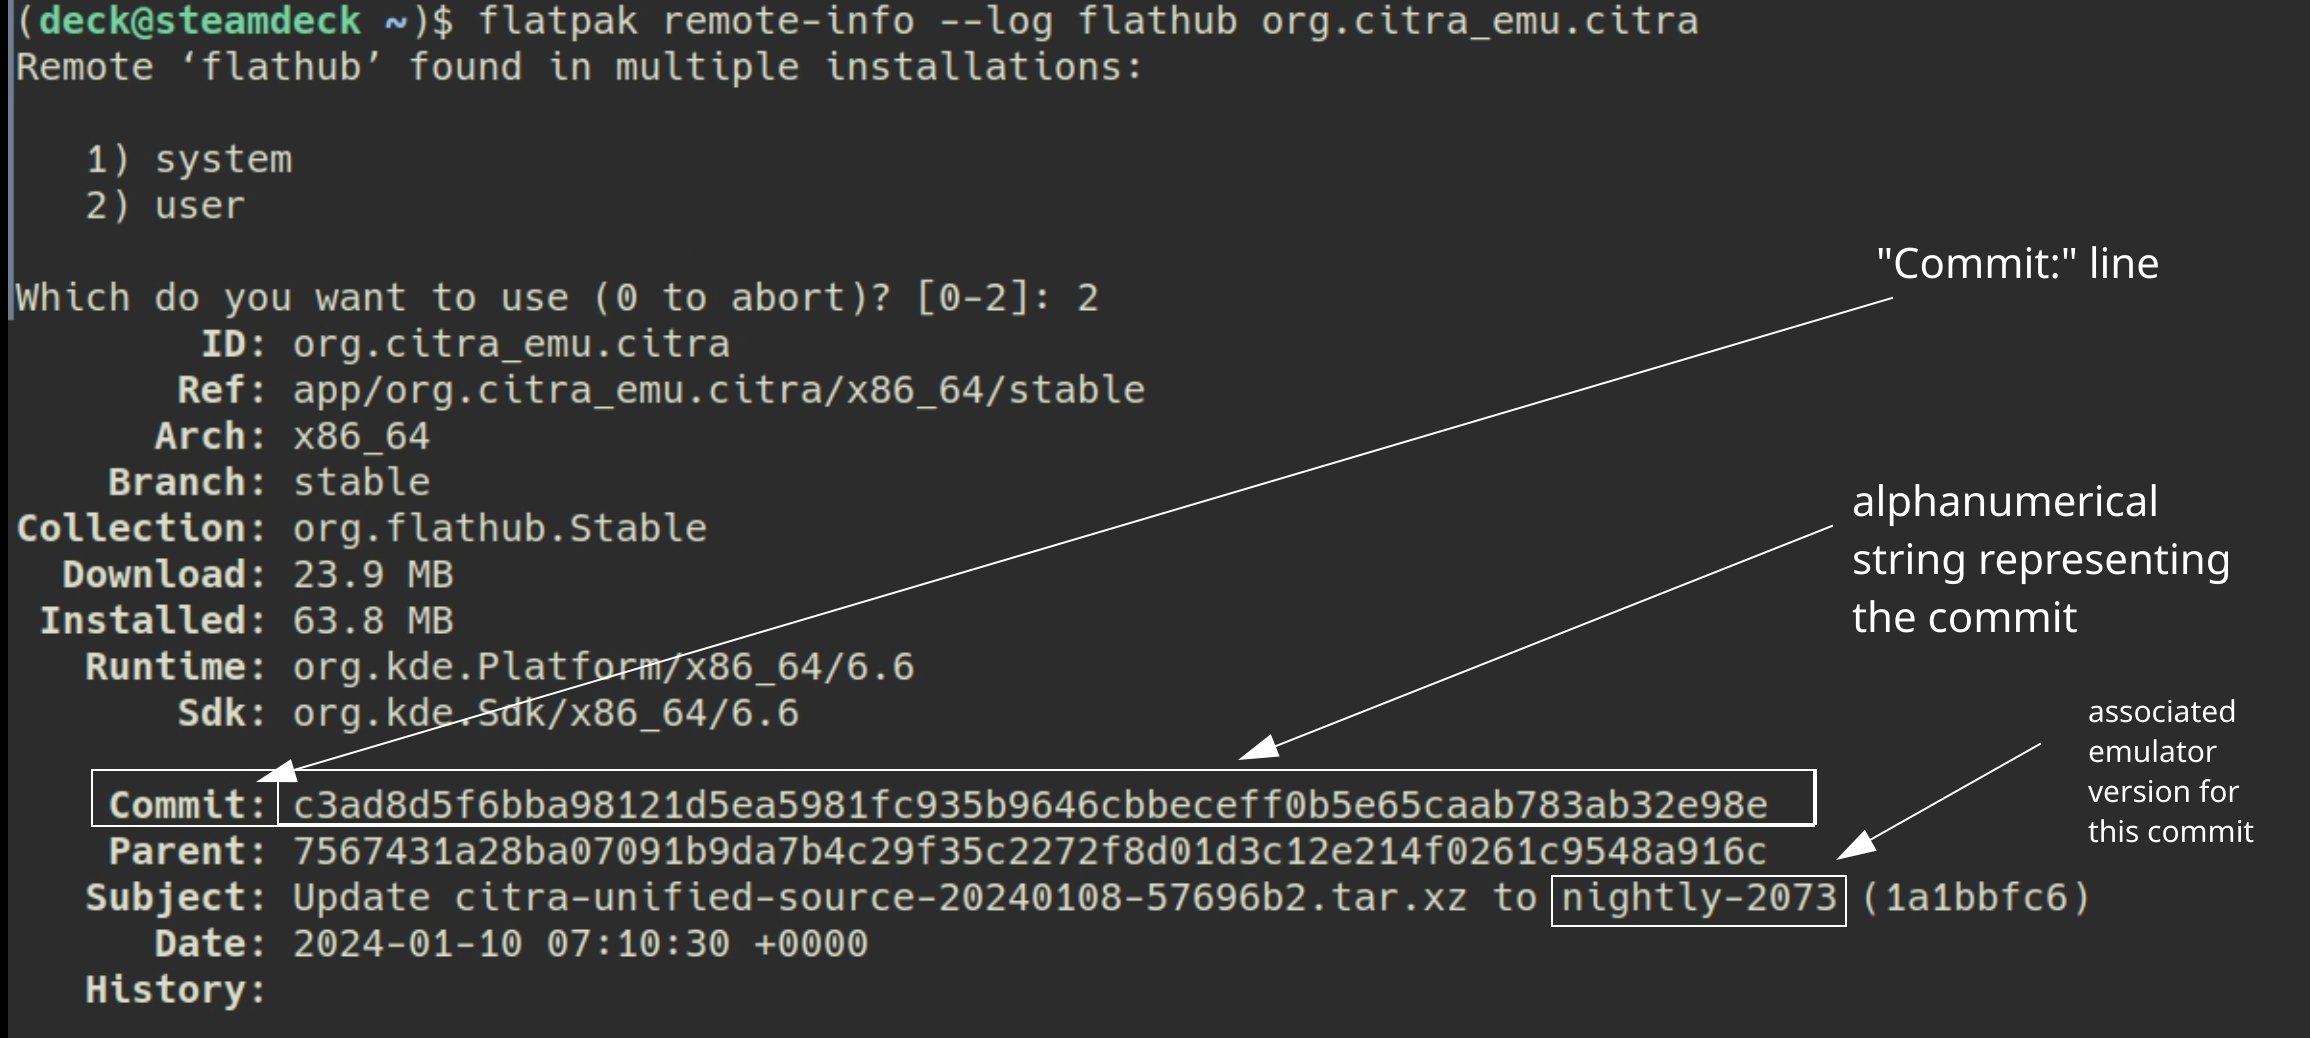
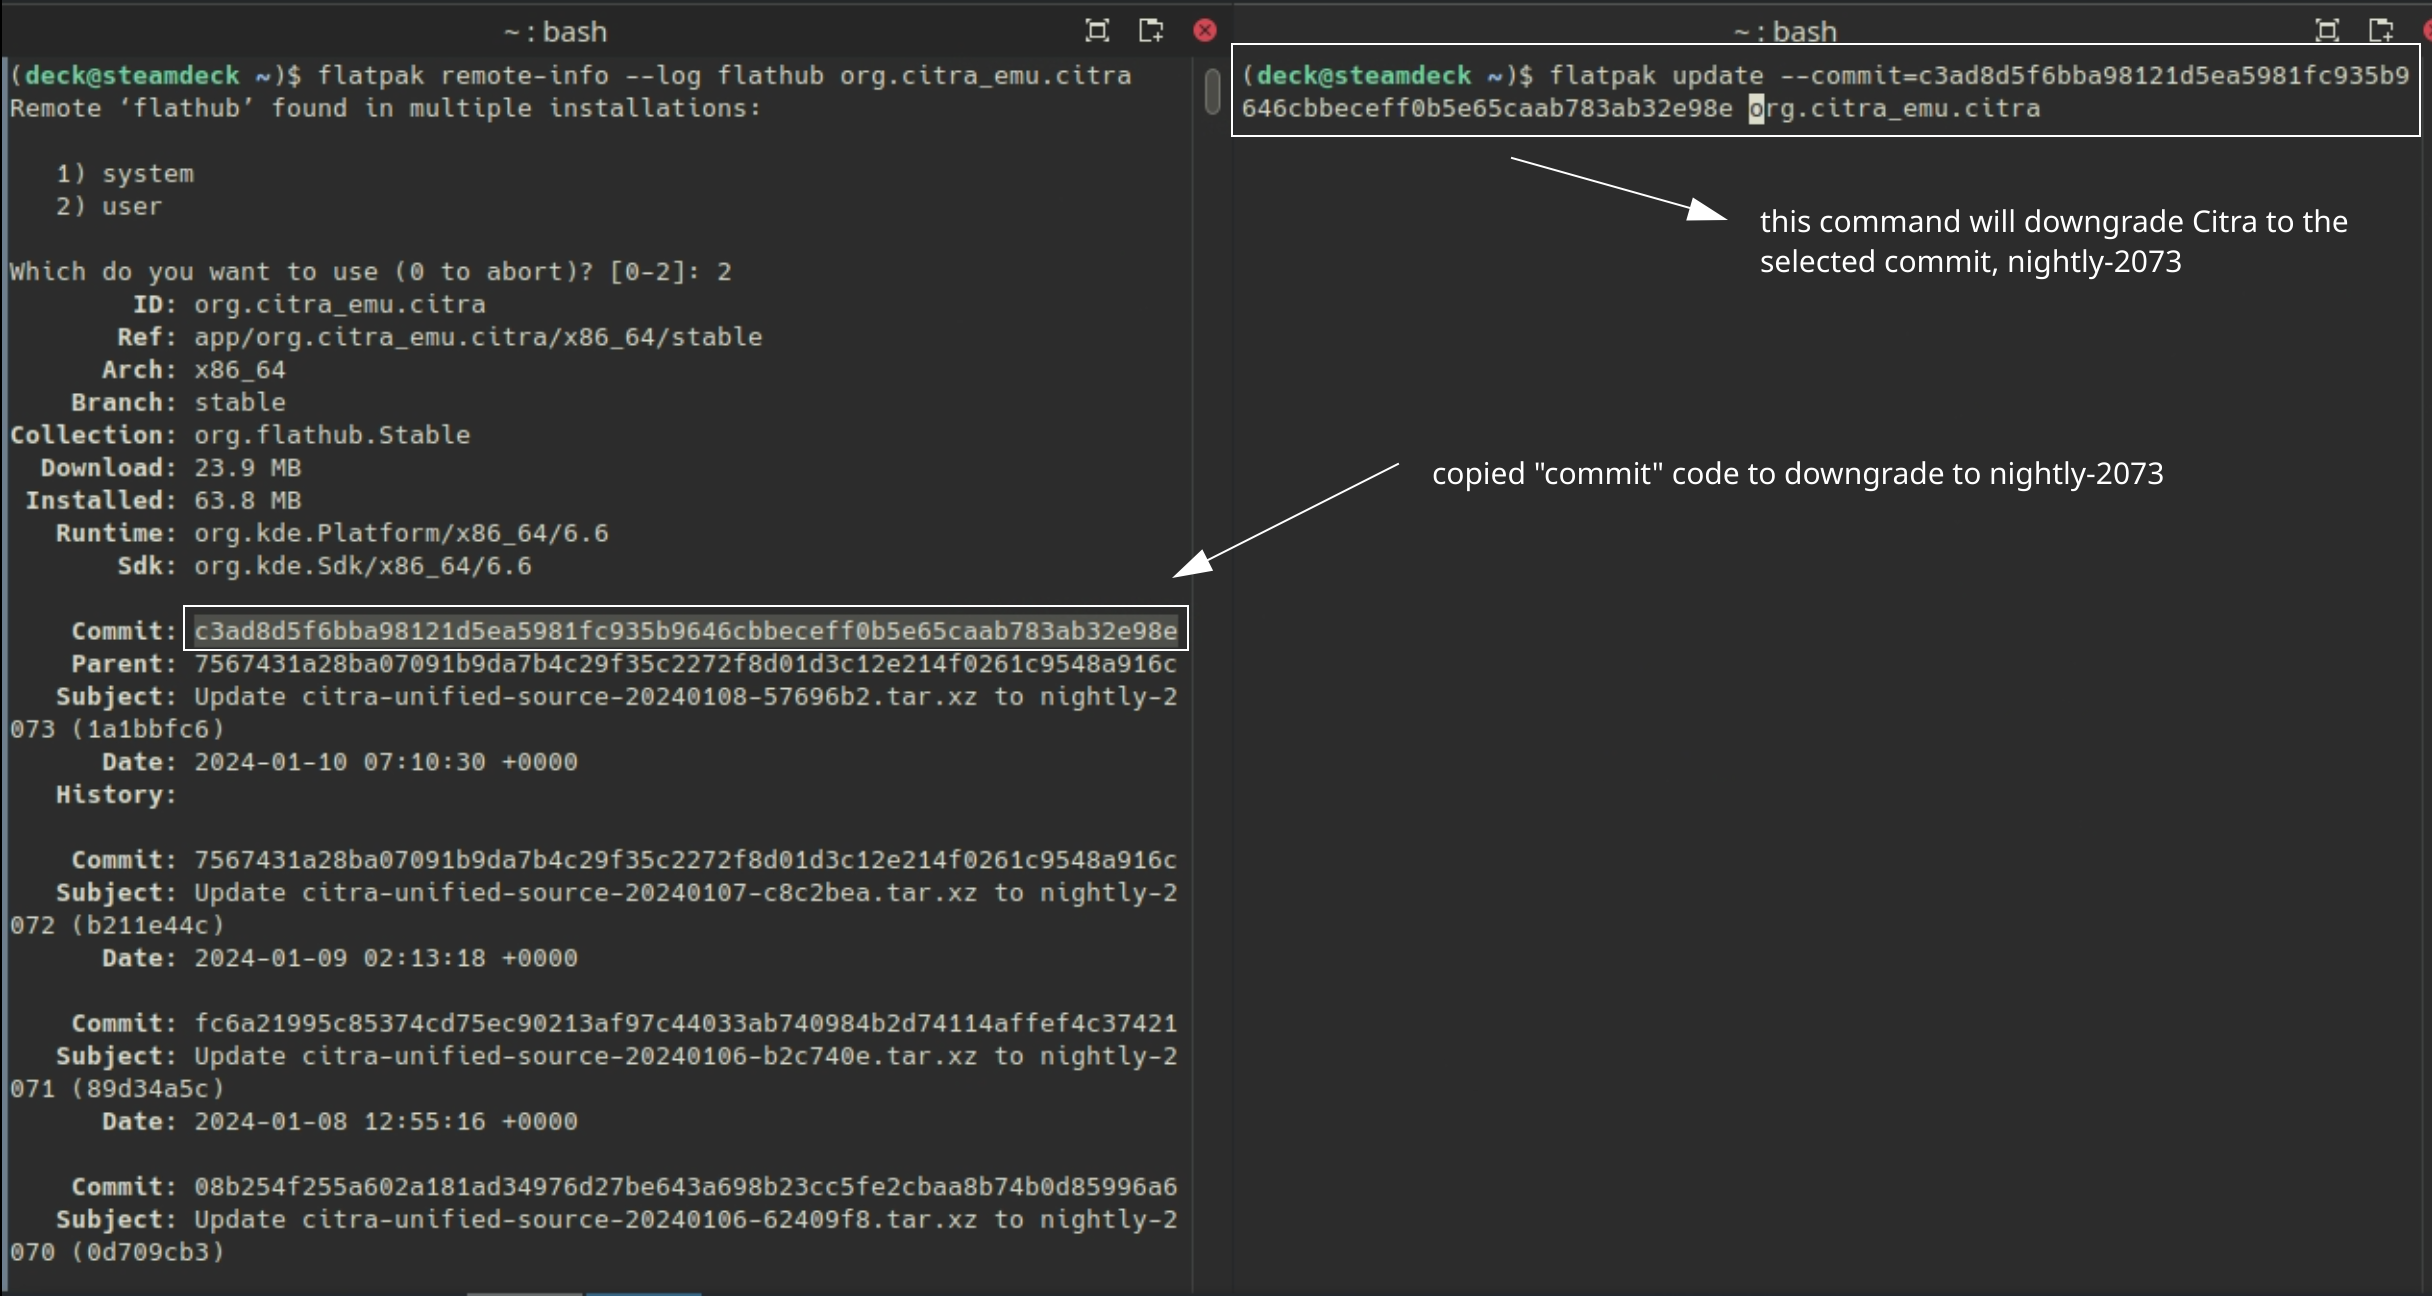
How to Roll Back PPSSPP to an Older Version
If you do not have access to a mouse and keyboard for the below section, use L2 to right click and R2 to left click. Alternatively, remote into your Steam Deck using one of the methods found in the FAQ, How do I remotely control my Steam Deck?.
- In Desktop Mode, open
Konsole - To see a list of prior versions of the emulator, type:
flatpak remote-info --log flathub org.ppsspp.PPSSPP
- If Konsole prompts you to select
systemoruser, enter2to selectuser - Konsole will list a list of previous versions for the flatpak. The important line for each version is the
Commit:line. TheCommit:line will have a long accompanying alphanumeric string (the “commit” code). Copy the string for the version you want to downgrade to.- Using Citra as an example:
- Using Citra as an example:
- To downgrade to the version you want:
flatpak update --commit=put_commit_code_here org.ppsspp.PPSSPP- Replace
put_commit_code_herewith the actual code you located in Step 2.- Using Citra as an example:
- Using Citra as an example:
If the above steps did not work and you are getting an error message along the lines of Flatpak not installed, your Flatpak is likely installed at the system level instead. Select one of the below solutions:
Solution 1: Open the EmuDeck application, click the Manage Emulators page, select the emulator in question, and click Reinstall / Update.
Solution 2: Add sudo in front of the commands written in Step 2 and Step 5. In Step 2, write sudo flatpak remote-info --log flathub org.ppsspp.PPSSPP and in Step 5, write sudo flatpak update --commit=put_commit_code_here org.ppsspp.PPSSPP.
How to Use the Original PSP Font
Legally, PPSSPP cannot use the original PPSSPP font and instead uses an open source font, "Roboto-Condensed". However, switching to the original PPSSPP font is easy.
Before proceeding with the below steps, dump the original font from a PSP. You can find the font in the flash0/font folder.
- Open the
/home/deck/.var/app/org.ppsspp.PPSSPP/config/ppsspp/PSPfolder~/.varis a hidden folder by default, click theHamburgermenu in the top right of the file explorer, clickShow Hidden Files
- Create a
flash0folder in/home/deck/.var/app/org.ppsspp.PPSSPP/config/ppsspp/PSP - Create a
fontfolder in/home/deck/.var/app/org.ppsspp.PPSSPP/config/ppsspp/PSP/flash0 - Place your fonts in
/home/deck/.var/app/org.ppsspp.PPSSPP/config/ppsspp/PSP/flash0/font - Your fonts are now installed
How to Configure Language Settings
UI
- In Desktop Mode, open PPSSPP
- On the right, click
Settings - Click the
Systemtab - To the right of
Language, select your preferred language in the drop-down menu
In-Game
- In Desktop Mode, open the
/home/deck/.var/app/org.ppsspp.PPSSPP/config/ppsspp/PSP/SYSTEMfolder - Right click
ppsspp.iniand clickOpen with Kateor a text editor of your choice - Under the
[SystemParam]section, locateLanguage = 1 - Replace
1with your preferred language:- JAPANESE 0
- ENGLISH 1
- FRENCH 2
- SPANISH 3
- GERMAN 4
- ITALIAN 5
- DUTCH 6
- PORTUGUESE 7
- RUSSIAN 8
- KOREAN 9
- CHINESE_TRADITIONAL 10
- CHINESE_SIMPLIFIED 11
- Save and exit out of the text file