File Management, learn how to manage your files like a wizard.
File Management Table of Contents
Managing ROM Files
How to Manage ROMs with Multiple Discs
Preface
An M3U File is a "playlist" for ROMs with multiple discs. Like a music playlist, the first ROM is the "first track", the second is the "second track" and so on.
Emulators will typically treat the M3U file itself as the ROM and auto-play the playlist (each disc) as you progress through the game. This section will cover how to create those M3U files so you can handle those multi-disc games like an emulator aficionado.
Quick Tips
- Compress your ROMs
- Open the EmuDeck application on your desktop and run the
Compression Toolto.chd. Compression will make managing your ROM folder and creating your M3Us infinitely easier - Re-run Steam ROM Manager after compressing your ROMs (this can be done after you have finished creating an M3U file)
- Open the EmuDeck application on your desktop and run the
- After you have created an M3U file, use the various emulator quick-menus to seamlessly move onto the next disc
- For a full list of hotkeys, see the Hotkeys page
Emulators without M3U Support
- PCSX2 does not support M3U files
- Xenia does not support M3U files
How to Create an M3U File
Quick and Dirty Guide
- In your ROM folder, right click, click
Create New Text File - Name it
GAMENAME.m3u- Replace GAMENAME with the game name
- Right click the text file, click
Open with Kateor a text editor of your choice - Place the full file name of each ROM disc including the file extension on a separate line
- If your ROM file extensions are
.cueand.bin, only write the.cuefiles in the M3U file- For Dreamcast, only write the
.gdifiles
- For Dreamcast, only write the
- If your ROM file extensions are
- Save and close out of the text file
- From now on, you can treat the newly created M3U file as the game file
For how to use the M3U with Steam ROM Manager, see Steam ROM Manager: How to Manage ROMs with Multiple Discs
For how to use the M3U with ES-DE, see ES-DE: How to Manage ROMs with Multiple Discs
In-Depth Guide
Here's How:
- In your ROM folder, right click, click
Create New Text File - Name it
GAMENAME.m3u- The file name of the M3U file is up to you. However, it is recommended you match the M3U file as closely as possible to the game name so Steam ROM Manager and ES-DE can scrape the appropriate game art or game info
- For example, with the game:
The Legend of Dragoon, you may name the M3U file,The Legend of Dragoon.m3uso Steam ROM Manager or ES-DE can locate the appropriate art. However, if you name itLoD.m3uas an example, neither tool will know to matchLoDtoLegend of Dragoon
- Right click the text file, click
Open with Kateor a text editor of your choice - Place the full file name of each ROM disc including the file extension on a separate line
- IMPORTANT: If you are using both
.binand.cuefiles, only write the.cuefiles in the M3U file. If you are using both.gdiand.binfiles, only write the.gdifiles in the M3U file- It is recommended you use the EmuDeck compression tool for easier file management
- Example (Using D2 for the Dreamcast):
- Folder:

- M3U File:

- Folder:
- IMPORTANT: If you are using both
- Save and close out of the text file
- From now on, you can treat the newly created M3U file as the game file, and play the respective ROM discs by running the newly created M3U file through one of EmuDeck's included front-ends: Steam shortcuts created by Steam ROM Manager, ES-DE, or by running the emulator directly
- Steam ROM Manager:
- Steam ROM Manager will still parse all of your discs in addition to the M3U file. To solve this, you can hide each disc entry, and only allow Steam ROM Manager to parse the M3U file
- To learn more, see: Steam ROM Manager: How to Manage ROMs with Multiple Discs
- Steam ROM Manager will still parse all of your discs in addition to the M3U file. To solve this, you can hide each disc entry, and only allow Steam ROM Manager to parse the M3U file
- ES-DE:
- ES-DE will display all of your discs in addition to the M3U file. To solve this issue, ES-DE allows you to treat directories as files.
- To learn more, see: ES-DE: How to Manage ROMs with Multiple Discs
- ES-DE will display all of your discs in addition to the M3U file. To solve this issue, ES-DE allows you to treat directories as files.
- Alternatively, you can move all of your Multi-Disk games to a new folder
- For example:
psx-multidisk, and keep the .m3u files in thepsxfolder, changing the contents to point to the disks in their new location. This will prevent those disks from being read, as the parsers will not look in the new folders created- Note: Not all emulators support absolute pathing
- For example:
- Steam ROM Manager:
Video: How to Create an M3U File
How to Verify ROMs
How to Verify a ROM Successfully Transferred
Sometimes, data loss or corruption can occur when you transfer ROMs to your Steam Deck. You can verify that the ROM successfully transferred by checking its MD5 Checksum. An MD5 Checksum is a 32-character hexadecimal number that is computed on a file. If the MD5 checksum on both the file on the Steam Deck and the original PC is an exact match, the file transferred successfully. If they do not match, the file is potentially corrupt. You will need to correct or adjust how you transfer files.
Here's How
Do note that Dolphin and PCSX2 have built in verification tools. If you are using one of those emulators, see Dolphin: How to Verify ROMs and PCSX2: How to Verify ROMs. For any other system/emulator, you may follow the below instructions instead.
On the Steam Deck
- Right click the ROM
- Click Properties
- Click the Checksums tab
- Click
Calculateto the right ofMD5- Wait, it may take a few moments


On the non-Steam Deck PC
- Windows:
- Mac: https://ss64.com/osx/md5.html
- Linux (Command-line): https://man7.org/linux/man-pages/man1/md5sum.1.html
How to Verify a ROM is Valid
For one reason or another, your ROM may be corrupt and may not work properly. One way to confirm that you have a valid ROM is by comparing it to the ROM page on redump.org. Redump is an internet community "dedicated to collecting precise and accurate information about every video game ever released". You can validate your ROM by comparing its MD5 Checksum, a 32-character hexadecimal number that is computed on a file, to the MD5 Checksum on redump.org.
Alternatively, you may also use No-Intro's DAT-o-MATIC, https://datomatic.no-intro.org/. No-Intro is an internet community similar to Redump. For No-Intro's website, see https://no-intro.org/.
Here's How
How to Find your MD5 Checksum
Note: Vampire Night, for the Playstation 2 is being used as an example in the below guide.
- Right click the ROM
- Click Properties
- Click the Checksums tab
- Click
Calculateto the right ofMD5- Wait, it may take a few moments

- Note down the MD5 Checksum for the next section

How to Compare your MD5 Checksum to Redump
- Open redump.org, and search for your ROM
- For example, Vampire Night's page: http://redump.org/disc/13152/
- Note down the MD5 Checksum on the redump.org page and compare it to your ROM
- Using Vampire Night as an example:
- MD5 Checksum on the ROM:
- Redump's MD5 Checksum:

- MD5 Checksum on the ROM:
- Using Vampire Night as an example:
- The Vampire Night ISO MD5 Checksum matches to the MD5 Checksum on the redump page, meaning the ROM is valid
How to Compare your MD5 Checksum to No-Intro
- Open https://datomatic.no-intro.org/ and search for your ROM
- Note down the MD5 Checksum on DAT-o-MATIC and compare it to your ROM
- If the MD5 Checksum is a match, your ROM is valid
How to Create CUE Files
Info
"A cue sheet, or cue file, is a metadata file which describes how the tracks of a CD or DVD are laid out. Cue sheets are stored as plain text files and commonly have a ".cue" filename extension."
Source: https://emulation.gametechwiki.com/index.php/Cue_sheet_(.cue)
Typically CUE files are paired with BIN files. You will have one CUE file paired with BIN files. The CUE file is important for multiple reasons. Firstly, it tells the emulator in which order to play each BIN file. Secondly, if you are compressing your ROMs into the CHD file format, the CUE file is used as a reference by the compression tool. Without the CUE file, the compression tool cannot compress and convert your ROM to CHD.
If you are missing a CUE file, you will need to create one. If you renamed any of your BIN files, you will need to either edit your CUE file in a text editor of your choice or recreate it.
Fortunately creating CUE files is easy.
Here's How
- In Desktop Mode, open https://nielsbuus.dk/pg/psx_cue_maker/
- Drag all of your
BINfiles to the box that writesDrop your .bin files here! - Create a new text file using a text editor of your choice and copy the outputted text in the white box below into the newly created text file
- Save the newly created text file and name it
GAMENAME.cue- The file name of the
CUEfile is up to you. However, it is recommended you match theCUEfile as closely as possible to the game name so Steam ROM Manager and ES-DE can scrape the appropriate game art or game info
- The file name of the
- Move your newly created
CUEfile to the same folder as theBINfiles corresponding to theCUEfile
Managing Emulators and Tools
How to Swap out AppImages and Binaries
Preface
Sometimes, when an emulator updates, there can be regressions for certain games or bugs that break the emulator temporarily. You can downgrade to a previous version by replacing the emulator in /home/deck/Applications.
Additionally for Yuzu, you can also use this feature to download the Early Access version of Yuzu.
For some emulators, your ROMs launch using a script created by EmuDeck, which look for the corresponding emulator, depending on how it is installed or downloaded. In the case of PCSX2 and Yuzu, the script looks for two things:
- The most recently downloaded version in
/home/deck/Applications, based on the file date. - The emulator name at the beginning of the file. Anything after the emulator name is ignored.
pcsx2-Qtin the case of PCSX2 andYuzuin the case of Yuzu. For example, if the latest version ofYuzuis1351and you would like to downgrade to1349. When you downloadyuzu 1349, you could rename it toYuzu-1349.AppImage, and EmuDeck's script will ignore the-1349in the file name, allowing you to record which versions of Yuzu you are using through the file name.
List of Supported Emulators and Tools
- Cemu (AppImage)
- Executable Location:
/home/deck/Applications/Cemu.AppImage - Download Link: https://github.com/cemu-project/Cemu/releases
- Executable Location:
- Cemu (Swap out its EXE)
- Executable Location:
Emulation/roms/wiiu/cemu.exe - Download Link: https://github.com/cemu-project/Cemu
- Executable Location:
- ES-DE
- Executable Location:
Emulation/tools/ES-DE-x64_SteamDeck.AppImage - Download Link: https://gitlab.com/es-de/emulationstation-de/-/packages/
- Executable Location:
- mGBA
- Executable Location:
/home/deck/Applications/mGBA.AppImage - Download Link: https://github.com/mgba-emu/mgba/releases
- Executable Location:
- PCSX2-QT
- Executable Location:
/home/deck/Applications/pcsx2-Qt.AppImage - Download Link: https://pcsx2.net/downloads/#nightly-anchor
- Executable Location:
- Ryujinx
- Executable Location:
/home/deck/Applications/publish/Ryujinx - Download Link: https://github.com/Ryujinx/release-channel-master/releases
- Steam ROM Manager
- Executable Location:
Emulation/tools/srm/Steam-ROM-Manager.AppImage - Download Link: https://github.com/SteamGridDB/steam-rom-manager/releases
- Executable Location:
- Vita3K
- Executable Location:
/home/deck/Applications/Vita3K/Vita3K
- Executable Location:
- Xenia (Swap out its EXE)
- Executable Location:
Emulation/roms/xbox360/xenia_canary.exe - Download Link: https://github.com/xenia-canary/xenia-canary/releases
- Executable Location:
- Yuzu
- Executable Location:
/home/deck/Applications/yuzu.AppImage - Download Link: https://github.com/yuzu-emu/yuzu-mainline/releases
- Executable Location:
How to Swap Out Emulators
- Download the version of the emulator you would like to use, from the list above to your
/home/deck/Downloadsfolder - Open the respective emulator folder location, using the list above: List of Supported Emulators and Tools
- Move the downloaded emulator from Step 1 to the folder in Step 2
- Rename or delete the original emulator file
- Rename it so it can be distinguished from your downloaded file
- A Few Examples:
- Rename
Yuzu.AppImagetoYauzu.AppImage - Rename
Yuzu.AppImageto add a.bakto the end of the file extension,Yuzu.AppImage.bak - Rename
Yuzu.AppImageto add the version number. For example, if the latest version is 1351, rename it toYuzu-1351.AppImage
- Rename
- A Few Examples:
- Rename it so it can be distinguished from your downloaded file
- Right click the newly downloaded emulator, click
Properties, clickPermissions, checkIs executable - Your games will now launch using the version of the emulator you downloaded
Watch the following GIF for a visual (Yuzu is being used as an example in this GIF):

How to Reset an Emulator's Configurations to EmuDeck's Defaults
Sometimes after installing EmuDeck, you may notice an emulator's configurations were not set properly or you tweaked something on accident and you do not remember the default settings.
You may reset an emulator's configurations in the Manage Emulators page.
Tutorial
- Open EmuDeck on your desktop.
- Click the
Manage Emulatorsbutton. - Select which emulator configurations you would like to reset in the drop-down menu.
- Click
Reset configuration, wait a moment.- Using PCSX2 as an example:

- Using PCSX2 as an example:
- Your selected emulator has been reset.
Emulator Save and Save State Locations
See Save Management: Emulator Save and Save State Locations.
Managing Files
How to Use Symlinks
Preface
Symbolic links, or symlinks for short, are a powerful way to link files or directories. Symlinks are a kind of file that points to another file, similar to a shortcut on Windows. However, symlinks are much more versatile.
A few features of symlinks include: renaming the symlink, crossing partitions (between an SD card and an internal SSD for example), and creating multiple symlinks to the same file.
It is recommended you symlink your folders inside of the folders created by EmuDeck. For example, if you would like to symlink a PlayStation 2 ROM folder, symlink this folder inside of the Emulation/roms/ps2 folder instead of overwriting the ps2 folder.
Use Cases
Let's go over a few use cases specifically pertaining EmuDeck:
- If you wanted to install EmuDeck on multiple storage devices, you could instead install EmuDeck to the internal SSD and symlink ROM folders from the various storage devices to the ROM folders within the
Emulationfolder on the internal SSD. - If you had a large texture pack folder or a large folder of any sort, you could place this folder on your removable storage device and symlink it to its expected location on the internal SSD.
- If you wanted to symlink your NAS to your
Emulationfolder.
How to create a Symlink
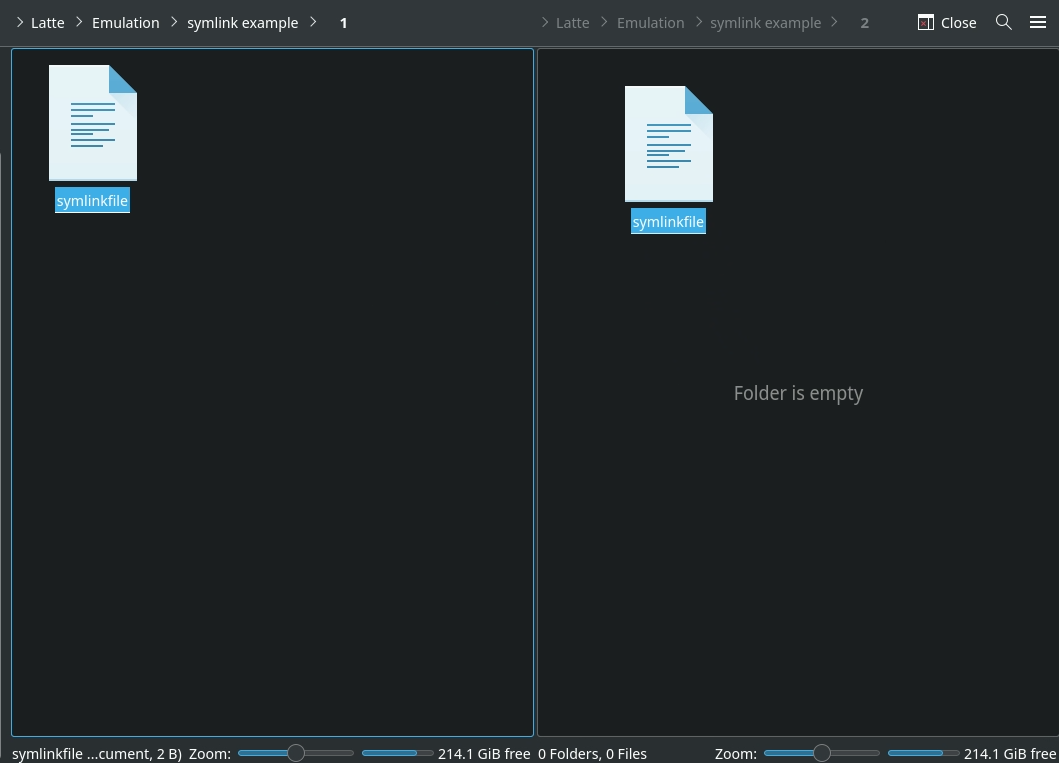
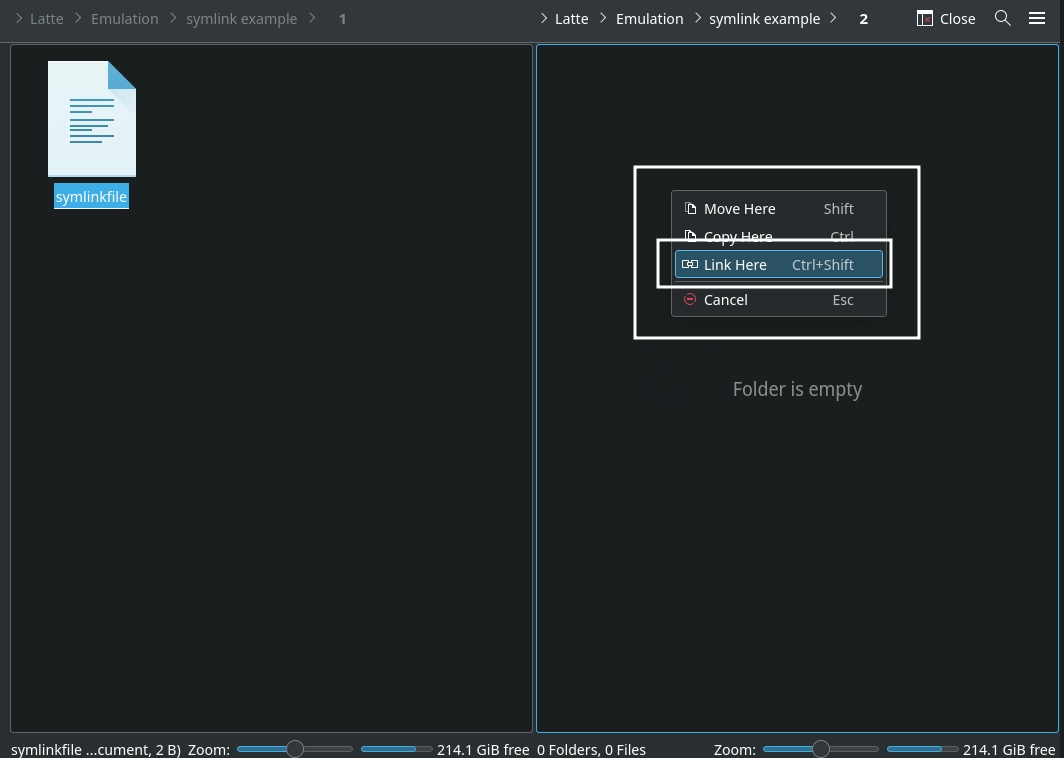
You can create a symlink a couple of ways. One method is to create a symlink through Dolphin (file manager). Keep in mind that within Dolphin (file manager), you can open tabs and view multiple folders at the same time.
When you have your original folder or file and the destination ready, drag the original folder or file to the destination and click Link here. A symlink is indicated with a small link icon and the file name in italics.
Photos

GIF

How to Use Multiple Storage Devices With EmuDeck
If you would like to use multiple SD Cards or multiple storage devices with EmuDeck to either dedicate each storage device to a specific system or to increase your storage, you can do so using symlinks.
Step 1
Install EmuDeck to your internal SSD. Regardless of where you install EmuDeck, the emulators will be installed to your internal SSD. However, if you prefer, you can leave the ROMs folder on the internal SSD empty to ensure that your internal storage does not run out of space.
Step 2
Format your external storage device either using the Steam Deck or a device that allows you to format it in a supported file format. The Steam Deck will format it in EXT4, but you may also use BRTFS.
Step 3
Use symlinks to link your ROM folders from your various external storage devices to the internal install of EmuDeck. You can create a symlink by dragging the folder from your external storage device to the respective ROM folder on your internal SSD.
For example, if you have an SD Card for Nintendo Switch ROMs, drag your Nintendo Switch folder (however you would like to name it) to the Emulation/roms/switch folder on your internal SSD and click Link Here. Once you click Link Here, a symlink will be created and your Nintendo Switch ROM folders are now linked.
Typically, you will have various folders (named however you would like) and you will link them to the contents of the respective ROM folder on your internal SSD allowing for each subfolder to represent the folders on your various external storage devices.
A couple of specific symlink examples are shown below. Symlinks are a powerful way of creating shortcuts without taking up any space in the target location (the internal SSD in this case).
GIF
How to Transfer Files to a Steam Deck
Preface
By default, Steam Deck formats your SD card in ext4 format, which is not readable on Windows without additional tinkering. Use one of the following methods to transfer files to your Steam Deck.
List of File Transfer Methods
- Method 1: SSH
- Method 2: DeckMTP
- Method 3: Removable Storage Device
- Method 4: AnyDesk
- Method 5: SMB Shares
Method 1: SSH
Select one of the two tutorials below:
Although the below guide may look lengthy, SSH is a quick and easy process to set up. Once you have it set up, you can transfer files with ease in both Desktop Mode and Game Mode, no additional storage device needed.
Tutorial 1: Text
Part 1 of 2: On the Steam Deck
- Open
Konsole - In Konsole, type
passwdand follow the prompts to set a password for the account- Your password will be invisible. Press enter when you've finished, you will be prompted to type it once again as confirmation
- In Konsole, type
sudo systemctl enable --now sshdto both start and permanently enable the service - In Konsole, type
ip addr | grep inet | grep wlan0, jot down the###.###.##.##number in front ofinet
Part 2 of 2: On the Non-Steam Deck PC
Install Filezilla or WinSCP on your computer. No additional program is needed on the Steam Deck.
WinSCP is only available on Windows: https://winscp.net/eng/download.php
Filezilla is available on Linux, Mac, and Windows:
- Windows: https://filezilla-project.org/download.php?platform=win64
- Mac: https://filezilla-project.org/download.php?platform=osx
Select one of the two and follow the respective guide below.
Option 1: How to Use Filezilla
- Install FileZilla: https://filezilla-project.org/ on your non-Steam Deck PC
- No additional program is needed on the Steam Deck
- Click the icon in the top left
- Click
New Site, give it a memorable name - Use the following template:
- Protocol:
SFTP - SSH File Transfer Protocol - Host:
steamdeckor the###.###.##.##number you received inStep 4in theOn the Steam Decksection - Port: Either blank or
22 - Logon Type: Normal
- User:
deck - Password: The password you set in
Step 2in theOn the Steam Decksection 
- Protocol:
- Click
Connect - (Optional) To browse to your SD Card, click the
..at the top two times, select therunfolder,media,mmcblk0p1 - Drag files between the two windows or use the context menu (
Right Click) to transfer files

Option 2: How to Use WinSCP
- Install WINSCP: https://winscp.net/eng/index.php on your non-Steam Deck PC
- No additional program is needed on the Steam Deck
- Open WinSCP and you should be prompted with WinSCP's address book

- You can also re-open this interface by clicking
New Sessionin the top left
- On the right side of the screen, use the following template:
- File Protocol:
SFTP - Host Name:
steamdeckor the###.###.##.##number you received inStep 4in theOn the Steam Decksection - Port number:
22or blank - User name:
deck - Password: The password you set in
Step 2in theOn the Steam Decksection 
- File Protocol:
- Click
Saveunder theUser namebox and give the site name a memorable name - Click
Login - (Optional) To browse to your SD Card, click the
..at the top two times, select therunfolder,media,mmcblk0p1 - Drag files between the two windows or use the context menu (
Right Click) to transfer files

Post File Transfer
After you are finished setting up SSH and you have transferred your files, you may want to consider disabling SSH.
With a weak sudo password, leaving SSH enabled may be a security risk if you take your Steam Deck outside of your home and connect it to public Wi-Fi. With a strong sudo password, this risk is less apparent. Regardless, this section will cover how to disable SSH.
Select one of the two and follow the respective section below.
Option 1: Terminal Command
- In Desktop Mode, enter the below command in Konsole to disable SSH
sudo systemctl disable --now sshd
- To re-enable SSH, enter the below command in Konsole
sudo systemctl enable --now sshd
Option 2: Decky Loader Plugin
Skip Steps 1-4 if you have already installed Decky Loader
- Open
EmuDeckon your desktop - Select
Power Tools - Enter your password, and click
Install PowerTools- If you have not set a password, this page will prompt you to create one
- Restart your Steam Deck
- In Game Mode, press the
...button, press the Socket icon - Click the store icon in the top right, install
System Toolbox - After installing
System Toolbox: In Game Mode, press the QAM (...) button, press the socket icon (Decky Loader's icon), selectSystem Toolboxand disableRemote Terminal Access - When you would like to transfer files again, re-enable
Remote Terminal Access
Tutorial 2: Video
Watch: https://www.youtube.com/watch?v=F790rBfyAQM
Method 2: DeckMTP
Preface
Watch: https://www.youtube.com/watch?v=4GcbEWl12Uc
For further reading: https://github.com/dafta/DeckMTP
DeckMTP is a Decky Loader plugin that allows the Steam Deck to be detected as a MTP drive (similar to a USB drive), once directly plugged into a PC via USB. (MacOS users may need the Android File Transfer App to be able to transfer files to MTP devices.)
How to Install DeckMTP
- Boot to desktop mode and open
Konsole - In Konsole, type
passwdand follow the prompts to set a password for the account- Your password will be invisible. Press enter when you've finished, you will be prompted to type it once again as confirmation
- Install Decky Loader by choosing one of the two following ways:
- Install through the EmuDeck application
- Install from the DeckyLoader Github: https://github.com/SteamDeckHomebrew/decky-loader
- Press the big
Downloadbutton at the top
- Restart the Steam Deck
- In Game Mode, press the QAM (
...) button - Press the
Socketicon at the bottom of the list - In the top right, press the
Storeicon - Install DeckMTP


How to Set up DeckMTP
DeckMTP requires enabling DRD.
For a Youtube Video, watch: https://www.youtube.com/watch?v=4GcbEWl12Uc
- To enable DRD, shut down your Steam Deck
- Enter the BIOS by holding Volume Up and Power until you hear a beep
- Select Setup Utility
- Select Advanced
- Select USB Configuration
- Select USB Dual-Role Device
- Select DRD instead of the existing XHCI
- Plugging your Steam Deck into a PC via USB should now make it show up as a drive
Method 3: Removable Storage Device
Use a flash drive or a removable storage device that can be read on both Windows and Linux. You may need either a USB C adapter or a USB C Hub.
Method 4: AnyDesk
On the Steam Deck
- Install Anydesk from Discover (Shopping Bag icon) in desktop mode
- Install Flatseal from Discover (Shopping Bag icon) in desktop mode
- Open Flatseal
- On the left, select AnyDesk
- Under
Filesystem, toggleAll system files, filesystem=host

On the Non-Steam Deck PC
- Install AnyDesk on your other PC from the website: https://anydesk.com/
- Connect to your Steam Deck
- Use AnyDesk's file transfer feature to transfer files between your Steam Deck and non Steam Deck PC
How to use AnyDesk to Transfer Files
- Connect to your Steam Deck
- Click the box with a right arrow at the top
- Your non-Steam Deck PC will be on the left side of the screen, your Steam Deck will be on the right side of the screen, right click files on either side to
UploadorDownloadto the respective devices

Tips
- Your SD Card path is
/run/media/.... To navigate to your SD Card, click the..dots at the top until you are in the/directory. You will see therunfolder, you can navigate to the remaining folders from here
Method 5: SMB Shares
Pick a tutorial:
- Watch: https://www.youtube.com/watch?v=x4_Sexd1UAw
- Read (Verbose): https://www.reddit.com/r/SteamDeck/comments/wdyqya/the_semiultimate_guide_to_smb_shares_on_steam_deck/
- Read (Succinct): https://www.reddit.com/r/SteamDeck/comments/tfjq1m/how_to_connect_to_smb_shares/iosxjcm/
Managing EmuDeck
EmuDeck File Locations
Preface
These file locations apply regardless of where you chose to install EmuDeck (to your internal SSD, to your SD Card, or elsewhere). Some emulator configuration files will be located on the internal SSD as listed below.
$HOME refers to your home folder. If you are on a Steam Deck, this folder will be named /home/deck (you will likely not see deck in the file path when navigating using the file manager).
Paths beginning with Emulation/.. correspond to your EmuDeck install location. If you installed on an SD Card, your path may be /run/media/mmcblk0p1/Emulation/roms/... If you installed on your internal SSD, your path may be /home/deck/Emulation/roms/..
Do note that folders with a . (.var, .local, .config, etc.) at the beginning are hidden by default. In Dolphin (file manager), click the hamburger menu in the top right, click Show Hidden Files to see these folders.
EmuDeck
$HOME/.config/EmuDeck/
EmuDeck/
├── backend
│   ├── chimeraOS
│   │   └── configs
│   │       └── emulationstation
│   │           └── custom_systems
│   ├── configs
│   │   ├── app.xemu.xemu
│   │   │   └── data
│   │   │       └── xemu
│   │   │           └── xemu
│   │   ├── cemu
│   │   │   ├── config
│   │   │   │   └── cemu
│   │   │   │       └── controllerProfiles
│   │   │   └── data
│   │   │       └── cemu
│   │   │           └── mlc01
│   │   ├── com.github.Rosalie241.RMG
│   │   │   └── config
│   │   │       └── RMG
│   │   ├── emulationstation
│   │   │   ├── custom_systems
│   │   │   └── gamelists
│   │   │       ├── atarilynx
│   │   │       ├── dos
│   │   │       ├── gamegear
│   │   │       ├── gb
│   │   │       ├── gbc
│   │   │       ├── gc
│   │   │       ├── n3ds
│   │   │       ├── nds
│   │   │       ├── nes
│   │   │       ├── ps2
│   │   │       ├── psp
│   │   │       ├── psx
│   │   │       ├── saturn
│   │   │       ├── scummvm
│   │   │       └── wii
│   │   ├── info.cemu.Cemu
│   │   │   └── data
│   │   │       └── cemu
│   │   │           ├── controllerProfiles
│   │   │           └── mlc01
│   │   ├── io.github.shiiion.primehack
│   │   │   ├── config
│   │   │   │   └── dolphin-emu
│   │   │   │       └── Profiles
│   │   │   │           └── Wiimote
│   │   │   └── data
│   │   │       └── dolphin-emu
│   │   │           ├── GameSettings
│   │   │           └── Load
│   │   │               └── Textures
│   │   │                   └── R3M
│   │   │                       ├── 0EXTRA - Steam Deck Button Prompts
│   │   │                       │   ├── Common
│   │   │                       │   ├── MP1
│   │   │                       │   ├── MP2
│   │   │                       │   └── MP3
│   │   │                       └── 0EXTRA - Wiimote Warning Replacement
│   │   ├── mame
│   │   │   └── cfg
│   │   ├── mgba
│   │   ├── net.kuribo64.melonDS
│   │   │   └── config
│   │   │       └── melonDS
│   │   ├── net.pcsx2.PCSX2
│   │   │   └── config
│   │   │       └── PCSX2
│   │   │           ├── cheats_ws
│   │   │           └── inis
│   │   ├── net.rpcs3.RPCS3
│   │   │   └── config
│   │   │       └── rpcs3
│   │   │           ├── GuiConfigs
│   │   │           └── input_configs
│   │   │               └── global
│   │   ├── org.citra_emu.citra
│   │   │   └── config
│   │   │       └── citra-emu
│   │   ├── org.DolphinEmu.dolphin-emu
│   │   │   └── config
│   │   │       └── dolphin-emu
│   │   │           ├── GameSettings
│   │   │           └── Profiles
│   │   │               ├── GCPad
│   │   │               └── Wiimote
│   │   ├── org.duckstation.DuckStation
│   │   │   └── config
│   │   │       └── duckstation
│   │   ├── org.libretro.RetroArch
│   │   │   └── config
│   │   │       └── retroarch
│   │   │           ├── autoconfig
│   │   │           ├── config
│   │   │           │   ├── Beetle Cygne
│   │   │           │   ├── Beetle Lynx
│   │   │           │   ├── Beetle NeoPop
│   │   │           │   ├── Beetle PCE
│   │   │           │   ├── Beetle PCE Fast
│   │   │           │   ├── Beetle PSX
│   │   │           │   ├── Beetle PSX HW
│   │   │           │   ├── Beetle WonderSwan
│   │   │           │   ├── bsnes-hd beta
│   │   │           │   ├── FinalBurn Neo
│   │   │           │   ├── Flycast
│   │   │           │   ├── Gambatte
│   │   │           │   ├── Gearsystem
│   │   │           │   ├── Genesis Plus GX
│   │   │           │   ├── Handy
│   │   │           │   ├── MAME
│   │   │           │   ├── MAME 2003-Plus
│   │   │           │   ├── Mesen
│   │   │           │   ├── mGBA
│   │   │           │   ├── Mupen64Plus-Next
│   │   │           │   ├── Nestopia
│   │   │           │   ├── PicoDrive
│   │   │           │   ├── PUAE
│   │   │           │   ├── remaps
│   │   │           │   │   └── Gambatte
│   │   │           │   ├── SameBoy
│   │   │           │   ├── Snes9x
│   │   │           │   ├── Stella
│   │   │           │   ├── YabaSanshiro
│   │   │           │   └── Yabause
│   │   │           └── overlays
│   │   │               └── pegasus
│   │   ├── org.ppsspp.PPSSPP
│   │   │   └── config
│   │   │       └── ppsspp
│   │   │           └── PSP
│   │   │               └── SYSTEM
│   │   ├── org.ryujinx.Ryujinx
│   │   │   └── config
│   │   │       └── Ryujinx
│   │   ├── org.scummvm.ScummVM
│   │   │   └── config
│   │   │       └── scummvm
│   │   ├── org.yuzu_emu.yuzu
│   │   │   ├── config
│   │   │   │   └── yuzu
│   │   │   │       └── input
│   │   │   └── data
│   │   │       └── yuzu
│   │   │           ├── keys
│   │   │           └── nand
│   │   │               └── system
│   │   │                   └── Contents
│   │   │                       └── registered
│   │   ├── pcsx2qt
│   │   ├── rclone
│   │   ├── Ryujinx
│   │   │   └── profiles
│   │   │       └── controller
│   │   ├── steam-deck-romate
│   │   ├── steam-input
│   │   │   └── Icons
│   │   ├── steam-rom-manager
│   │   │   └── userData
│   │   │       └── img
│   │   │           ├── default
│   │   │           ├── emus
│   │   │           │   └── rmg
│   │   │           ├── playwhatever
│   │   │           ├── systems
│   │   │           │   ├── grid
│   │   │           │   └── poster
│   │   │           └── updater
│   │   ├── Vita3K
│   │   └── xenia
│   ├── functions
│   │   ├── EmuScripts
│   │   ├── RemotePlayClientScripts
│   │   └── ToolScripts
│   ├── icons
│   ├── roms
│   │   ├── 3do
│   │   ├── 3ds
│   │   ├── ags
│   │   ├── amiga
│   │   ├── amiga1200
│   │   ├── amiga600
│   │   ├── amigacd32
│   │   ├── amstradcpc
│   │   ├── android
│   │   ├── apple2
│   │   ├── apple2gs
│   │   ├── arcade
│   │   ├── arcadia
│   │   ├── arduboy
│   │   ├── astrocde
│   │   ├── atari2600
│   │   ├── atari5200
│   │   ├── atari7800
│   │   ├── atari800
│   │   ├── atarijaguar
│   │   ├── atarijaguarcd
│   │   ├── atarilynx
│   │   ├── atarist
│   │   ├── atarixe
│   │   ├── atomiswave
│   │   ├── bbcmicro
│   │   ├── c16
│   │   ├── c64
│   │   ├── cavestory
│   │   ├── cdimono1
│   │   ├── cdtv
│   │   ├── chailove
│   │   ├── channelf
│   │   ├── cloud
│   │   ├── coco
│   │   ├── colecovision
│   │   ├── cps
│   │   ├── cps1
│   │   ├── cps2
│   │   ├── cps3
│   │   ├── crvision
│   │   ├── daphne
│   │   ├── desktop
│   │   ├── doom
│   │   ├── dos
│   │   ├── dragon32
│   │   ├── dreamcast
│   │   ├── easyrpg
│   │   ├── epic
│   │   ├── famicom
│   │   ├── fba
│   │   ├── fbneo
│   │   ├── fds
│   │   ├── flash
│   │   ├── fmtowns
│   │   ├── gameandwatch
│   │   ├── gamecom
│   │   ├── gamecube
│   │   ├── gamegear
│   │   ├── gb
│   │   ├── gba
│   │   ├── gbc
│   │   ├── gc -> gamecube
│   │   ├── genesis
│   │   ├── gx4000
│   │   ├── intellivision
│   │   ├── j2me
│   │   ├── kodi
│   │   ├── lcdgames
│   │   ├── lutris
│   │   ├── lutro
│   │   ├── macintosh
│   │   ├── mame
│   │   ├── mame-advmame
│   │   ├── mame-mame4all
│   │   ├── mastersystem
│   │   ├── megacd
│   │   ├── megacdjp
│   │   ├── megadrive
│   │   ├── megadrivejp
│   │   ├── megaduck
│   │   ├── mess
│   │   ├── model2
│   │   ├── model3
│   │   ├── moonlight
│   │   ├── moto
│   │   ├── msx
│   │   ├── msx1
│   │   ├── msx2
│   │   ├── msxturbor
│   │   ├── mugen
│   │   ├── multivision
│   │   ├── n3ds -> 3ds
│   │   ├── n64
│   │   ├── n64dd
│   │   ├── naomi
│   │   ├── naomigd
│   │   ├── nds
│   │   ├── neogeo
│   │   ├── neogeocd
│   │   ├── neogeocdjp
│   │   ├── nes
│   │   ├── ngp
│   │   ├── ngpc
│   │   ├── odyssey2
│   │   ├── openbor
│   │   ├── oric
│   │   ├── palm
│   │   ├── pc
│   │   ├── pc88
│   │   ├── pc98
│   │   ├── pcengine
│   │   ├── pcenginecd
│   │   ├── pcfx
│   │   ├── pico8
│   │   ├── pokemini
│   │   ├── ports
│   │   ├── primehacks
│   │   ├── ps2
│   │   ├── ps3
│   │   ├── ps4
│   │   ├── psp
│   │   ├── psvita
│   │   ├── psx
│   │   ├── pv1000
│   │   ├── quake
│   │   ├── remoteplay
│   │   ├── samcoupe
│   │   ├── satellaview
│   │   ├── saturn
│   │   ├── saturnjp
│   │   ├── scummvm
│   │   ├── sega32x
│   │   ├── sega32xjp
│   │   ├── sega32xna
│   │   ├── segacd
│   │   ├── sfc
│   │   ├── sg-1000
│   │   ├── sgb
│   │   ├── snes
│   │   ├── sneshd
│   │   ├── snesna
│   │   ├── solarus
│   │   ├── spectravideo
│   │   ├── steam
│   │   ├── stratagus
│   │   ├── sufami
│   │   ├── supergrafx
│   │   ├── supervision
│   │   ├── switch
│   │   ├── symbian
│   │   ├── tanodragon
│   │   ├── tg16
│   │   ├── tg-cd
│   │   ├── ti99
│   │   ├── tic80
│   │   ├── to8
│   │   ├── trs-80
│   │   ├── uzebox
│   │   ├── vectrex
│   │   ├── vic20
│   │   ├── videopac
│   │   ├── virtualboy
│   │   ├── vsmile
│   │   ├── wasm4
│   │   ├── wii
│   │   ├── wiiu
│   │   │   └── roms
│   │   ├── wonderswan
│   │   ├── wonderswancolor
│   │   ├── x1
│   │   ├── x68000
│   │   ├── xbox
│   │   ├── xbox360
│   │   │   └── roms
│   │   ├── zmachine
│   │   ├── zx81
│   │   └── zxspectrum
│   ├── store
│   │   ├── gamegear
│   │   ├── gb
│   │   ├── gba
│   │   ├── gbc
│   │   ├── genesis
│   │   ├── mastersystem
│   │   ├── nes
│   │   └── snes
│   └── tools
│       ├── binaries
│       ├── binupdate
│       ├── chdconv
│       ├── cloud
│       ├── flatpakupdate
│       ├── launchers
│       ├── remoteplayclients
│       ├── remoteplaywhatever
│       └── updater
├── blob_storage
│   └── 08119cde-284f-4f9b-842a-3570c31a4fd1
├── Cache
│   └── Cache_Data
│       └── index-dir
├── Code Cache
│   ├── js
│   │   └── index-dir
│   └── wasm
│       └── index-dir
├── Crashpad
├── Dictionaries
├── GPUCache
├── Local Storage
│   └── leveldb
├── logs
└── Session Storage
$HOME/.steam/steam/controller_base/templates/
templates
├── cemu_controller_config.vdf
├── citra_controller_config.vdf
├── duckstation_controller_config.vdf
├── emudeck_cloud_controller_config.vdf
├── emulationstation-de_controller_config.vdf
├── melonds_controller_config.vdf
├── mGBA_controller_config.vdf
├── ppsspp_controller_config.vdf
└── rmg_controller_config.vdf
$HOME/homebrew
homebrew
├── plugins
│   └── PowerTools
│       ├── bin
│       │   ├── backend
│       │   └── libryzenadj.so
│       ├── dist
│       │   └── index.js
│       ├── LICENSE
│       ├── main.py
│       ├── package.json
│       ├── plugin.json
│       ├── README.md
│       └── translations
│           ├── build.py
│           ├── es-ES.mo
│           ├── es-ES.po
│           ├── fr-CA.mo
│           ├── fr-CA.po
│           ├── fr-FR.mo
│           ├── it-IT.mo
│           ├── it-IT.po
│           ├── pt.pot
│           ├── ru-RU.mo
│           ├── ru-RU.po
│           ├── test.mo
│           ├── test.po
│           ├── uk-UA.mo
│           ├── uk-UA.po
│           ├── zh-CN.mo
│           ├── zh-CN.po
│           ├── zh-HK.mo
│           └── zh-HK.po
├── services
│   └── PluginLoader
└── settings
    └── loader.json
Emulators
Cemu Native
$HOME/.config/Cemu/
Cemu/
├── controllerProfiles
│   ├── controller0.xml
│   ├── controller1.xml
│   ├── controller2.xml
│   ├── controller3.xml
│   ├── Deck-Gamepad-Gyro.xml
│   ├── Deck-P1.xml
│   ├── Deck-P2.xml
│   ├── Deck-P3.xml
│   └── Deck-P4.xml
└── settings.xml
$HOME/.local/share/Cemu/
$HOME/.cache/Cemu
Emulation/roms/wiiu/mlc01
- Saves Location:
- Symlink:
Emulation/saves/Cemu/saves/ - Target:
Emulation/roms/wiiu/mlc01/usr/save
- Symlink:
Cemu Proton
Emulation/roms/wiiu/
wiiu
├── Cemu.exe
├── controllerProfiles
│   ├── controller0.xml
│   ├── controller0.xml.bak
│   ├── deck2.xml
│   ├── deck2.xml.bak
│   ├── deck3.xml
│   ├── deck3.xml.bak
│   ├── deck4.xml
│   ├── deck4.xml.bak
│   ├── Deck-Gamepad-Gyro.xml
│   ├── Deck-Gamepad-Gyro.xml.bak
│   ├── Deck.xml
│   └── Deck.xml.bak
├── gameProfiles
│   ├── default
│   └── example.ini
├── graphicPacks
│   └── downloadedGraphicPacks
├── keys.txt
├── log.txt
├── memorySearcher
├── mlc01
│   ├── readme.txt
│   ├── readme.txt.bak
│   ├── sys
│   └── usr
├── resources
│   ├── ca
│   ├── de
│   ├── es
│   ├── fr
│   ├── hu
│   ├── it
│   ├── ja
│   ├── ko
│   ├── libusb-1.0.dll
│   ├── nb
│   ├── nl
│   ├── pl
│   ├── pt
│   ├── ru
│   ├── sharedFonts
│   ├── sv
│   ├── tr
│   ├── uk
│   ├── WinGamingInput.dll
│   └── zh
├── roms
├── settings.xml
├── shaderCache
│   ├── driver
│   ├── info.txt
│   ├── precompiled
│   └── transferable
└── title_list_cache.xml
Emulation/roms/wiiu/mlc01
- Saves Location:
- Symlink:
Emulation/saves/Cemu/saves/ - Target:
Emulation/roms/wiiu/mlc01/usr/save
- Symlink:
Citra
$HOME/.var/app/org.citra_emu.citra
org.citra_emu.citra/
├── cache
├── config
    ├── citra-emu
    │   ├── custom
    │   ├── qt-config.ini
    │   ├── qt-config.ini.bak
    │   └── telemetry_id
    ├── kdeglobals
    ├── pulse
    │   └── cookie
    ├── QtProject.conf
    └── user-dirs.dirs
└── data
    └── citra-emu
        ├── cheats
        ├── load
        ├── log
        ├── nand
        ├── screenshots
        ├── sdmc
        ├── shaders
        ├── states
        └── sysdata
- Saves Location:
- Symlink:
Emulation/saves/citra/saves - Target:
/home/deck/.var/app/org.citra_emu.citra/data/citra-emu/sdmc
- Symlink:
- Save States Location:
- Symlink:
Emulation/saves/citra/states/ - Target:
/home/deck/.var/app/org.citra_emu.citra/data/citra-emu/states
- Symlink:
Dolphin
$HOME/.var/app/org.DolphinEmu.dolphin-emu
org.DolphinEmu.dolphin-emu/
├── cache
├── config
    ├── dolphin-emu
    │   ├── Debugger.ini
    │   ├── Dolphin.ini
    │   ├── DSUClient.ini
    │   ├── FreeLookController.ini
    │   ├── FreeLook.ini
    │   ├── GameSettings
    │   ├── GBA.ini
    │   ├── GCKeyNew.ini
    │   ├── GCPadNew.ini
    │   ├── GFX.ini
    │   ├── GraphicMods
    │   ├── Hotkeys.ini
    │   ├── Logger.ini
    │   ├── Profiles
    │   │   ├── GCPad
    │   │   │   ├── GC_base.ini
    │   │   │   └── GC_reverse_camera.ini
    │   │   └── Wiimote
    │   │       ├── Wii_base_nunchuck.ini
    │   │       ├── Wii_base_nunchuck_with_touchpad.ini
    │   │       ├── Wii_classic_controller.ini
    │   │       ├── Wii_no_attachment.ini
    │   │       ├── Wii_no_attachment_with_touchpad.ini
    │   │       └── Wii_NoController.ini
    │   ├── Qt.ini
    │   └── WiimoteNew.ini
    ├── kdeglobals
    └── user-dirs.dirs
└── data
    └── dolphin-emu
        ├── Dump
        │   ├── Audio
        │   ├── DSP
        │   ├── Frames
        │   ├── Objects
        │   ├── SSL
        │   └── Textures
        ├── GameSettings
        ├── GC
        │   ├── EUR
        │   ├── JAP
        │   └── USA
        ├── Load
        │   ├── DynamicInputTextures
        │   ├── GraphicMods
        │   ├── Riivolution
        │   ├── Textures
        │   └── WiiSDSync
        ├── Logs
        │   └── Mail
        ├── Maps
        ├── ResourcePacks
        ├── ScreenShots
        ├── Shaders
        │   └── Anaglyph
        ├── StateSaves
        ├── Styles
        ├── Themes
        └── Wii
            ├── import
            ├── meta
            ├── shared1
            ├── shared2
            ├── sys
            ├── ticket
            ├── title
            ├── tmp
            └── wfs
- Saves (Wii):
- Symlink:
Emulation/saves/dolphin/Wii - Target:
/home/deck/.var/app/org.DolphinEmu.dolphin-emu/data/dolphin-emu/Wii
- Symlink:
- Saves (GameCube):
- Symlink:
Emulation/saves/dolphin/GC - Target:
/home/deck/.var/app/org.DolphinEmu.dolphin-emu/data/dolphin-emu/GC
- Symlink:
- Save States (Wii):
- Symlink:
Emulation/saves/dolphin/StateSaves - Target:
/home/deck/.var/app/org.DolphinEmu.dolphin-emu/data/dolphin-emu/StateSaves
- Symlink:
- Save States (GameCube):
- Symlink:
Emulation/saves/dolphin/StateSaves - Target:
/home/deck/.var/app/org.DolphinEmu.dolphin-emu/data/dolphin-emu/StateSaves
- Symlink:
DuckStation
$HOME/.var/app/org.duckstation.DuckStation
org.duckstation.DuckStation/
├── cache
├── config
│   ├── duckstation
│   │   ├── cache
│   │   ├── cheats
│   │   ├── covers
│   │   ├── dump
│   │   ├── gamesettings
│   │   ├── inputprofiles
│   │   ├── playtime.dat
│   │   ├── screenshots
│   │   ├── settings.ini
│   │   ├── settings.ini.bak
│   │   ├── shaders
│   │   └── textures
│   ├── kdeglobals
│   ├── pulse
│   │   └── cookie
│   ├── QtProject.conf
│   └── user-dirs.dirs
└── data
    └── duckstation
        ├── settings.ini
        └── settings.ini.bak
- Saves:
Emulation/saves/duckstation/saves - Save States:
Emulation/saves/duckstation/states
MAME
$HOME/.mame
Emulation/storage/mame
- Saves:
Emulation/saves/MAME/saves - Save States:
Emulation/saves/MAME/states
melonDS
$HOME/.var/app/net.kuribo64.melonDS
net.kuribo64.melonDS
├── cache
├── config
│   ├── kdeglobals
│   ├── melonDS
│   │   ├── melonDS.ini
│   │   ├── melonDS.ini.bak
│   │   ├── timewarp.mln
│   │   └── wfcsettings.bin
│   ├── pulse
│   │   └── cookie
│   ├── QtProject.conf
│   └── user-dirs.dirs
└── data
    ├── user-places.xbel
    ├── user-places.xbel.bak
    └── user-places.xbel.tbcache
- Saves:
Emulation/saves/melonds/saves - Save States:
Emulation/saves/melonds/states
mGBA
$HOME/.config/mgba
mgba/
├── config.ini
├── config.ini.bak
├── library.sqlite3
├── nointro.sqlite3
├── qt.ini
├── qt.ini.bak
└── updater.log
Emulation/storage/mgba
- Saves:
Emulation/saves/mgba/saves - Save States
Emulation/saves/mgba/states
PCSX2
$HOME/.config/PCSX2
PCSX2
├── cheats
├── gamesettings
├── inis
│   └── PCSX2.ini
├── inputprofiles
├── logs
├── memcards
├── patches
├── sstates
└── videos
Emulation/storage/pcsx2
- Saves:
Emulation/saves/pcsx2/saves - Save States
Emulation/saves/pcsx2/states
PPSSPP
$HOME/.var/app/org.ppsspp.PPSSPP
org.ppsspp.PPSSPP
├── cache
├── config
│   ├── ppsspp
│   │   └── PSP
│   │       ├── CHEATS
│   │       ├── GAME
│   │       ├── PPSSPP_STATE
│   │       ├── SAVEDATA
│   │       ├── SYSTEM
│   │       │   ├── controls.ini
│   │       │   └── ppsspp.ini
│   │       └── TEXTURES
│   ├── pulse
│   │   └── cookie
│   └── user-dirs.dirs
└── data
- Saves:
- Symlink:
Emulation/saves/ppsspp/saves - Target:
/home/deck/.var/app/org.ppsspp.PPSSPP/config/ppsspp/PSP/SAVEDATA
- Symlink:
- Save States:
- Symlink:
Emulation/saves/ppsspp/states/ - Target:
/home/deck/.var/app/org.ppsspp.PPSSPP/config/ppsspp/PSP/PPSSPP_STATE
- Symlink:
PrimeHack
$HOME/.var/app/io.github.shiiion.primehack
io.github.shiiion.primehack/
├── cache
│   ├── dolphin-emu
│   │   └── GameCovers
│   ├── fontconfig
│   ├── mesa_shader_cache
│   └── tmp
├── config
│   └── dolphin-emu
│       ├── GraphicMods
│       └── Profiles
│           └── Wiimote
└── data
    └── dolphin-emu
        ├── Dump
        │   ├── Audio
        │   ├── DSP
        │   ├── Frames
        │   ├── Objects
        │   ├── SSL
        │   └── Textures
        ├── GameSettings
        ├── GC
        │   ├── EUR
        │   ├── JAP
        │   └── USA
        ├── Load
        │   ├── GraphicMods
        │   ├── Riivolution
        │   ├── Textures
        │   │   └── R3M
        │   │       ├── 0EXTRA - Steam Deck Button Prompts
        │   │       │   ├── Common
        │   │       │   ├── MP1
        │   │       │   ├── MP2
        │   │       │   └── MP3
        │   │       └── 0EXTRA - Wiimote Warning Replacement
        │   └── WiiSDSync
        ├── Logs
        │   └── Mail
        ├── Maps
        ├── ResourcePacks
        ├── ScreenShots
        ├── Shaders
        │   └── Anaglyph
        ├── StateSaves
        ├── Styles
        ├── Themes
        └── Wii
            ├── import
            ├── meta
            ├── shared1
            ├── shared2
            │   └── sys
            ├── sys
            ├── ticket
            ├── title
            ├── tmp
            └── wfs
- Saves:
- Symlink:
Emulation/saves/primehack/Wii - Target:
/home/deck/.var/app/io.github.shiiion.primehack/data/dolphin-emu/Wii
- Symlink:
- Save States:
- Symlink:
Emulation/saves/primehack/Savestates - Target:
/home/deck/.var/app/io.github.shiiion.primehack/data/dolphin-emu/StateSaves/
- Symlink:
RetroArch
$HOME/.var/app/org.libretro.RetroArch/config/retroarch
org.libretro.RetroArch
├── cache
├── config
│   ├── pulse
│   └── retroarch
│       ├── assets
│       ├── autoconfig
│       ├── cheats
│       ├── config
│       │   ├── Beetle Cygne
│       │   ├── Beetle Lynx
│       │   ├── Beetle NeoPop
│       │   ├── Beetle PCE
│       │   ├── Beetle PCE Fast
│       │   ├── Beetle PSX
│       │   ├── Beetle PSX HW
│       │   ├── Beetle Saturn
│       │   ├── Beetle SuperGrafx
│       │   ├── Beetle WonderSwan
│       │   ├── blueMSX
│       │   ├── bsnes-hd beta
│       │   ├── dolphin_emu
│       │   ├── DOSBox-pure
│       │   ├── DOSBox Pure
│       │   ├── FinalBurn Neo
│       │   ├── Flycast
│       │   ├── Gambatte
│       │   ├── Gearsystem
│       │   ├── Genesis Plus GX
│       │   ├── Handy
│       │   ├── Hatari
│       │   ├── Kronos
│       │   ├── MAME
│       │   ├── MAME 2003-Plus
│       │   ├── melonDS
│       │   ├── Mesen
│       │   ├── mGBA
│       │   ├── Mupen64Plus-Next
│       │   ├── NeoCD
│       │   ├── Nestopia
│       │   ├── ParaLLEl N64
│       │   ├── PicoDrive
│       │   ├── PPSSPP
│       │   ├── PUAE
│       │   ├── remaps
│       │   │   └── Gambatte
│       │   ├── SameBoy
│       │   ├── Snes9x
│       │   ├── Stella
│       │   ├── SwanStation
│       │   ├── VICE x64
│       │   ├── VICE x64sc
│       │   ├── VICE xscpu64
│       │   ├── VICE xvic
│       │   ├── YabaSanshiro
│       │   └── Yabause
│       ├── cores
│       ├── database
│       │   └── rdb
│       ├── downloads
│       │   └── core_backups
│       │       ├── 81_libretro
│       │       ├── a5200_libretro
│       │       ├── atari800_libretro
│       │       ├── bluemsx_libretro
│       │       ├── bsnes_hd_beta_libretro
│       │       ├── bsnes_libretro
│       │       ├── cap32_libretro
│       │       ├── citra2018_libretro
│       │       ├── citra_libretro
│       │       ├── desmume_libretro
│       │       ├── dosbox_core_libretro
│       │       ├── dosbox_svn_libretro
│       │       ├── easyrpg_libretro
│       │       ├── fbalpha2012_cps1_libretro
│       │       ├── fbalpha2012_cps2_libretro
│       │       ├── fbalpha2012_cps3_libretro
│       │       ├── fbalpha2012_neogeo_libretro
│       │       ├── fbneo_libretro
│       │       ├── fceumm_libretro
│       │       ├── flycast_libretro
│       │       ├── fmsx_libretro
│       │       ├── gambatte_libretro
│       │       ├── genesis_plus_gx_libretro
│       │       ├── genesis_plus_gx_wide_libretro
│       │       ├── gpsp_libretro
│       │       ├── handy_libretro
│       │       ├── hatari_libretro
│       │       ├── kronos_libretro
│       │       ├── lutro_libretro
│       │       ├── mame2000_libretro
│       │       ├── mame2003_plus_libretro
│       │       ├── mame2010_libretro
│       │       ├── mame_libretro
│       │       ├── mednafen_lynx_libretro
│       │       ├── mednafen_ngp_libretro
│       │       ├── mednafen_pce_fast_libretro
│       │       ├── mednafen_pce_libretro
│       │       ├── mednafen_pcfx_libretro
│       │       ├── mednafen_psx_hw_libretro
│       │       ├── mednafen_psx_libretro
│       │       ├── mednafen_saturn_libretro
│       │       ├── mednafen_supergrafx_libretro
│       │       ├── mednafen_vb_libretro
│       │       ├── mednafen_wswan_libretro
│       │       ├── melonds_libretro
│       │       ├── mesen_libretro
│       │       ├── mgba_libretro
│       │       ├── mu_libretro
│       │       ├── mupen64plus_next_libretro
│       │       ├── neocd_libretro
│       │       ├── nestopia_libretro
│       │       ├── np2kai_libretro
│       │       ├── nxengine_libretro
│       │       ├── o2em_libretro
│       │       ├── parallel_n64_libretro
│       │       ├── pcsx2_libretro
│       │       ├── pcsx_rearmed_libretro
│       │       ├── picodrive_libretro
│       │       ├── ppsspp_libretro
│       │       ├── prboom_libretro
│       │       ├── prosystem_libretro
│       │       ├── puae_libretro
│       │       ├── px68k_libretro
│       │       ├── quasi88_libretro
│       │       ├── quicknes_libretro
│       │       ├── race_libretro
│       │       ├── same_cdi_libretro
│       │       ├── scummvm_libretro
│       │       ├── snes9x2010_libretro
│       │       ├── snes9x_libretro
│       │       ├── stella2014_libretro
│       │       ├── stella_libretro
│       │       ├── swanstation_libretro
│       │       ├── tic80_libretro
│       │       ├── tyrquake_libretro
│       │       ├── vbam_libretro
│       │       ├── vba_next_libretro
│       │       ├── vecx_libretro
│       │       ├── vice_x128_libretro
│       │       ├── vice_x64_libretro
│       │       ├── vice_x64sc_libretro
│       │       ├── vice_xscpu64_libretro
│       │       ├── vice_xvic_libretro
│       │       ├── vitaquake2_libretro
│       │       ├── vitaquake2-rogue_libretro
│       │       ├── vitaquake2-xatrix_libretro
│       │       ├── vitaquake2-zaero_libretro
│       │       ├── vitaquake3_libretro
│       │       ├── wasm4_libretro
│       │       └── yabause_libretro
│       ├── filters
│       │   ├── audio
│       │   └── video
│       ├── layouts
│       ├── logs
│       ├── overlay
│       ├── overlays
│       │   └── pegasus
│       ├── playlists
│       │   └── logs
│       │       ├── Beetle Lynx
│       │       ├── Beetle PCE
│       │       ├── Beetle PSX
│       │       ├── Beetle Saturn
│       │       ├── Beetle SuperGrafx
│       │       ├── blueMSX
│       │       ├── Gambatte
│       │       ├── Handy
│       │       ├── MAME (Git)
│       │       ├── melonDS
│       │       ├── mGBA
│       │       ├── Mupen64Plus-Next
│       │       ├── ParaLLEl N64
│       │       └── Snes9x
│       ├── records
│       ├── records_config
│       ├── saves
│       │   └── mame
│       │       ├── cfg
│       │       └── nvram
│       ├── screenshots
│       ├── shaders
│       │   └── shaders_slang
│       │       ├── anamorphic
│       │       ├── anti-aliasing
│       │       ├── auto-box
│       │       ├── bezel
│       │       ├── blurs
│       │       ├── border
│       │       ├── cel
│       │       ├── crt
│       │       ├── cubic
│       │       ├── ddt
│       │       ├── deblur
│       │       ├── denoisers
│       │       ├── dithering
│       │       ├── eagle
│       │       ├── film
│       │       ├── fsr
│       │       ├── gpu
│       │       ├── handheld
│       │       ├── hdr
│       │       ├── hqx
│       │       ├── include
│       │       ├── interpolation
│       │       ├── linear
│       │       ├── misc
│       │       ├── motionblur
│       │       ├── motion-interpolation
│       │       ├── nedi
│       │       ├── nes_raw_palette
│       │       ├── nnedi3
│       │       ├── ntsc
│       │       ├── omniscale
│       │       ├── pal
│       │       ├── presets
│       │       ├── procedural
│       │       ├── quad
│       │       ├── reshade
│       │       ├── sabr
│       │       ├── scalefx
│       │       ├── scalehq
│       │       ├── scalenx
│       │       ├── scanlines
│       │       ├── sharpen
│       │       ├── spec
│       │       ├── stereoscopic-3d
│       │       ├── test
│       │       ├── vhs
│       │       ├── warp
│       │       ├── windowed
│       │       ├── xbr
│       │       ├── xbrz
│       │       ├── xsal
│       │       └── xsoft
│       ├── states
│       ├── system
│       └── thumbnails
└── data
- Saves:
- Symlink:
Emulation/saves/retroarch/saves - Target Location:
/home/deck/.var/app/org.libretro.RetroArch/config/retroarch/saves/
- Symlink:
- Save States:
- Symlink:
Emulation/saves/retroarch/states - Target Location:
/home/deck/.var/app/org.libretro.RetroArch/config/retroarch/states/
- Symlink:
Rosalie's Mupen GUI
$HOME/.var/app/com.github.Rosalie241.RMG
com.github.Rosalie241.RMG
├── cache
├── config
│   ├── kdeglobals
│   ├── pulse
│   │   └── cookie
│   ├── QtProject.conf
│   ├── RMG
│   │   ├── GLideN64.ini
│   │   ├── GLideN64.ini.bak
│   │   ├── mupen64plus.cfg
│   │   └── mupen64plus.cfg.bak
│   └── user-dirs.dirs
└── data
    └── RMG
        ├── Cheats-User
        └── Save
            ├── Game
            └── State
- Saves:
Emulation/saves/RMG/saves - Save States:
Emulation/saves/RMG/states
RPCS3
$HOME/.var/app/net.rpcs3.RPCS3
net.rpcs3.RPCS3
├── cache
│   ├── fontconfig
│   ├── mesa_shader_cache
│   │   ├── 17
│   │   ├── 9b
│   │   ├── d6
│   │   └── ea
│   ├── rpcs3
│   │   ├── savestates
│   │   ├── shaderlog
│   │   └── spu_progs
│   └── tmp
├── config
│   ├── kdeglobals
│   ├── pulse
│   │   └── cookie
│   ├── QtProject.conf
│   ├── rpcs3
│   │   ├── captures
│   │   ├── config.yml
│   │   ├── dev_bdvd
│   │   ├── dev_flash
│   │   ├── dev_flash2
│   │   ├── dev_flash3
│   │   ├── dev_hdd1
│   │   │   └── caches
│   │   ├── dev_usb000
│   │   ├── games.yml
│   │   ├── GuiConfigs
│   │   │   └── CurrentSettings.ini
│   │   ├── Icons
│   │   ├── patches
│   │   ├── sounds
│   │   └── uuid
│   └── user-dirs.dirs
└── data
Emulation/storage/rpcs3
- Saves:
- Symlink:
Emulation/saves/rpcs3/saves - Target:
Emulation/storage/rpcs3/dev_hdd0/home/00000001/savedata
- Symlink:
Ryujinx
$HOME/.config/Ryujinx
Ryujinx/
├── bis
│   ├── system
│   │   ├── Contents
│   │   └── save
│   └── user
│       ├── Contents
│       ├── save
│       ├── saveMeta
│       └── temp
├── Config.json
├── Config.json.bak
├── games -> Emulation/storage/ryujinx/games/
├── mods
│   ├── contents
│   ├── exefs_patches
│   └── nro_patches
├── profiles
│   └── controller
│       ├── Deck.json
│       └── Deck.json.bak
├── sdcard
│   ├── atmosphere
│   │   ├── contents
│   │   ├── exefs_patches
│   │   └── nro_patches
│   ├── Nintendo
│   │   ├── Contents
│   │   └── save
│   └── ocw-config.json
└── system
    ├── prod.keys
    └── Profiles.json
Emulation/bios/Ryujinx
- Saves:
- Symlink:
Emulation/saves/ryujinx/saves - Target:
/home/deck/.config/Ryujinx/bis/user/save
- Symlink:
- saveMeta:
- Symlink:
Emulation/saves/Ryujinx/saveMeta - Target:
/home/deck/.config/Ryujinx/bis/user/saveMeta
- Symlink:
ScummVM
$HOME/.var/app/org.scummvm.ScummVM
org.scummvm.ScummVM/
├── cache
│   ├── fontconfig
│   ├── scummvm
│   │   ├── icons
│   │   └── logs
│   │       └── scummvm.log
│   └── tmp
├── config
│   ├── pulse
│   │   └── cookie
│   ├── scummvm
│   │   ├── scummvm.ini
│   │   └── scummvm.ini.bak
│   └── user-dirs.dirs
└── data
    └── scummvm
- Saves:
Emulation/saves/scummvm/saves
Vita3K
$HOME/.config/Vita3K
$HOME/.local/share/Vita3K
$HOME/.cache/Vita3K
Emulation/storage/Vita3K
Vita3K/
├── gro0
├── grw0
├── host0
├── imc0
├── os0
│   ├── kd
│   ├── sm
│   ├── ue
│   └── us
├── pd0
├── sa0
│   └── data
├── sd0
├── tm0
├── ud0
├── uma0
│   └── data
├── ur0
├── ux0
│   ├── app
│   ├── data
│   ├── license
│   ├── temp
│   ├── theme
│   └── user
│       └──00
│           └──savedata
├── vd0
├── vs0
│   ├── app
│   ├── data
│   ├── sys
│   ├── tool
│   └── vsh
└── xmc0
- Saves:
Emulation/storage/Vita3K/ux0/user/00/savedata- Save folders correspond to a game's Title ID. To locate your game's Title ID, open Vita3K, right click a game, and click
Information
- Save folders correspond to a game's Title ID. To locate your game's Title ID, open Vita3K, right click a game, and click
Xemu
$HOME/.var/app/app.xemu.xemu
app.xemu.xemu/
├── cache
├── config
│   ├── glib-2.0
│   │   └── settings
│   ├── gtk-3.0
│   │   └── bookmarks
│   ├── ibus
│   │   └── bus
│   ├── pulse
│   │   └── cookie
│   └── user-dirs.dirs
└── data
    ├── recently-used.xbel
    └── xemu
        └── xemu
            ├── shader_cache_list
            ├── shaders
            ├── xemu.toml
            └── xemu.toml.bak
Emulation/storage/xemu
- Saves:
Emulation/storage/xemu/xbox_hdd.qcow2- To access your saves, read Xemu How to Access Saves
Emulation/storage/xemu/eeprom.bin
Xenia
Emulation/roms/xbox360
xbox360/
├── cache
│   └── modules
│       ├── 591F88BF31D190A8FC6D34699CD04D6D
│       │   └── executable_addr_flags.bin
│       └── 92894AFA8482EBA139E20552587117
│           └── executable_addr_flags.bin
├── LICENSE
├── patches
│   ├── 415607D3 - Gun.patch.toml
│   ├── 415607DD - Tony Hawk's Project 8.patch.toml
│   ├── 415607F2 - Kung Fu Panda.patch.toml
│   ├── 415607F5 - Bee Movie Game.patch.toml
│   ├── 41560817 - Modern Warfare 2 (TU6).patch.toml
│   ├── 415608AF - GoldenEye 007 Reloaded.patch.toml
│   ├── 415608C5 - Family Guy Back to the Multiverse.patch.toml
│   ├── 41560904 - Transformers-Rise of The Dark Spark.patch.toml
│   ├── 425307D1 - The Elder Scrolls IV Oblivion (GOTY).patch.toml
│   ├── 425307DB - Wet.patch.toml
│   ├── 425307E6 - The Elder Scrolls V Skyrim.patch.toml
│   ├── 434307D4 - Resident Evil 5.patch.toml
│   ├── 43430817 - Asura's Wrath.patch.toml
│   ├── 43430824 - DmC Devil May Cry.patch.toml
│   ├── 43430830 - Lost Planet 3.patch.toml
│   ├── 43430841 - Resident Evil.patch.toml
│   ├── 43430842 - Resident Evil 0.patch.toml
│   ├── 434D0822 - Leisure Suit Larry Box Office Bust.patch.toml
│   ├── 445007EA - Onechanbara Bikini Samurai Squad.patch.toml
│   ├── 454107D9 - Need for Speed Most Wanted (2005).patch.toml
│   ├── 454107F9 - Battlefield Bad Company.patch.toml
│   ├── 45410809 - The Simpsons Game.patch.toml
│   ├── 4541080F - The Orange Box (default.xex).patch.toml
│   ├── 4541080F - The Orange Box (engine_360.dll).patch.toml
│   ├── 4541080F - The Orange Box (shaderapidx9_360.dll).patch.toml
│   ├── 4541080F - The Orange Box (tf-bin-Client_360.dll).patch.toml
│   ├── 45410850 - Mirror's Edge.patch.toml
│   ├── 4541087F - Skate 2.patch.toml
│   ├── 454108D8 - Army of Two The 40th Day.patch.toml
│   ├── 454108E6 - Skate 3.patch.toml
│   ├── 454108EF - Bulletstorm.patch.toml
│   ├── 45410914 - Rock Band 3.patch.toml
│   ├── 45410914 - Rock Band 3 TU5.patch.toml
│   ├── 45410915 - Fight Night Champion (TU0).patch.toml
│   ├── 45410915 - Fight Night Champion (TU1).patch.toml
│   ├── 45410915 - Fight Night Champion (TU2).patch.toml
│   ├── 45410916 - Alice Madness Returns.patch.toml
│   ├── 4541092A - Shadows of the Damned.patch.toml
│   ├── 4541096D - SSX.patch.toml
│   ├── 465307D6 - Armored Core 4 (USA).patch.toml
│   ├── 475007D2 - Hail to the Chimp.patch.toml
│   ├── 475807D1 - Lucha Libre AAA Heroes del Ring.patch.toml
│   ├── 494F07D1 - El Shaddai.patch.toml
│   ├── 4B4E0823 - Silent Hill Downpour.patch.toml
│   ├── 4B4E0823 - Silent Hill Downpour (TU1).patch.toml
│   ├── 4B5607E8 - Dead or Alive 5 Ultimate.patch.toml
│   ├── 4C4107D7 - LEGO Star Wars The Complete Saga.patch.toml
│   ├── 4C4107F3 - LEGO Star Wars III The Clone Wars.patch.toml
│   ├── 4D5307D1 - Project Gotham Racing 3 (v10.0 or higher).patch.toml
│   ├── 4D5307D1 - Project Gotham Racing 3 (v9.0 or lower).patch.toml
│   ├── 4D5307D2 - Kameo Elements of Power.patch.toml
│   ├── 4D5307D2 - Kameo Elements of Power (TU2).patch.toml
│   ├── 4D5307D3 - Perfect Dark Zero.patch.toml
│   ├── 4D5307D3 - Perfect Dark Zero (Platinum Hits).patch.toml
│   ├── 4D5307D3 - Perfect Dark Zero (TU3).patch.toml
│   ├── 4D5307D5 - Gears of War.patch.toml
│   ├── 4D5307D5 - Gears of War (TU5).patch.toml
│   ├── 4D5307DF - Blue Dragon.patch.toml
│   ├── 4D5307DF - ブルードラゴン.patch.toml
│   ├── 4D5307E6 - Halo 3.patch.toml
│   ├── 4D5307ED - Banjo-Kazooie Nuts & Bolts.patch.toml
│   ├── 4D5307ED - Banjo-Kazooie Nuts & Bolts (TU3).patch.toml
│   ├── 4D5307F1 - Fable II (1).patch.toml
│   ├── 4D5307F1 - Fable II (2).patch.toml
│   ├── 4D5307F1 - Fable II (GOTY_Platinum Edition).patch.toml
│   ├── 4D5307F1 - Fable II (GOTY_Platinum Edition, TU1).patch.toml
│   ├── 4D5307F2 - Viva Piñata.patch.toml
│   ├── 4D5307F9 - Project Gotham Racing 4.patch.toml
│   ├── 4D5307FA - Lost Odyssey (NTSC-J).patch.toml
│   ├── 4D5307FA - Lost Odyssey.patch.toml
│   ├── 4D53082D - Gears of War 2.patch.toml
│   ├── 4D53082D - Gears of War 2 (TU6).patch.toml
│   ├── 4D53085B - Halo Reach.patch.toml
│   ├── 4D53085F - Viva Piñata Trouble in Paradise.patch.toml
│   ├── 4D53085F - Viva Piñata Trouble in Paradise (TU1).patch.toml
│   ├── 4D530877 - Halo 3 ODST.patch.toml
│   ├── 4D5308AB - Gears of War 3.patch.toml
│   ├── 4D5308AB - Gears of War 3 (TU6 Disc; TU1 XBL).patch.toml
│   ├── 4D53090E - Kinect Star Wars.patch.toml
│   ├── 4D5309B1 - Halo Combat Evolved Anniversary.patch.toml
│   ├── 4D5309C9 - Forza Horizon (E3 Demo).patch.toml
│   ├── 4D5309C9 - Forza Horizon.patch.toml
│   ├── 4D530A26 - Gears of War Judgment.patch.toml
│   ├── 4D530A26 - Gears of War Judgment (TU4).patch.toml
│   ├── 4D530A87 - Fable Anniversary.patch.toml
│   ├── 4D5387E0 - Kameo Elements of Power (kiosk demo).patch.toml
│   ├── 4D5387E9 - Kameo Elements of Power (demo).patch.toml
│   ├── 4D53880C - Halo 3 Alpha.patch.toml
│   ├── 4D53883A - Halo 3 Epsilon (Aug 20th).patch.toml
│   ├── 4D5388BF - Crackdown 2 Demo.patch.toml
│   ├── 4D5707D7 - Blacksite.patch.toml
│   ├── 4D5707DB - Unreal Tournament 3.patch.toml
│   ├── 4D5707DF - TNA Impact (TU1).patch.toml
│   ├── 4E4D07D3 - Ridge Racer 6.patch.toml
│   ├── 4E4D07F0 - Splatterhouse.patch.toml
│   ├── 4E4D080B - Magnacarta2.patch.toml
│   ├── 534307E2 - Bionicle Heroes.patch.toml
│   ├── 5343080B - Batman Arkham Asylum GOTY.patch.toml
│   ├── 534507D6 - Sonic the Hedgehog (2006).patch.toml
│   ├── 53450812 - Sonic Unleashed.patch.toml
│   ├── 53450812 - Sonic Unleashed (TU2).patch.toml
│   ├── 5345085A - Dreamcast Collection.patch.toml
│   ├── 535107E4 - Final Fantasy XIII.patch.toml
│   ├── 535107E8 - Nier.patch.toml
│   ├── 535107FA - Deus Ex Human Revolution Director's Cut.patch.toml
│   ├── 53510806 - Final Fantasy XIII-2.patch.toml
│   ├── 53518810 - Final Fantasy XIII-2 Demo.patch.toml
│   ├── 544307D5 - Ninja Gaiden II (Japan, TU3).patch.toml
│   ├── 544307D5 - Ninja Gaiden II (World).patch.toml
│   ├── 544307D5 - Ninja Gaiden II (World, TU2).patch.toml
│   ├── 545107D1 - Saints Row.patch.toml
│   ├── 545107D1 - Saints Row (TU1).patch.toml
│   ├── 545107F1 - Ratatouille.patch.toml
│   ├── 545107FC - Saints Row 2.patch.toml
│   ├── 545107FC - Saints Row 2 (TU1).patch.toml
│   ├── 545107FE - DAH Path of the Furon.patch.toml
│   ├── 5451083B - 50 Cent Blood on the Sand.patch.toml
│   ├── 54510850 - SpongeBob - Truth or Square.patch.toml
│   ├── 54510866 - WWE All Stars.patch.toml
│   ├── 545407D4 - Amped 3.patch.toml
│   ├── 545407DF - Table Tennis.patch.toml
│   ├── 545407EE - The Darkness.patch.toml
│   ├── 545407F2 - Grand Theft Auto IV.patch.toml
│   ├── 545407F8 - Midnight Club Los Angeles (Complete Edition).patch.toml
│   ├── 545407F8 - Midnight Club Los Angeles.patch.toml
│   ├── 5454082B - Red Dead Redemption (GOTY, Disc 1).patch.toml
│   ├── 5454082B - Red Dead Redemption (GOTY, Disc 2).patch.toml
│   ├── 5454082B - Red Dead Redemption (Original, NTSC).patch.toml
│   ├── 5454082B - Red Dead Redemption (Original, NTSC, TU9).patch.toml
│   ├── 5454082B - Red Dead Redemption-Undead Nightmare (Platinum Hits).patch.toml
│   ├── 5454085D - Bioshock Infinite.patch.toml
│   ├── 545408A7 - Grand Theft Auto V (TU26).patch.toml
│   ├── 545408A7 - Grand Theft Auto V (TU27).patch.toml
│   ├── 555307DC - Far Cry Instincts Predator.patch.toml
│   ├── 555307E5 - Naruto Rise of a Ninja.patch.toml
│   ├── 5553088C - Far Cry 3.patch.toml
│   ├── 565507D4 - The Bourne Conspiracy.patch.toml
│   ├── 565707D0 - Lollipop Chainsaw.patch.toml
│   ├── 565707D0 - Lollipop Chainsaw (Premium Edition).patch.toml
│   ├── 57520802 - Batman Arkham City GOTY.patch.toml
│   ├── 57520802 - Batman Arkham City (TU6).patch.toml
│   ├── 584107D5 - Small Arms.patch.toml
│   ├── 58410889 - Peggle.patch.toml
│   ├── 584108A9 - Bean (GoldenEye 007).patch.toml
│   ├── 584108D3 - Boogie Bunnies.patch.toml
│   ├── 584108DB - A Kingdom for Keflings.patch.toml
│   ├── 584108F6 - Shadow Complex.patch.toml
│   ├── 58410908 - Gel Set & Match.patch.toml
│   ├── 5841090B - Doritos Dash of Destruction.patch.toml
│   ├── 58410954 - Banjo-Kazooie.patch.toml
│   ├── 58410955 - Banjo-Tooie.patch.toml
│   ├── 58410968 - Outrun Online Arcade.patch.toml
│   ├── 5841096A - Hydro Thunder Hurricane.patch.toml
│   ├── 584109FF - Plants vs. Zombies.patch.toml
│   ├── 58410A34 - Crazy Taxi.patch.toml
│   ├── 58410A39 - Space Channel 5 Part 2.patch.toml
│   ├── 58410A70 - Harm's Way.patch.toml
│   ├── 58410B00 - Dead Rising 2 Case West.patch.toml
│   ├── 584111E8 - State of Decay (TU5).patch.toml
│   ├── 584111F7 - Minecraft (XBLA, TU0).patch.toml
│   ├── 584111F7 - Minecraft (XBLA, TU1).patch.toml
│   ├── 584111F7 - Minecraft (XBLA, TU2).patch.toml
│   ├── 584111F7 - Minecraft (XBLA, TU3).patch.toml
│   ├── 584111F7 - Minecraft (XBLA, TU4).patch.toml
│   ├── 5841124F - Doritos Crash Course 2.patch.toml
│   └── 58411436 - Peggle 2.patch.toml
├── portable.txt
├── recent.toml
├── roms
│   └── xbla
├── xenia-canary.config.toml
├── xenia_canary.exe
├── xenia.config.toml
└── xenia.log
- Saves:
Emulation/roms/xbox360/content
Yuzu
$HOME/.config/yuzu
yuzu/
├── custom
├── input
│   ├── emudeck.ini
│   └── emudeck.ini.bak
├── qt-config.ini
├── qt-config.ini.bak
└── telemetry_id
$HOME/.local/share/yuzu
Emulation/storage/yuzu
yuzu/
├── dump
├── load
├── nand
│   └── user
│       ├── Contents
│       │   ├── placehld
│       │   └── registered
│       ├── save
│       │   ├── 0000000000000000
│       │   └── cache
│       └── temp
├── screenshots
├── sdmc
└── tas
Emulation/bios/yuzu
yuzu/
├── firmware -> Emulation/storage/yuzu/nand/system/Contents/registered/
└── keys -> /home/deck/.local/share/yuzu/keys/
- Saves:
- Symlink:
Emulation/saves/yuzu/ - Target Location:
Emulation/storage/yuzu/nand/user/save/
- Symlink:
Tools
ES-DE
$HOME/ES-DE
ES-DE
├── collections
├── custom_systems
│   └── es_systems.xml
├── es_log.txt
├── es_settings.xml
├── gamelists
│   ├── atarilynx
│   │   └── gamelist.xml
│   ├── gc
│   │   └── gamelist.xml
│   ├── n3ds
│   │   └── gamelist.xml
│   ├── nds
│   │   └── gamelist.xml
│   ├── ps2
│   │   └── gamelist.xml
│   ├── psp
│   │   └── gamelist.xml
│   ├── psx
│   │   └── gamelist.xml
│   ├── saturn
│   │   └── gamelist.xml
│   ├── scummvm
│   │   └── gamelist.xml
│   └── wii
│       └── gamelist.xml
└── themes
    └── epic-noir-revisited-es-de
Emulation/tools/downloaded_media
This folder will also have your scraped media in folders corresponding to the system name.
Steam ROM Manager
$HOME/.config/steam-rom-manager/
steam-rom-manager
├── blob_storage
│   └── 5257b979-4c93-4039-b1a7-282225ecfc98
├── Cache
│   └── Cache_Data
│       ├── 028ba8726b422f79_0
│       ├── 04fe5a4b67f8af7b_0
│       ├── 0976f5d716b332e9_0
│       ├── 0f348937e5e86189_0
│       ├── 1192ebcfbc5b9781_0
│       ├── 18a70390e8adea78_0
│       ├── 1925722440a825a7_0
│       ├── 1ca4eabb72dee2db_0
│       ├── 225b67431b988dfc_0
│       ├── 2833994317b5cca4_0
│       ├── 2b5f485dd82e7f3f_0
│       ├── 2ceeece2a1cf1aea_0
│       ├── 2f05b0ecfe0a1308_0
│       ├── 2fd315871bbd6f25_0
│       ├── 31914ef0d9985f40_0
│       ├── 320bf6fc3f2f9680_0
│       ├── 33a91cc15ddaa3bd_0
│       ├── 34a5f1d4cdc60565_0
│       ├── 377c6707127786b1_0
│       ├── 38f424c004064921_0
│       ├── 3bfbf333de5ff389_0
│       ├── 3d98f5534554bf00_0
│       ├── 47878111e4e8d230_0
│       ├── 48e1e68c567a2030_0
│       ├── 4c76a51995c0aaf9_0
│       ├── 51a3d64110fe92ce_0
│       ├── 5283edf90cf4ab50_0
│       ├── 58f759a9647bda1d_0
│       ├── 694140bea313acca_0
│       ├── 6b695849cca9a492_0
│       ├── 703de038b8383ac9_0
│       ├── 7194fa4b9742ab08_0
│       ├── 7adbf1d7b310899a_0
│       ├── 7ea573902f3ae92a_0
│       ├── 7f26c167b650eb41_0
│       ├── 7f29309fc2bd84cb_0
│       ├── 7ffbcc65a4d03cf3_0
│       ├── 80e5f9555d5bc5c1_0
│       ├── 8372f8a31e7cf34b_0
│       ├── 85f6cb26925af2cb_0
│       ├── 8667d7a8d2f4520f_0
│       ├── 8c29033759f4e271_0
│       ├── 8d0888bd4c9f267e_0
│       ├── 8d5c29462101ee23_0
│       ├── 8da02db6d04bc3ce_0
│       ├── 94714b57b99d9aa8_0
│       ├── 9796d935872d0cdf_0
│       ├── 9d92505a097ded22_0
│       ├── a82a3d8302433987_0
│       ├── a9277f390099704e_0
│       ├── b0a493a570acd850_0
│       ├── b15fe038f32a3b29_0
│       ├── b1fb4b8294f75fc1_0
│       ├── b265ee6c7cde6f02_0
│       ├── b660624362731c32_0
│       ├── b683b391129b2057_0
│       ├── b7d445602391d974_0
│       ├── baf5822b54d8c06c_0
│       ├── bbf5d3057aa9d6b5_0
│       ├── c0b80dc9efa01aaa_0
│       ├── c444914d3c162d5a_0
│       ├── c9eef9001ea73de6_0
│       ├── cb81c4b63b31f1b3_0
│       ├── cce000a38fee5a1c_0
│       ├── ce7927f10eca4ffc_0
│       ├── cecc68f9b885d805_0
│       ├── d896565c24c2480e_0
│       ├── dafcf8f7e9be9c86_0
│       ├── ddf8321b7676e4ed_0
│       ├── dec08325c67f7de1_0
│       ├── e382ac5998027bae_0
│       ├── e8de3c24fd3490ef_0
│       ├── f033c17e4aac4f78_0
│       ├── f614ec0891919b28_0
│       ├── f7877064843f7c5d_0
│       ├── fb82e33316207d2b_0
│       ├── ffd026023df4e119_0
│       ├── index
│       └── index-dir
│           └── the-real-index
├── Code Cache
│   ├── js
│   │   ├── index
│   │   └── index-dir
│   │       └── the-real-index
│   └── wasm
│       ├── index
│       └── index-dir
│           └── the-real-index
├── Cookies
├── Cookies-journal
├── Crashpad
│   ├── attachments
│   ├── client_id
│   ├── completed
│   ├── new
│   ├── pending
│   └── settings.dat
├── DawnCache
│   ├── data_0
│   ├── data_1
│   ├── data_2
│   ├── data_3
│   └── index
├── Dictionaries
│   └── en-US-10-1.bdic
├── GPUCache
│   ├── data_0
│   ├── data_1
│   ├── data_2
│   ├── data_3
│   └── index
├── Local Storage
│   └── leveldb
│       ├── 000003.log
│       ├── CURRENT
│       ├── LOCK
│       ├── LOG
│       └── MANIFEST-000001
├── logs
│   └── main.log
├── Network Persistent State
├── Preferences
├── Session Storage
│   ├── 000003.log
│   ├── CURRENT
│   ├── LOCK
│   ├── LOG
│   └── MANIFEST-000001
├── TransportSecurity
└── userData
    ├── configPresets.json
    ├── customVariables.json
    └── window-state.json