RetroArch is an open source and cross platform frontend/framework for emulators.
Website: https://www.retroarch.com/
GitHub: https://github.com/libretro/RetroArch
RetroArch Wiki: https://docs.libretro.com/
RetroArch FAQ: https://www.retroarch.com/?page=faq
RetroArch Table of Contents
-
- How to Optimize Storage (Compression Tool)
- How to Manage Multiple Discs
- How to Configure Multiplayer
- How to Change RetroArch Global Settings
- How to Change RetroArch Hotkeys
- How to Change Shaders
- How to Change Controller Layouts on a Per Game Basis
- How to Change Controller Layouts for a System
- How to Set Game Settings On a Per-Game Basis
- How to Change Settings On a Per-Core Basis
- How to Roll Back RetroArch to an Older Version
- How to Configure Language Settings
- How to Create CUE files
- How to Set Up PKHeX
- How to Install the Universal Pokemon Randomizer
- How to Use ROM Hacks
Getting Started with RetroArch
RetroArch Configuration
- Type of Emulator: Flatpak
- Config Location:
/home/deck/.var/app/org.libretro.RetroArch/config/retroarch - Storage Location:
Emulation/storage/retroarch - ROMs: Refer to the Cheat Sheet
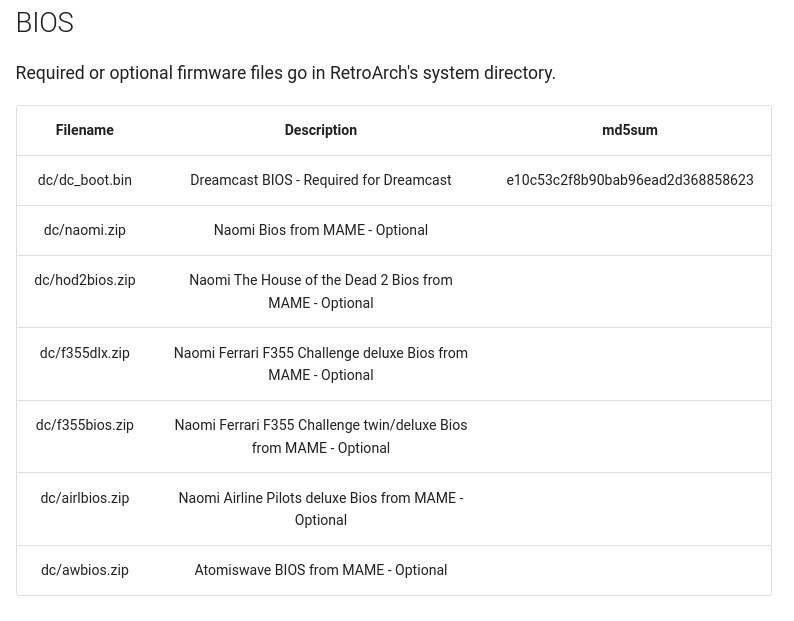
- BIOS: Refer to the Cheat Sheet
- Saves:
- Symlink:
Emulation/saves/retroarch/saves - Target Location:
/home/deck/.var/app/org.libretro.RetroArch/config/retroarch/saves/
- Symlink:
- Save States:
- Symlink:
Emulation/saves/retroarch/states - Target Location:
/home/deck/.var/app/org.libretro.RetroArch/config/retroarch/states/
- Symlink:
- Systems Location:
Emulation/bios- Libretro wikis or guides may mention either placing your files into a
Systemfolder or creating a folder in theSystemdirectory. ThoughEmulation/biosis not namedSystem, treat it as theSystemfolder for RetroArch- For example, the Libretro wiki page for Dreamcast expects you to create a
dcfolder in RetroArch's system directory. Instead, create adcfolder inEmulation/biosand place any required files inEmulation/bios/dc
- For example, the Libretro wiki page for Dreamcast expects you to create a
- Libretro wikis or guides may mention either placing your files into a
Note: ~/.var is an invisible folder by default. In Dolphin (file manager), click the hamburger menu in the top right, click Show Hidden Files to see these folders.
Works With
- Steam Rom Manager
- EmulationStation-DE
RetroArch Folder Locations
These file locations apply regardless of where you chose to install EmuDeck (to your internal SSD, to your SD Card, or elsewhere). Some emulator configuration files will be located on the internal SSD as listed below.
$HOME refers to your home folder. If you are on a Steam Deck, this folder will be named /home/deck (you will likely not see deck in the file path when navigating using the file manager).
Paths beginning with Emulation/.. correspond to your EmuDeck install location. If you installed on an SD Card, your path may be /run/media/mmcblk0p1/Emulation/roms/... If you installed on your internal SSD, your path may be /home/deck/Emulation/roms/..
Note: Folders with a . (.var, .local, .config, etc.) at the beginning are hidden by default. In Dolphin (file manager), click the hamburger menu in the top right, click Show Hidden Files to see these folders.
$HOME/.var/app/org.libretro.RetroArch/config/retroarch
org.libretro.RetroArch
├── cache
├── config
│   ├── pulse
│   └── retroarch
│       ├── assets
│       ├── autoconfig
│       ├── cheats
│       ├── config
│       │   ├── Beetle Cygne
│       │   ├── Beetle Lynx
│       │   ├── Beetle NeoPop
│       │   ├── Beetle PCE
│       │   ├── Beetle PCE Fast
│       │   ├── Beetle PSX
│       │   ├── Beetle PSX HW
│       │   ├── Beetle Saturn
│       │   ├── Beetle SuperGrafx
│       │   ├── Beetle WonderSwan
│       │   ├── blueMSX
│       │   ├── bsnes-hd beta
│       │   ├── dolphin_emu
│       │   ├── DOSBox-pure
│       │   ├── DOSBox Pure
│       │   ├── FinalBurn Neo
│       │   ├── Flycast
│       │   ├── Gambatte
│       │   ├── Gearsystem
│       │   ├── Genesis Plus GX
│       │   ├── Handy
│       │   ├── Hatari
│       │   ├── Kronos
│       │   ├── MAME
│       │   ├── MAME 2003-Plus
│       │   ├── melonDS
│       │   ├── Mesen
│       │   ├── mGBA
│       │   ├── Mupen64Plus-Next
│       │   ├── NeoCD
│       │   ├── Nestopia
│       │   ├── ParaLLEl N64
│       │   ├── PicoDrive
│       │   ├── PPSSPP
│       │   ├── PUAE
│       │   ├── remaps
│       │   │   └── Gambatte
│       │   ├── SameBoy
│       │   ├── Snes9x
│       │   ├── Stella
│       │   ├── SwanStation
│       │   ├── VICE x64
│       │   ├── VICE x64sc
│       │   ├── VICE xscpu64
│       │   ├── VICE xvic
│       │   ├── YabaSanshiro
│       │   └── Yabause
│       ├── cores
│       ├── database
│       │   └── rdb
│       ├── downloads
│       │   └── core_backups
│       │       ├── 81_libretro
│       │       ├── a5200_libretro
│       │       ├── atari800_libretro
│       │       ├── bluemsx_libretro
│       │       ├── bsnes_hd_beta_libretro
│       │       ├── bsnes_libretro
│       │       ├── cap32_libretro
│       │       ├── citra2018_libretro
│       │       ├── citra_libretro
│       │       ├── desmume_libretro
│       │       ├── dosbox_core_libretro
│       │       ├── dosbox_svn_libretro
│       │       ├── easyrpg_libretro
│       │       ├── fbalpha2012_cps1_libretro
│       │       ├── fbalpha2012_cps2_libretro
│       │       ├── fbalpha2012_cps3_libretro
│       │       ├── fbalpha2012_neogeo_libretro
│       │       ├── fbneo_libretro
│       │       ├── fceumm_libretro
│       │       ├── flycast_libretro
│       │       ├── fmsx_libretro
│       │       ├── gambatte_libretro
│       │       ├── genesis_plus_gx_libretro
│       │       ├── genesis_plus_gx_wide_libretro
│       │       ├── gpsp_libretro
│       │       ├── handy_libretro
│       │       ├── hatari_libretro
│       │       ├── kronos_libretro
│       │       ├── lutro_libretro
│       │       ├── mame2000_libretro
│       │       ├── mame2003_plus_libretro
│       │       ├── mame2010_libretro
│       │       ├── mame_libretro
│       │       ├── mednafen_lynx_libretro
│       │       ├── mednafen_ngp_libretro
│       │       ├── mednafen_pce_fast_libretro
│       │       ├── mednafen_pce_libretro
│       │       ├── mednafen_pcfx_libretro
│       │       ├── mednafen_psx_hw_libretro
│       │       ├── mednafen_psx_libretro
│       │       ├── mednafen_saturn_libretro
│       │       ├── mednafen_supergrafx_libretro
│       │       ├── mednafen_vb_libretro
│       │       ├── mednafen_wswan_libretro
│       │       ├── melonds_libretro
│       │       ├── mesen_libretro
│       │       ├── mgba_libretro
│       │       ├── mu_libretro
│       │       ├── mupen64plus_next_libretro
│       │       ├── neocd_libretro
│       │       ├── nestopia_libretro
│       │       ├── np2kai_libretro
│       │       ├── nxengine_libretro
│       │       ├── o2em_libretro
│       │       ├── parallel_n64_libretro
│       │       ├── pcsx2_libretro
│       │       ├── pcsx_rearmed_libretro
│       │       ├── picodrive_libretro
│       │       ├── ppsspp_libretro
│       │       ├── prboom_libretro
│       │       ├── prosystem_libretro
│       │       ├── puae_libretro
│       │       ├── px68k_libretro
│       │       ├── quasi88_libretro
│       │       ├── quicknes_libretro
│       │       ├── race_libretro
│       │       ├── same_cdi_libretro
│       │       ├── scummvm_libretro
│       │       ├── snes9x2010_libretro
│       │       ├── snes9x_libretro
│       │       ├── stella2014_libretro
│       │       ├── stella_libretro
│       │       ├── swanstation_libretro
│       │       ├── tic80_libretro
│       │       ├── tyrquake_libretro
│       │       ├── vbam_libretro
│       │       ├── vba_next_libretro
│       │       ├── vecx_libretro
│       │       ├── vice_x128_libretro
│       │       ├── vice_x64_libretro
│       │       ├── vice_x64sc_libretro
│       │       ├── vice_xscpu64_libretro
│       │       ├── vice_xvic_libretro
│       │       ├── vitaquake2_libretro
│       │       ├── vitaquake2-rogue_libretro
│       │       ├── vitaquake2-xatrix_libretro
│       │       ├── vitaquake2-zaero_libretro
│       │       ├── vitaquake3_libretro
│       │       ├── wasm4_libretro
│       │       └── yabause_libretro
│       ├── filters
│       │   ├── audio
│       │   └── video
│       ├── layouts
│       ├── logs
│       ├── overlay
│       ├── overlays
│       │   └── pegasus
│       ├── playlists
│       │   └── logs
│       │       ├── Beetle Lynx
│       │       ├── Beetle PCE
│       │       ├── Beetle PSX
│       │       ├── Beetle Saturn
│       │       ├── Beetle SuperGrafx
│       │       ├── blueMSX
│       │       ├── Gambatte
│       │       ├── Handy
│       │       ├── MAME (Git)
│       │       ├── melonDS
│       │       ├── mGBA
│       │       ├── Mupen64Plus-Next
│       │       ├── ParaLLEl N64
│       │       └── Snes9x
│       ├── records
│       ├── records_config
│       ├── saves
│       │   └── mame
│       │       ├── cfg
│       │       └── nvram
│       ├── screenshots
│       ├── shaders
│       │   └── shaders_slang
│       │       ├── anamorphic
│       │       ├── anti-aliasing
│       │       ├── auto-box
│       │       ├── bezel
│       │       ├── blurs
│       │       ├── border
│       │       ├── cel
│       │       ├── crt
│       │       ├── cubic
│       │       ├── ddt
│       │       ├── deblur
│       │       ├── denoisers
│       │       ├── dithering
│       │       ├── eagle
│       │       ├── film
│       │       ├── fsr
│       │       ├── gpu
│       │       ├── handheld
│       │       ├── hdr
│       │       ├── hqx
│       │       ├── include
│       │       ├── interpolation
│       │       ├── linear
│       │       ├── misc
│       │       ├── motionblur
│       │       ├── motion-interpolation
│       │       ├── nedi
│       │       ├── nes_raw_palette
│       │       ├── nnedi3
│       │       ├── ntsc
│       │       ├── omniscale
│       │       ├── pal
│       │       ├── presets
│       │       ├── procedural
│       │       ├── quad
│       │       ├── reshade
│       │       ├── sabr
│       │       ├── scalefx
│       │       ├── scalehq
│       │       ├── scalenx
│       │       ├── scanlines
│       │       ├── sharpen
│       │       ├── spec
│       │       ├── stereoscopic-3d
│       │       ├── test
│       │       ├── vhs
│       │       ├── warp
│       │       ├── windowed
│       │       ├── xbr
│       │       ├── xbrz
│       │       ├── xsal
│       │       └── xsoft
│       ├── states
│       ├── system
│       └── thumbnails
└── data
How to Update RetroArch And Its Cores
How to Update RetroArch
- Update through
Discover(Shopping bag icon) - Through the
Update your Emulators & Toolssection on theManage Emulatorspage in theEmuDeckapplication
How to Update RetroArch Cores
- Open
RetroArch - Open the
Main Menu - Scroll down and select
Online Updater - Select
Update Installed Cores
Visual Reference:
How to Launch RetroArch in Desktop Mode
How to Launch RetroArch in Desktop Mode
- Launch
RetroArchfrom the Applications Launcher (Steam Deck icon in the bottom left of the taskbar) - Launch the script from
Emulation/tools/launchers,retroarch.sh - Launch the emulator from
Steamafter adding it via theEmulatorsparser inSteam Rom Manager
A Breakdown of Overrides
- Global = Everything.
- Core = Anything run by a specific core.
- Content Directory = Any ROM in a specific directory.
- These are used for the EmuDeck applied shaders.
- Game = that specific ROM.
As you get lower in this list it takes precedence, so if you do nothing but set a core shader preset, it will not override the content directory preset already applied.
For more information: https://docs.libretro.com/guides/overrides/
RetroArch Hotkeys
| Hotkeys | RetroArch |
|---|---|
| Quick Menu | L3 + R3 or Select + R3 |
| Save State | Select + R1 |
| Load State | Select + L1 |
| Next Save State Slot | Select + DPAD Right |
| Previous Save State Slot | Select + DPAD Left |
| Fast Forward | Select + R2 |
| Rewind | Select + L2 |
| Pause/Play | Select + A |
| Screenshot | Select + B |
| Swap Disc | Select + Y |
| Toggle FPS Display | Select + X |
| Reset Emulation | Select + L3 |
| Stop Emulation | Select + Start |
| Close/Open Lid (Nintendo DS) | L3 |
| Toggle Runahead | Select + DPad Up |
| Blow Mic (Nintendo DS) | L2 |
| Toggle Screen Layout (Nintendo DS) | R2 |
Note:
- Screenshots are saved in:
/home/deck/.var/app/org.libretro.RetroArch/config/retroarch/screenshots - The
Blow Michotkey only blows white noise. It cannot be used to speak into the Steam Deck microphone. The white noise may not be strong enough to progress in some games. - Steam Deck Button Layout
List of RetroArch Cores Used by EmuDeck
Common Issues
Banjo-Kazooie: Scrambled Text
If you are experiencing scrambled text in Banjo-Kazooie, here's how to fix it.
- While in game, press
L3+R3orSelect+R3to open theQuick Menu - In the
Quick Menu, SelectCore Options - Select
GLideN64 - Set
Cache TexturestoOff - Back out and click
Manage Core Options - Click
Save Game Options - This option will now be saved for only this game
Alternatively, you may also use the Parallel plugin. For instructions, see How to Switch to the ParaLLEl-RDP Plugin.
RetroArch Tips and Tricks
How to Optimize Storage (Compression Tool)
To optimize storage, you can use the EmuDeck Compressor within EmuDeck.
The EmuDeck Compressor will compress your Dreamcast, Playstation 1, Sega/MegaCD, 3DO, Saturn, TurboGraphix/PCEngineCD, PC-FX, Amiga CD32, and NeoGeoCD ROMs to CHD. If your ROM is a BIN/CUE, the Compression Tool will only compress it if you have both the BIN and the CUE files for a ROM. If the ROM is in a zip file or is missing a paired BIN or CUE file, the Compression Tool will not detect the ROM.
After running the EmuDeck Compression Tool, re-run Steam ROM Manager to update your ROM shortcuts to the newly compressed ROM.
Visual Reference: 
How to Manage Multiple Discs
M3U files can be used to manage multiple discs for RetroArch. Learn how to create an M3U File.
When the time comes to switch discs:
- Press L3 and R3 together
- Select manage discs
How to Configure Multiplayer
Multiplayer for RetroArch is configured out of the box, no additional configuration is needed.
You may need to re-arrange the controller order in Game Mode for your controllers to function as expected. See How to Re-Arrange the Controller Order for more information.
How to Change RetroArch Global Settings
This section is specifically for global settings. Global settings cover options like drivers, video output, etc. For core specific settings, see How to Change Settings On a Per-Core Basis.
Using the Save Configuration on Exit feature is not recommended. This feature makes it easy to mistakenly change configurations.
- Open RetroArch without any content loaded
- Select the
Settingstab - Configure your preferred settings
- After you are finished, back out and click the
Main Menutab - Click
Configuration File - Click
Save Current Configuration
How to Change RetroArch Hotkeys
- Open RetroArch without any content loaded
- Select the
Settingstab - Click
Input - Click
Hotkeys - Configure your preferred hotkeys
- After you are finished, back out and click the
Main Menutab - Click
Configuration File - Click
Save Current Configuration
How to Change Shaders
How to Download/Update Shaders
- Open RetroArch
- You may also do this in game by pressing L3 and R3
- Open the
Main Menu - Select
Online Updater - Select
Update Slang Shaders
How to Apply New Shaders if Shaders Are Already Applied
- Open a game in Game Mode that has a shader applied automatically
- Open the Quick Menu with L3 and R3
- Select
Shaders - In Shaders, select the
Removebutton - Select
Remove Content Directory Preset - Close RetroArch and reload content. No shaders will be applied
- Yes, it may be hard to see, but no more LCD squares

- If you want to select a different shader, open the
Shadersmenu again, and select your preferred settings/shaders. When you are satisfied, select theSavebutton, and clickSave Content Directory Preset


How to Apply Shaders if Shaders Are Not Already Applied
- Open a game in Game Mode
- Open the Quick Menu with L3 and R3
- Select
Shaders - Select
Load - Select a shader
- Back out to the
Shadersmenu - Click
Save, clickSave Content Directory Preset - Back out to the
Quick Menu, clickOverrides, and clickSave Content Directory Overrides
Override Precedence
The order they are listed in is the order they take precedence, from most general to most specific.
- Global = Everything.
- Core = Anything run by a specific core.
- Keep in mind that some cores run multiple systems. For example, the Gambatte RetroArch core plays both Game Boy and Game Boy color games. If you use the Core override, it will apply to both systems.
- Content Directory = Any ROM in a specific directory.
- The folders can be found in your
Emulationfolder, on the storage device you selected for EmuDeck. - These are used for the EmuDeck applied shaders.
- The folders can be found in your
- Game = that specific ROM.
As you get lower in this list it takes precedence, so if you do nothing but set a core shader preset, it will not override the content directory preset already applied.
How to Change Controller Layouts on a Per Game Basis
How to remap the controls for a single game:

1. Start content with the core for which you want to remap controls
2. Open the Quick Menu with L3 + R3
3. Select Controls
4. Configure controls
5. Select Manage Remap Files
6. Select Save Game Remap File
Copied From: https://docs.libretro.com/guides/input-and-controls/#remapping-controls-for-individual-cores-or-content
How to Change Controller Layouts for a System
How to remap the controls for a single system/core:

1. Start content with the core for which you want to remap controls
2. Open the Quick Menu with L3 + R3
3. Select Controls
4. Configure controls
5. Select Manage Remap Files
6. Select Save Content Directory Remap File
Copied From: https://docs.libretro.com/guides/input-and-controls/#remapping-controls-for-individual-cores-or-content
How to Set Game Settings On a Per-Game Basis
How to Set Game Settings On a Per-Game Basis:

1. Start content with the core for which you want to change settings
2. Open the Quick Menu with L3 + R3
3. Configure settings
4. Select Overrides
5. Select Save Game Overrides
How to Change Settings On a Per-Core Basis
How to Change Settings On a Per-Core Basis

1. Start content with the core for which you want to change settings
2. Open the Quick Menu with L3 + R3
3. Configure settings
4. Select Overrides
5. Select Save Content Directory Overrides
How to Roll Back RetroArch to an Older Version
If you do not have access to a mouse and keyboard for the below section, use L2 to right click and R2 to left click. Alternatively, remote into your Steam Deck using one of the methods found in the FAQ, How do I remotely control my Steam Deck?.
- In Desktop Mode, open
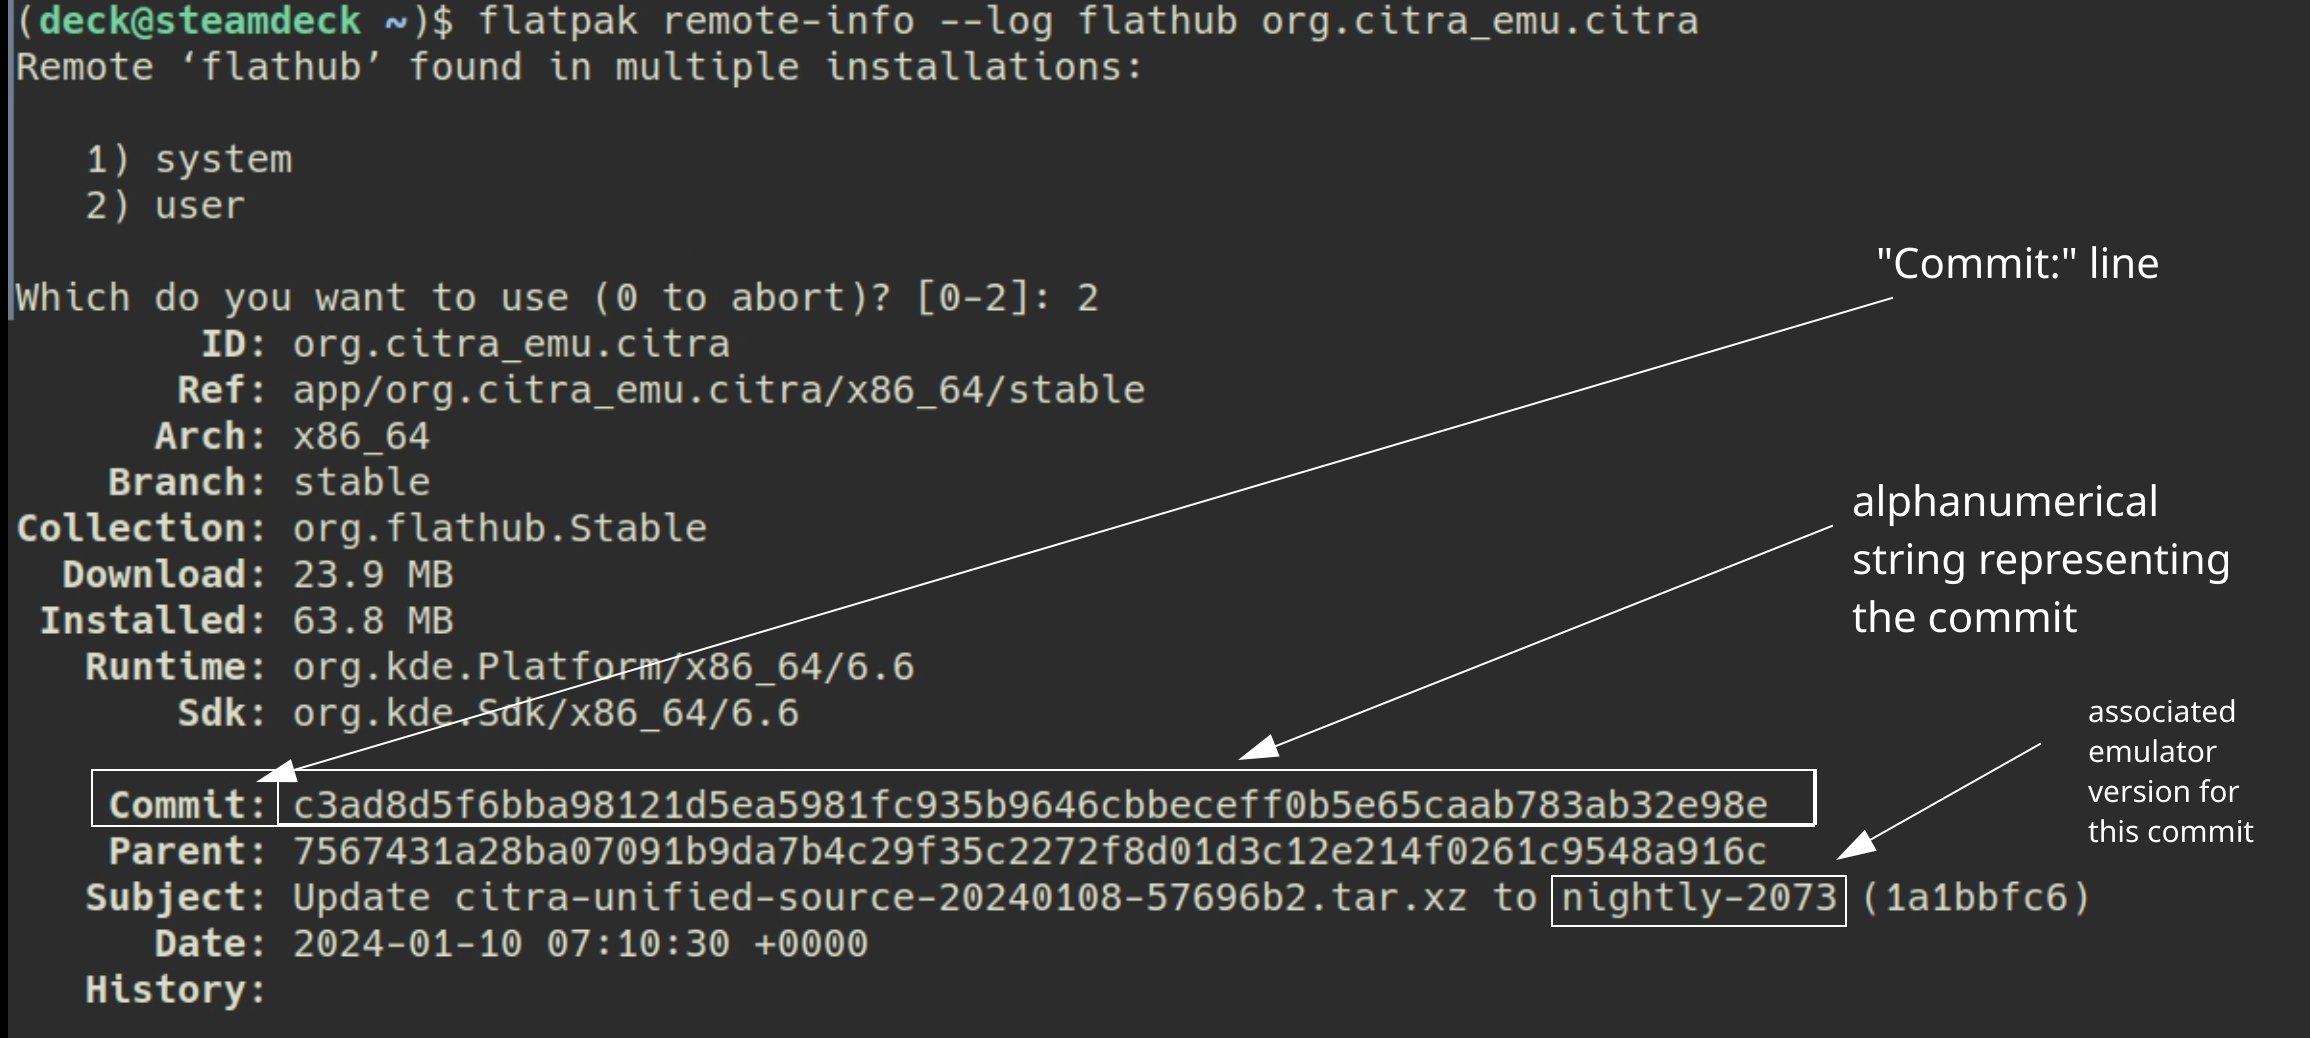
Konsole - To see a list of prior versions of the emulator, type:
flatpak remote-info --log flathub org.libretro.RetroArch
- If Konsole prompts you to select
systemoruser, enter2to selectuser - Konsole will list a list of previous versions for the flatpak. The important line for each version is the
Commit:line. TheCommit:line will have a long accompanying alphanumeric string (the “commit” code). Copy the string for the version you want to downgrade to.- Using Citra as an example:
- Using Citra as an example:
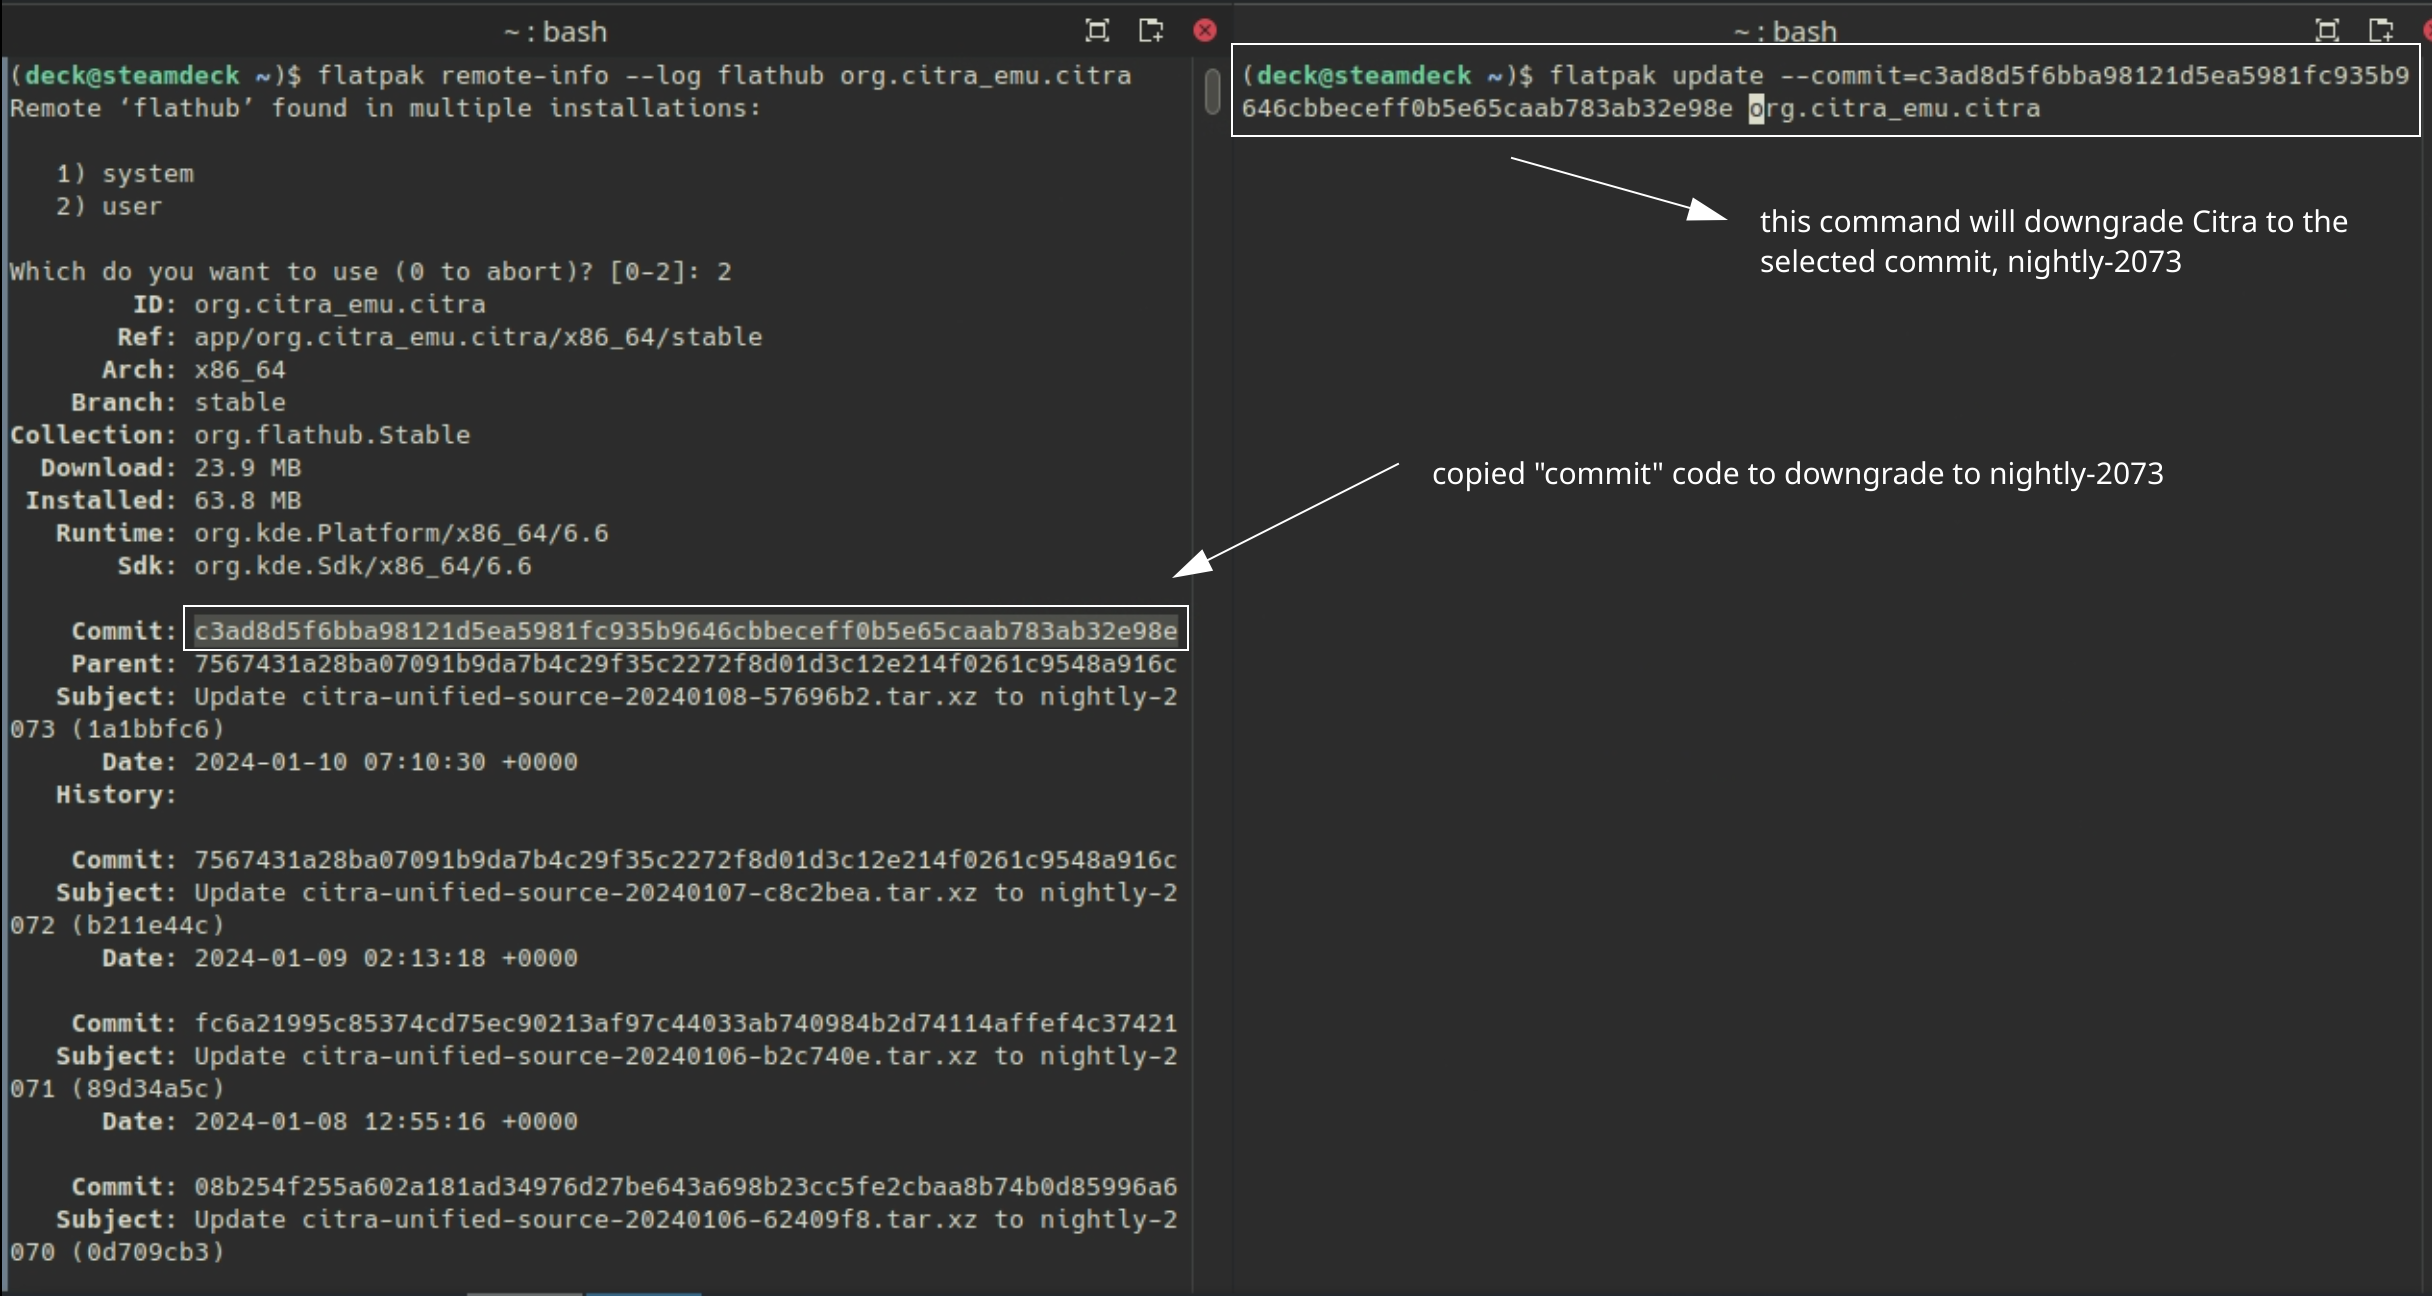
- To downgrade to the version you want:
flatpak update --commit=put_commit_code_here org.libretro.RetroArch- Replace
put_commit_code_herewith the actual code you located in Step 2.- Using Citra as an example:
- Using Citra as an example:
If the above steps did not work and you are getting an error message along the lines of Flatpak not installed, your Flatpak is likely installed at the system level instead. Select one of the below solutions:
Solution 1: Open the EmuDeck application, click the Manage Emulators page, select the emulator in question, and click Reinstall / Update.
Solution 2: Add sudo in front of the commands written in Step 2 and Step 5. In Step 2, write sudo flatpak remote-info --log flathub com.github.Rosalie241.RMG and in Step 5, write sudo flatpak update --commit=put_commit_code_here com.github.Rosalie241.RMG.
How to Configure Language Settings
UI
- In Desktop Mode, open RetroArch
- Click the
Main Menutab - Click
Online Updater - Click
Update Assets - Back out of the
Online Updater - Click the
Settingstab - Click
User - Click
Language - Select your preferred language in the drop-down menu
- Back out of the
Settingstab - Click the
Main Menutab - Click
Configuration File - Click
Save Current Configuration
In-Game
Varies depending on the core and ROM.
RetroArch Cores
Flycast
Flycast is a Dreamcast Core for RetroArch.
Wiki Link: https://docs.libretro.com/library/flycast/
How to Install Custom Textures For Flycast
- In
Emulation/bios, create adcfolder - In
Emulation/bios/dc, create 3 folders:texdump,textures, andskinsfoldertexdump- Dumped Textures Foldertextures- Texture Pack Folder
- Place texture packs in
Emulation/bios/dc/textures - Open a game, press
L3andR3, open the settings menu and enableLoad Custom Textures
Texture Pack Resources: https://old.reddit.com/r/Flycast_texture_packs/
Fuse
Fuse is a ZX Spectrum Core for RetroArch.
Wiki Link: https://docs.libretro.com/library/fuse/
How to Configure Controls for Fuse
You will want to set a joystick in the quick menu/controls/port one.
RetroArch sets it controller by default, but thats useless for a computer.
I always suggest setting it to "Kempston" and saving a core remap.
Kempston works for a lot of games so is a good base, but it may need changing on a game by game basis, which is easy enough.
If you load a game and kempston doesnt work, just head back to quick menu/controls/port one, and try one of the other joysticks.
When you find one that works save that as a game remap.
Bear in mind though the speccy was a computer, and some games will be keyboard only, you may be able to work around that via steam input.
MelonDS
MelonDS is a Nintendo DS Core for RetroArch.
Wiki Link: https://docs.libretro.com/library/melonds/. For the standalone emulator, visit the melonDS page.
How to Use the Trackpad for the Touch Screen
Description: This allows you to use one of the trackpads as a touch screen for a Nintendo DS game.
RetroArch
- Press both
L3andR3while playing a DS game Quick Menu>Core Options>Screen>Touch Mode> change fromTouchtoMouseQuick Menu>Manage Core Options>Save Content Directory Options
Steam Input
- Change one of your trackpads to a mouse and either use the
Bbutton orLeft Clickas the click option
Mupen64Plus-Next
Mupen64Plus-Next is a Nintendo 64 Core for RetroArch.
Wiki Link: https://docs.libretro.com/library/mupen64plus/
How to Install Custom Textures for Mupen64Plus-Next
Preface
HTS & HTC are cache formats. PNG is the 'source' of the texture packs before it's converted to a cache file.
Before installing a texture pack, you will need to determine if it is HTC, HTS, or PNG. This can usually be confirmed by checking the file extension or reading the attached documentation. Follow the respective section below for installing texture packs.
HTC
- Open the
/home/deck/.var/app/org.libretro.RetroArch/config/retroarch/system/Mupen64plus/cachefolder- Directories with a
.in front of their name, like/home/deck/.steam, are hidden by default. In Dolphin (a file manager), click the hamburger menu in the top right and toggle onShow Hidden Files. The setting may vary depending on which file manager you are using.
- Directories with a
- Place your texture pack file directly into this folder
HTS
- Open the
/home/deck/.var/app/org.libretro.RetroArch/config/retroarch/system/Mupen64plus/cachefolder- Directories with a
.in front of their name, like/home/deck/.steam, are hidden by default. In Dolphin (a file manager), click the hamburger menu in the top right and toggle onShow Hidden Files. The setting may vary depending on which file manager you are using.
- Directories with a
- Place your texture pack file directly into this folder
PNG
- Open the
/home/deck/.var/app/org.libretro.RetroArch/config/retroarch/system/Mupen64plus/hires_texturefolder- Directories with a
.in front of their name, like/home/deck/.steam, are hidden by default. In Dolphin (a file manager), click the hamburger menu in the top right and toggle onShow Hidden Files. The setting may vary depending on which file manager you are using.
- Directories with a
- Place your texture pack folder directly into this folder
RetroArch
- Open a game, open the
Quick Menu>Options>GlideN64>Use High-Res textures- Enable:
Cache TexturesUse High-Res Full Alpha ChannelUse Hi-Res Storage
- Enable:
- Back out and select
Overrides - Select
Save Game Overrides
How to Switch to the ParaLLEl-RDP Plugin
What is the ParaLLEl-RDP Plugin?
The "ParaLLEl-RDP" is "an LLE video plugin.. made to run on the GPU through the use of the Vulkan API's compute shaders." It can be demanding to run on the system at times. It is recommended to use this plugin on a per-game basis. For more details, see https://emulation.gametechwiki.com/index.php/Recommended_N64_plugins#ParaLLEl-RDP.
- While in game, press
L3+R3orSelect+R3to open theQuick Menu - In the
Quick Menu, SelectCore Options - Select
RDP Plugin - Set the
RDP PlugintoParaLLEl-RDP - Back out and click
Manage Core Options - Click
Save Game Options- If you would like to save this for all games, click
Save Content Directory Optionsbut this is not recommended since the plugin can be demanding
- If you would like to save this for all games, click
- This option will now be saved for only this game
Neko Project II Kai
Neko Project II Kai is a NEC PC-98 Core for RetroArch.
Wiki Link: https://docs.libretro.com/library/neko_project_ii_kai/
Configuring controls
Neko Project II Kai, soon
PPSSPP RetroArch Core
PPSSPP is a Playstation Portable Core for RetroArch. For the standalone emulator, visit the PPSSPP page.
How to Download Asset Files (Required)
The PPSSPP RetroArch core requires assets files to be fully functional.
To download these asset files:
- Open
RetroArch - Click
Online Updater - Click
Core System Files Downloaderto downloadppsspp.zip ppsppp.zipwill be downloaded toEmulation/bios, no additional steps are required
PX68k
PX68k is a Sharp - X68000 Core for RetroArch.