Hotkeys, snazzy button combos for your favorite emulators.
Hotkeys Table of Contents
Hotkeys Configuration
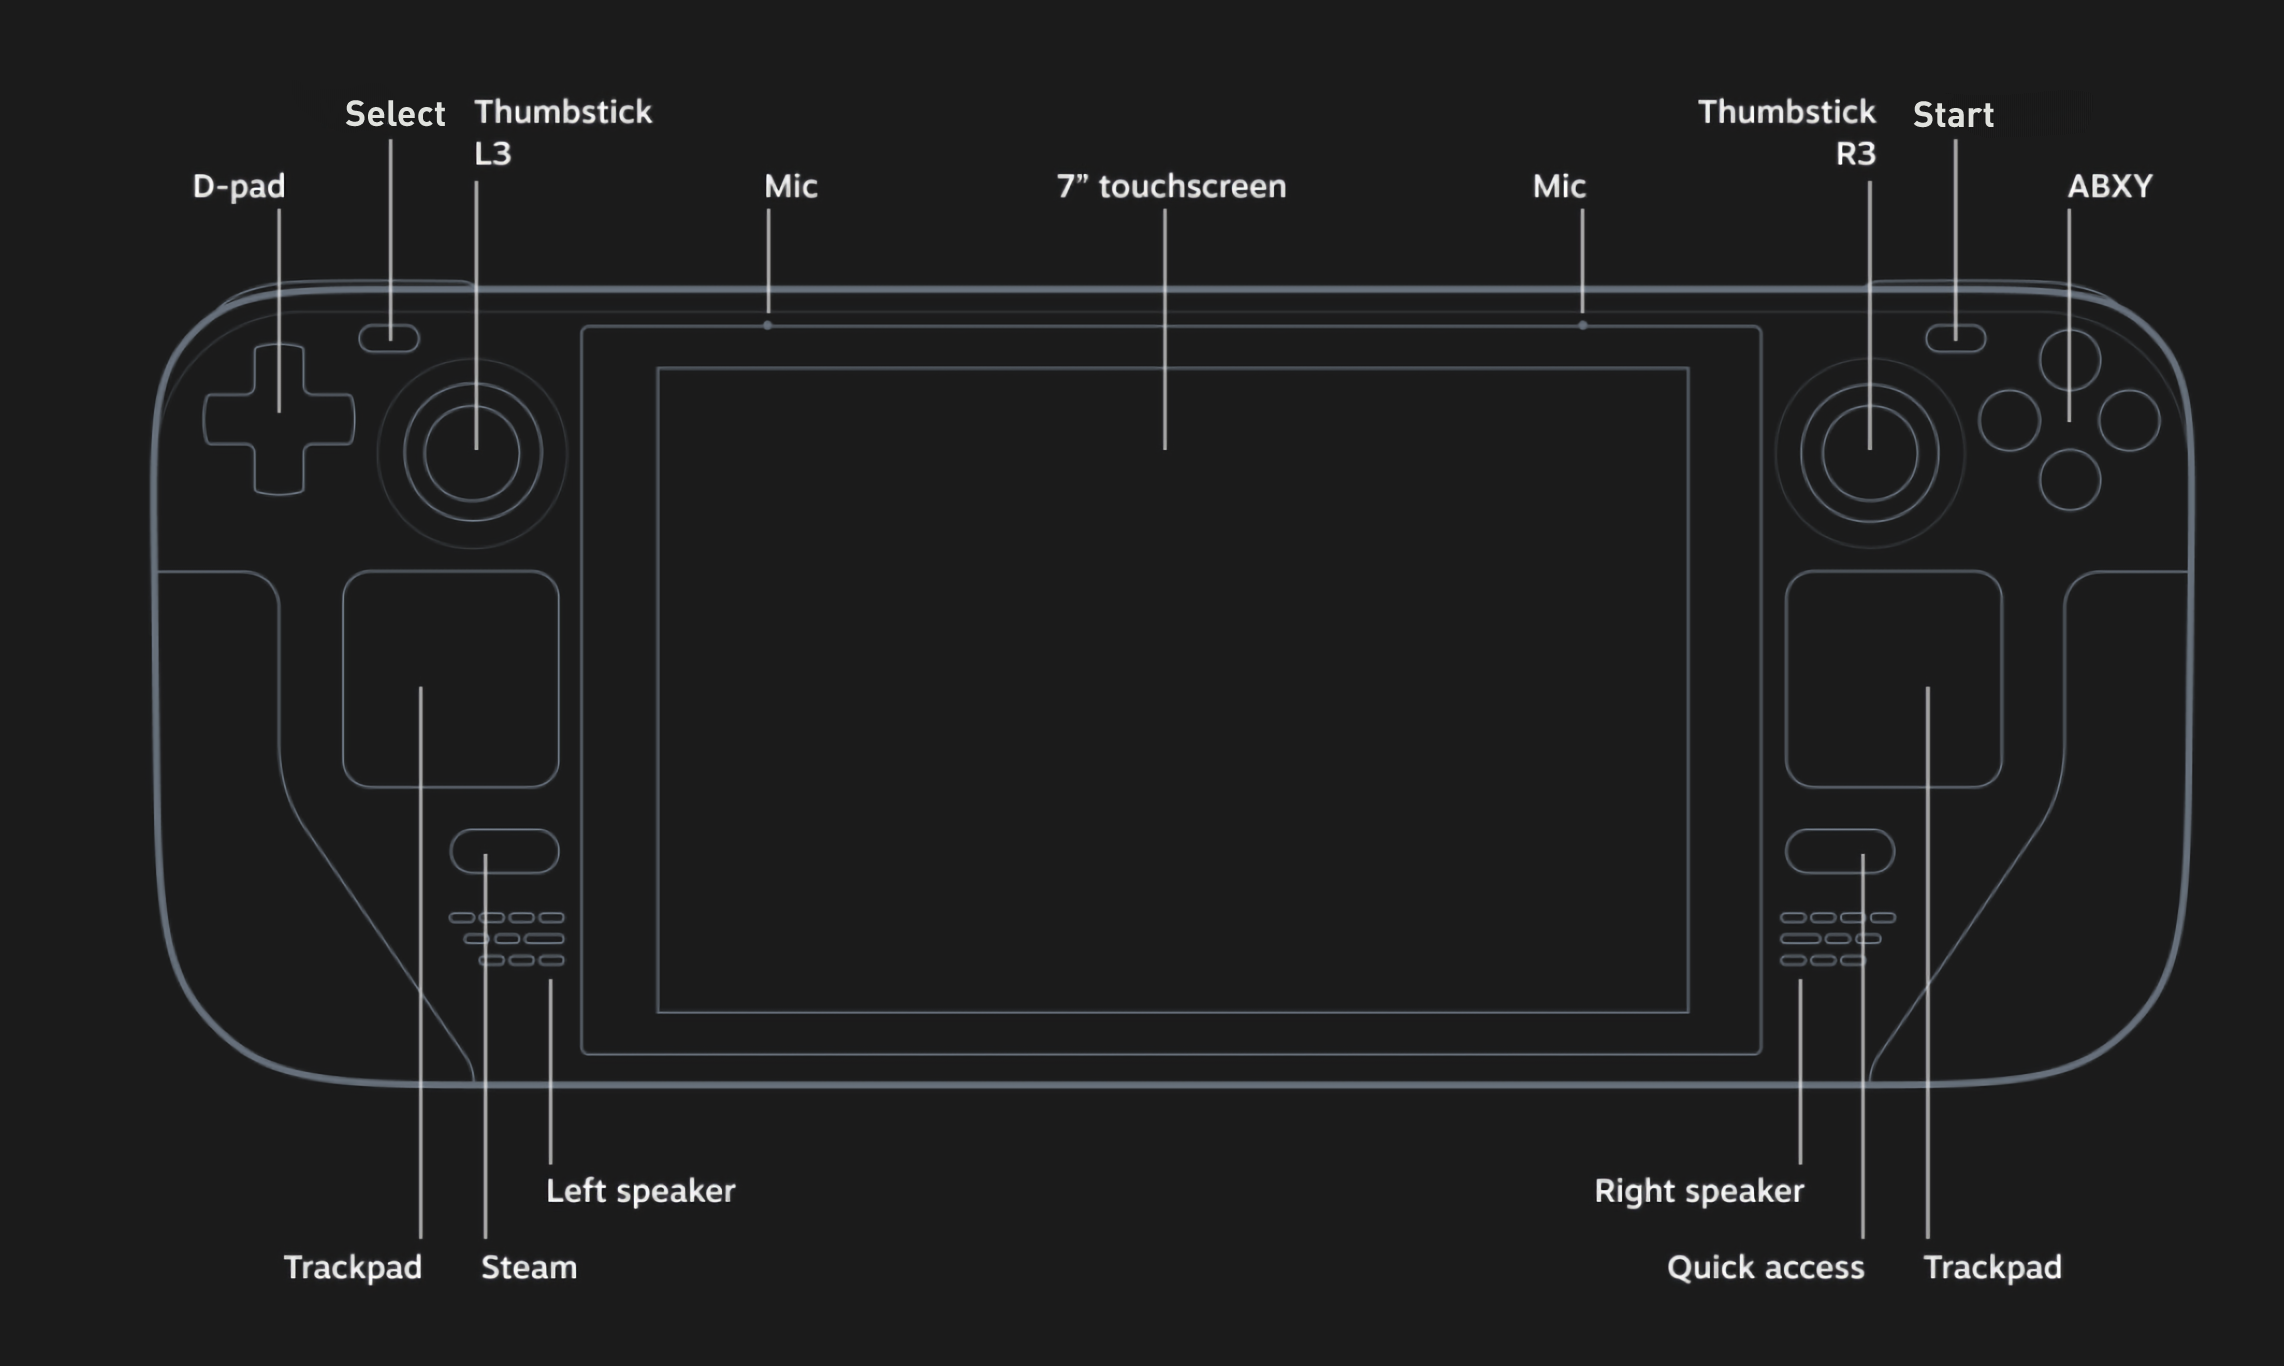
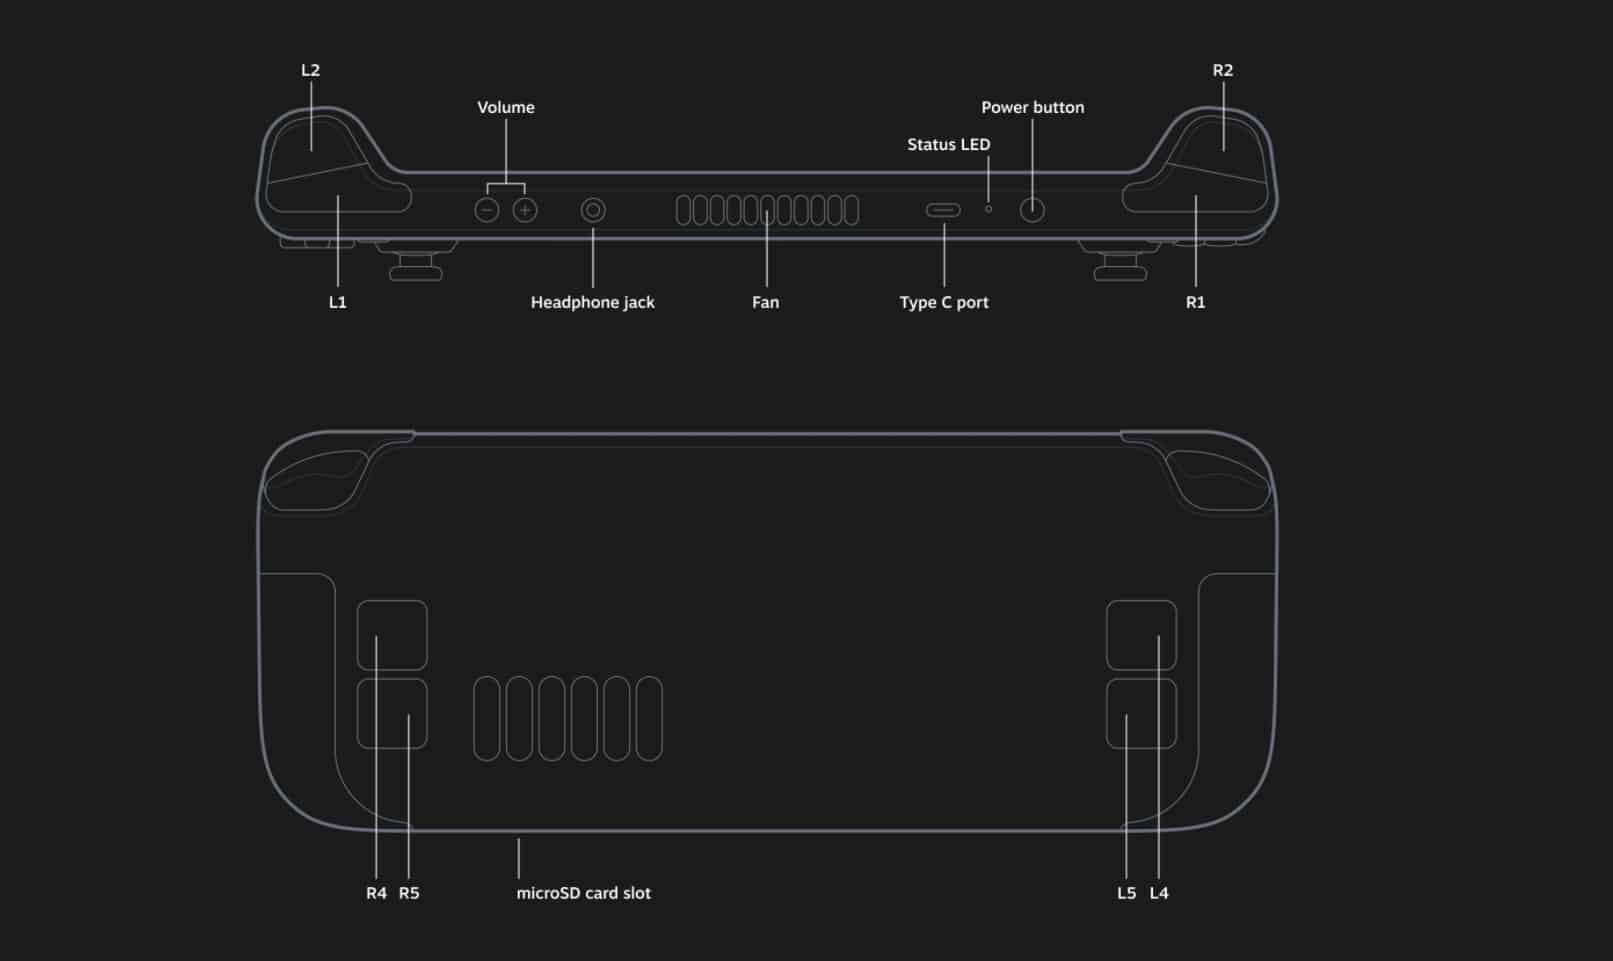
Steam Deck Button Layout
Front:
Back and Top:
Steam Input Profiles
How to Select A Steam Input Profile
Preface
EmuDeck comes with a few Steam Input profiles to make hotkeys easier to use in a few emulators. If an emulator does not have a Steam Input Profile, make sure you're on Gamepad with Joystick Trackpad, otherwise some controls may not work.
Selecting Steam Input Profiles
In Game Mode, single click the game you would like to change the Steam Input Profile for, and click the Controller Icon on the right of the screen. Click the layout (whichever name it is currently set to) at the top, and you will see a drop-down menu.
For a visual, watch the following GIF (DuckStation is being used as an example):

A Breakdown of the Steam Input Profiles
For a few emulators, binding hotkeys to controller combinations is not supported. For these emulators, only binding hotkeys to keyboard keys or singular button presses was supported. For these emulators specifically, Steam input profiles were used.
In the previous EmuDeck update, a mix of touch and radial menu profiles were utilized to bind hotkeys to the left trackpad. In the current update, this has been replaced with the Emulator Button Combinations Profile and Emulator Frontends Button Combinations Profile profiles. For more details on these two profiles, see Emulator Button Combinations Profile and Emulator Frontends Button Combinations Profile. In short, these profiles bind keyboard hotkeys such as Alt + F4 to controller combinations such as Select + Start to exit a game.
The reason for this change was twofold:
- To standardize hotkeys across all emulators. When you open an emulator, the expectation is that you will always use the same hotkeys
- To allow for support with external controllers in profiles that previously relied on the Steam Deck trackpads. With the new profiles, you can use any external controller and still use hotkeys that previously required hotkeys to be bound to a radial or touch menu
There are a few cases still where hotkeys are still not standardized due to lack of emulator features. These are listed below.
- BigPEmu - Fast Forward and Rewind are bound to Start + R2 or L2. For most emulators, it is bound to Select + L2 or R2
- Flycast (Standalone) - The hotkey system in Flycast (Standalone) is restrictive compared to other emulators. For a full list of Flycast (Standalone) hotkeys, see Flycast (Dreamcast) (Standalone)
- RetroArch - Increasing and decreasing the save and load state slots are bound to Start + DPad Right or Left. For most emulators, it is bound to Start + L2 or R2
- Ryujinx - No hotkeys are bound at this time. When controller hotkeys are implemented, EmuDeck will configure these to match the other emulators
Emulator Button Combinations Profile
Some of the emulators bundled with EmuDeck do not do not support controller hotkeys naturally. These emulators are Cemu, Citra, melonDS (Standalone), and mGBA (Standalone).
To standardize the hotkeys with the other emulators, these profiles require a Steam Input profile that binds keyboard keys to button chords. These button chords allow you to use controller hotkeys with emulators that do not naturally support them.
Typically, this profile will automatically be applied to your shortcuts for Cemu, Citra, melonDS (Standalone), and mGBA (Standalone). To apply it manually, click the Game Controller icon in Game Mode, change the template to EmuDeck - Controller Hotkeys.
For the specific button combinations, see the following sections:
Emulator Frontends Button Combinations Profile
The frontends bundled with EmuDeck, ES-DE and Pegasus, come with a Steam Input profile for hotkeys. Typically, this profile will automatically be applied to your shortcuts. To apply it manually, click the Game Controller icon in Game Mode, change the template to EmuDeck - Frontend Controller Hotkeys.
The EmuDeck - Frontend Controller Hotkeys profile comes with two action set layers. The first layer is blank intended for emulators with traditional controller hotkeys. The second layer assigns keyboard keys to button combinations, intended for emulators that do not support controller hotkeys naturally. This layer only covers Cemu, Citra, melonDS (Standalone), and mGBA (Standalone).
For the most part, you will be using the first layer, entitled the "All Hotkeys" layer. However, when you are playing a Cemu, Citra, melonDS (Standalone), or mGBA ROM, hold the Start button to switch to the Cemu, Citra, melonDS (Standalone), and mGBA (Standalone) layer.
For the specific button combinations, refer to the various sections on this page depending on which emulator you are using. The hotkeys have been largely standardized and for the most part are identical across emulators. Do note there are still a few exceptions:
- The Flycast (Standalone) emulator
- RetroArch binds the
Next Save State SlotandPrevious Save State SlottoStart+DPad LeftorDPAd Rightwhereas most emulators useStart+R2orL2
Emulator Frontends Radial Menu Profile
For details on why the Emulator Frontends Radial Menu Profile is no longer applied automatically, see A Breakdown of the Steam Input Profiles.
This profile is intended for emulator frontends such as ES-DE and Pegasus. This profile will not be applied automatically. To apply it manually, click the Game Controller icon in Game Mode, change the template to EmuDeck - Steam Deck Radial Menus. All emulators installed and configured by EmuDeck are included in this profile.
You may also use this profile with any ROM shortcut or emulator shortcut added through Steam ROM Manager. This profile will appear in the drop-down list of your profiles for any of your shortcuts added to Steam.
Use the left trackpad to pull up the menu and short-press an icon to switch into the respective profile. The buttons on the various touch and radial menus use a short-press to activate the respective hotkey.
A bonus feature of this profile is allowing you to map per-game profiles in emulator frontends such as ES-DE and Pegasus.
How to Map Per-Game Profiles
- To apply the Steam Input profile, click the
Game Controllericon inGame Mode, change the template toEmuDeck - Steam Deck Radial Menus - On the
Game Controllerscreen, click theEdit Layout - Press
R1until you seeBlank Profile #and select one of the 10Blank Profiles- There will be 10 Blank Profile action sets
- On the
Blank Profilepage you selected, remap your controls - (Optional) To rename the blank icon in the radial menu:
- Click
Virtual Menuson the left side of the screen in theController Settingsmenu - Click the
Pencilicon to the right ofBlank Profile Selector - On the profile # you selected in 3 and 4, click the
Gearicon, clickRename command, and rename your profile
- Click
- When you are finished, exit out and open the frontend
- On the left trackpad, select the
Blank Profile Selectoricon and select the matchingBlank Profilenumber (or your renamed profile) to the profile you mapped in Step 3
Hotkeys
General
Global
These hotkeys only work in Game Mode and can be used for any Steam or Non-Steam game.
Hold the Steam button to view the list on your Steam Deck as well.
The Steam button in the chart below is interchangeable with the ... (QAM) button. For example, to "Force Game Shutdown", you can either hold Steam and the B button or hold ... and the B button.
| Global | Hotkeys |
|---|---|
| View Global Hotkey List | Hold Steam |
| Force Game Shutdown | Steam + B (Long Press) |
| Show Keyboard | Steam + X |
| Toggle Magnifier | Steam + L1 |
| Take Screenshot | Steam + R1 |
| Right Mouse Click | Steam + L2 |
| Left Mouse Click | Steam + R2 |
| Joystick Mouse | Steam + Right Joystick |
| Trackpad Mouse | Steam + Right Trackpad |
| Left Mouse Click | Steam + Right Trackpad (Click) |
| Increase Screen Brightness | Steam + Left Stick Up |
| Decrease Screen Brightness | Steam + Left Stick Down |
| Enter Key | Steam + DPad Right |
| Tab Key | Steam + DPad Down |
| Escape Key | Steam + DPad Left |
Atari Hotkeys
BigPEmu (Atari Jaguar)
| Hotkey | BigPEmu |
|---|---|
| Menu | Select + R3 |
| Exit | Select + Start |
| Fast Forward | Start + R2 |
| Rewind | Start + L2 |
| Save State | Select + R1 |
| Load State | Select + L1 |
| Screenshot | Select + B |
Microsoft Hotkeys
Xemu (OG Xbox)
N/A
Xenia (Xbox 360)
N/A
Multisystems Hotkeys
MAME
| Hotkey | MAME |
|---|---|
| Quick Menu* | STEAM + DPad Down or Select + R3 |
| Save State | Select + R1 |
| Load State | Select + L1 |
| Fast Forward | Select + R2 |
| Stop Emulation | Select + Start or STEAM + DPad Left |
| Coin for Player | Select |
| Start for Player | Start |
- If you make any changes in the Quick Menu while in game, make sure to use one of the
Exit Emulatorhotkeys to close out of the game to ensure any changes you made are saved. If you useSTEAM+ theExit gamebutton, your changes will not be saved.
Steam Deck Light Gun Controls
MAME also comes with a EmuDeck - Steam Deck Light Gun Controls profile intended to be used with light gun games. To use this profile, apply it manually. For instructions, see How to Select a Steam Input Profile.
| Controls | EmuDeck - Steam Deck Light Gun Controls | General Notes | Emulator Specific Notes |
|---|---|---|---|
| Left Trackpad | Mouse and Right Click on Click | Mouse sensitivity set to 100% | - |
| Right Trackpad | Mouse and Left Click on Click | Mouse sensitivity increased to 200% | - |
| R2 | Left Click | Typically used to shoot | When using MAME, move the cursor to the bottom left of the screen, and click L2 or R2 depending on the game to reload |
| L2 | Right Click | Typically used to reload | When using MAME, move the cursor to the bottom left of the screen, and click L2 or R2 depending on the game to reload |
RetroArch
List of RetroArch Cores Used by EmuDeck
| Hotkeys | RetroArch |
|---|---|
| Quick Menu | L3 + R3 or Select + R3 |
| Save State | Select + R1 |
| Load State | Select + L1 |
| Next Save State Slot | Select + DPAD Right |
| Previous Save State Slot | Select + DPAD Left |
| Fast Forward | Select + R2 |
| Rewind | Select + L2 |
| Pause/Play | Select + A |
| Screenshot | Select + B |
| Swap Disc | Select + Y |
| Toggle FPS Display | Select + X |
| Reset Emulation | Select + L3 |
| Stop Emulation | Select + Start |
| Close/Open Lid (Nintendo DS) | L3 |
| Toggle Runahead | Select + DPad Up |
| Blow Mic (Nintendo DS) | L2 |
| Toggle Screen Layout (Nintendo DS) | R2 |
Note:
- Screenshot Folder Location:
/home/deck/.var/app/org.libretro.RetroArch/config/retroarch/screenshots - The
Blow Michotkey only blows white noise. It cannot be used to speak into the Steam Deck microphone. The white noise may not be strong enough to progress in some games
ScummVM
N/A
Nintendo Hotkeys
Rosalie's Mupen GUI (N64) (Standalone)
| Hotkey | RMG |
|---|---|
| Toggle Full Screen | Select + R3 |
| Save State | Select + R1 |
| Load State | Select + L1 |
| Next Save State Slot | Start + R1 |
| Previous Save State Slot | Start + L1 |
| 1x Speed/Regular Speed | Select + L2 |
| 2x Speed/Fast Forward | Select + R2 |
| Pause/Play | Select + A |
| Screenshot | Select + B |
| Reset Emulation | Select + L3 |
| Stop Emulation | Select + Start |
| Switch to Memory Pak | Start + DPad Up |
| Remove Pak | Start + Dpad Down |
| Limit FPS | Start + DPad Left |
| Switch to Rumble Pak | Start + DPad Right |
These hotkeys are for Rosalie's Mupen GUI, a standalone N64 emulator. These hotkeys are not for the Mupen64Plus-Next RetroArch core. For more information on RetroArch and the Mupen64Plus-Next RetroArch core hotkeys, visit RetroArch.
mGBA (GB, GBC, and GBA) (Standalone)
mGBA comes with a Steam Input profile for Hotkeys. When playing mGBA ROM shortcuts through Steam, the EmuDeck - Controller Hotkeys profile will automatically be applied so you may use the below hotkeys. For more info, see Emulator Button Combinations Profile.
When using a frontend (ES-DE, Pegasus, or the emulator itself), the EmuDeck - Frontend Controller Hotkeys will automatically be applied. Hold Start for a few seconds to switch to the action set required to use the below hotkeys. For more info, see Emulator Frontends Button Combinations Profile.
| Hotkey | mGBA |
|---|---|
| Quick Menu | Select + R3 |
| Toggle Full Screen | Start + L3 |
| Save State | Select + R1 |
| Load State | Select + L1 |
| Fast Forward | Select + R2 |
| Pause/Play | Select + A |
| Screenshot | Select + B |
| Reset Emulation | Select + L3 |
| Stop Emulation | Select + Start or hold L5 or hold R5 |
| Open Cheats Menu | Start + DPad Right |
Note
- For a tutorial on how to select Steam Input Profiles, see How to Select a Steam Input Profile
- These hotkeys are for mGBA, a standalone Nintendo Game Boy, Game Boy Color and Game Boy Advance emulator. These hotkeys are not for the mGBA RetroArch core. For more information on RetroArch and the mGBA RetroArch core hotkeys, visit RetroArch
- If you would like to use the old touch menus, apply the
EmuDeck - Steam Deck Radial Menusprofile instead
melonDS (NDS) (Standalone)
melonDS comes with a Steam Input profile for Hotkeys. When playing melonDS ROM shortcuts through Steam, the EmuDeck - Controller Hotkeys profile will automatically be applied so you may use the below hotkeys. For more info, see Emulator Button Combinations Profile.
When using a frontend (ES-DE, Pegasus, or the emulator itself), the EmuDeck - Frontend Controller Hotkeys will automatically be applied. Hold Start for a few seconds to switch to the action set required to use the below hotkeys. For more info, see Emulator Frontends Button Combinations Profile.
| Hotkey | melonDS |
|---|---|
| Toggle Full Screen | Select + R3 |
| Save State | Select + R1 |
| Load State | Select + L1 |
| Fast Forward | Select + R2 |
| Pause/Play | Select + A |
| Reset Emulation | Select + L3 |
| Stop Emulation | Select + Start or hold L5 or hold R5 |
| Close/Open Lid | Start + DPad Up |
| Swap Screens | L4 or R4 or Start + DPad Left or Select + Y |
| Toggle FPS Limit | Start + DPad Right |
Note
- For a tutorial on how to select Steam Input Profiles, see How to Select a Steam Input Profile
- These hotkeys are for melonDS, a standalone NDS emulator. These hotkeys are not for the melonDS RetroArch core. For more information on RetroArch and the melonDS RetroArch core hotkeys, visit RetroArch
- If you would like to use the old radial menus, apply the
EmuDeck - Steam Deck Radial Menusprofile instead
PrimeHack (Metroid Prime Trilogy)
| Hotkey | PrimeHack |
|---|---|
| Toggle Full Screen | Not supported by emulator |
| Quick Menu | Not supported by emulator |
| Save State | Select + R1 |
| Load State | Select + L1 |
| Next Save State Slot | Start + R1 |
| Previous Save State Slot | Start + L1 |
| Fast Forward (Hold) | Select + R2 |
| Pause/Play | Select + A |
| Stop Emulation | Select + Start |
| Toggle Aspect Ratio | Start + DPAD Right |
| Increase IR | Start + DPAD Up |
| Decrease IR | Start + DPAD Down |
| Graphics Toggle | Start + L3 |
PrimeHack Controls
| Controls | PrimeHack |
|---|---|
| Jump/Spring Ball | A* |
| Grapple/Boost Ball | B |
| Morph Ball | Y |
| Missile/Power Bomb | X |
| Lock On/Grapple | L2 |
| Shoot/Interact | R2 |
| Cycle Visors | DPad Left/Right |
| Cycle Beams | DPad Up/Down |
| Visor Selection Menu | Hold L1 and use Right Stick to select |
| Beam Selection Menu | Hold R1 and use Right Stick to select |
- When in the
Morph Ballstate, theAbutton becomes theSpring Ballbutton. - EmuDeck includes a texture pack that matches Metroid Prime's button prompts to the buttons in the above chart.
- The Steam Input profile for PrimeHack is:
Gamepad with Joystick Trackpad. Community Layouts conflict with EmuDeck's pre-configured controls. - Only
Metroid Prime Trilogy(Wii)'s controls are configured. The Gamecube versions do not have controls configured at this time.
Dolphin (Gamecube and Wii)
| Hotkey | Dolphin |
|---|---|
| Toggle Full Screen | Not supported by emulator |
| Quick Menu | Not supported by emulator |
| Save State | Select + R1 |
| Load State | Select + L1 |
| Next Save State Slot | Start + R1 |
| Previous Save State Slot | Start + L1 |
| Fast Forward (Hold) | Start + R2 |
| Increase Emulation Speed | Select + R2 |
| Decrease Emulation Speed | Select + L2 |
| Pause/Play | Select + A |
| Reset Emulation | Select + L3 |
| Stop Emulation | Select + Start |
| Shake Wiimote | L1 |
| Shake Nunchuk | L2 |
| Tilt Wiimote | L2 + Move Left Stick |
| Hide Wii Pointer | L3 |
| Sideways Toggle | Select + R3 |
| Next Game Profile Select | Select + Left Stick Up |
| Attach/Detach Nunchuk | Select + Left Stick Down |
| Previous Wii Profile Select | Select + Left Stick Left |
| Next Wii Profile Select | Select + Left Stick Right |
| Previous Game Profile Select | Select + Left Stick Down |
| Increase Internal Resolution | Start + DPAD Up |
| Decrease Internal Resolution | Start + DPAD Down |
| Toggle Aspect Ratio | Start + DPAD Right |
Note: If you open Dolphin directly and then launch a game, you may use the full screen hotkey Start + L3. However, if you launch a GameCube or a Wii game as a shortcut through Steam, ES-DE, or Pegasus, this hotkey will not work.
List of Wii Profiles Included with EmuDeck
- Wiimote with Nunchuk
- Wiimote with Nunchuk and Touchpad Support
- Wiimote with No Attachment
- Wiimote with No Attachment and Touchpad Support
- Wii Classic Controller
Citra (3DS)
Citra comes with a Steam Input profile for Hotkeys. When playing Citra ROM shortcuts through Steam, the EmuDeck - Controller Hotkeys profile will automatically be applied so you may use the below hotkeys. For more info, see Emulator Button Combinations Profile.
When using a frontend (ES-DE, Pegasus, or the emulator itself), the EmuDeck - Frontend Controller Hotkeys will automatically be applied. Hold Start for a few seconds to switch to the action set required to use the below hotkeys. For more info, see Emulator Frontends Button Combinations Profile.
| Hotkey | Citra |
|---|---|
| Toggle Full Screen | Select + R3 |
| Save State | Select + R1 |
| Load State | Select + L1 |
| Fast Forward | Select + R2 |
| Pause/Play | Select + A |
| Reset Emulation | Select + L3 |
| Stop Emulation | Select + Start or hold L5 or hold R5 |
| Toggle Screen Layout | L4 or R4 or Start + DPad Left or Select + Y |
| Swap Screens | L5 or R5 or Start + DPad Down or Select + X |
| Load Amiibo | Start + DPad Right |
Note
- For a tutorial on how to select Steam Input Profiles, see How to Select a Steam Input Profile.
- If you would like to use the old radial menus, apply the
EmuDeck - Steam Deck Radial Menusprofile instead
Cemu (Wii U)
Cemu comes with a Steam Input profile for Hotkeys. When playing Cemu ROM shortcuts through Steam, the EmuDeck - Controller Hotkeys profile will automatically be applied so you may use the below hotkeys. For more info, see Emulator Button Combinations Profile.
When using a frontend (ES-DE, Pegasus, or the emulator itself), the EmuDeck - Frontend Controller Hotkeys will automatically be applied. Hold Start for a few seconds to switch to the action set required to use the below hotkeys. For more info, see Emulator Frontends Button Combinations Profile.
| Hotkey | Cemu |
|---|---|
| Toggle Full Screen | Select + R3 |
| Toggle Screens | L4 or R4 or Start + DPad Left or Select + Y |
| Swap Screens | L5 or R5 or Start + DPad Down or Select + X |
| Stop Emulation | Select + Start or hold L5 or hold R5 |
| Blow Mic | R3 |
Note
- The
Blow Michotkey only works if you are using the gamepad. - For a tutorial on how to select Steam Input Profiles, see How to Select a Steam Input Profile.
- If you would like to use touch menus, apply the
EmuDeck - Steam Deck Radial Menusprofile instead.
Ryujinx (Switch)
| Ryujinx | Hotkeys | Keyboard Keys |
|---|---|---|
| Stop Emulation | Steam or ... + DPad Left |
Esc |
Yuzu (Switch)
| Hotkey | Yuzu |
|---|---|
| Quick Menu | Select + R3 |
| Toggle Full Screen | Start + L3 |
| Pause/Play | Select + A |
| Fast Forward | Select + R2 |
| Stop Emulation | Select + Start |
| Full Screen Toggle | Select + R3 |
| Docked Mode Toggle | Start + DPAD Up |
| GPU Accuracy | Start + DPAD Down |
| Filter | Start + DPAD Left |
Sega Hotkeys
Model 2 Emulator (Sega Model 2)
| Hotkey | Model 2 Emulator | Notes |
|---|---|---|
| Stop Emulation | Not supported by emulator | Workaround: Press the STEAM button (HOME + A on an external controller) and press the controller X button on the game tab to close the game |
| Service Menu | F2 | Bind a button to F2 through Steam Input to access the Service Menu |
| Navigate Service Menu | F1 | Bind a button to F1 through Steam Input to navigate the Service Menu |
Steam Deck Light Gun Controls
The Model 2 Emulator also comes with a EmuDeck - Steam Deck Light Gun Controls profile intended to be used with light gun games. To use this profile, apply it manually. For instructions, see How to Select a Steam Input Profile.
| Controls | EmuDeck - Steam Deck Light Gun Controls | General Notes | Emulator Specific Notes |
|---|---|---|---|
| Left Trackpad | Mouse and Right Click on Click | Mouse sensitivity set to 100% | - |
| Right Trackpad | Mouse and Left Click on Click | Mouse sensitivity increased to 200% | - |
| R2 | Left Click | Typically used to shoot | When using MAME, move the cursor to the bottom left of the screen, and click L2 or R2 depending on the game to reload |
| L2 | Right Click | Typically used to reload | When using MAME, move the cursor to the bottom left of the screen, and click L2 or R2 depending on the game to reload |
Flycast (Dreamcast) (Standalone)
| Hotkey | Flycast |
|---|---|
| Quick Menu | Select or TAB or STEAM + DPad Down* |
| Fast Forward | STEAM + DPad Right or ENTER |
| Stop Emulation | STEAM + DPad Left or ESCAPE |
| Insert Coin | Select* |
| Service Key | L3 |
| Test Key | R3 |
| Insert Card | Enter or STEAM + DPad Right* |
- When playing arcade games through Flycast, the
Selectbutton will no longer open theQuick Menu. For arcade games specifically, theSelectbutton is mapped toInsert Coin. For Dreamcast games, theSelectbutton is mapped to theQuick Menu - When playing arcade games through Flycast,
STEAM+DPad Rightwill no longerFast Forward. For arcade games specifically,STEAM+DPad Rightis mapped toInsert Card. For Dreamcast games, theSTEAM+DPad Rightbutton is mapped toFast Forward
Steam Deck Light Gun Controls
Flycast also comes with a EmuDeck - Steam Deck Light Gun Controls profile intended to be used with light gun games. To use this profile, apply it manually. For instructions, see How to Select a Steam Input Profile.
| Controls | EmuDeck - Steam Deck Light Gun Controls | General Notes | Emulator Specific Notes |
|---|---|---|---|
| Left Trackpad | Mouse and Right Click on Click | Mouse sensitivity set to 100% | - |
| Right Trackpad | Mouse and Left Click on Click | Mouse sensitivity increased to 200% | - |
| R2 | Left Click | Typically used to shoot | When using MAME, move the cursor to the bottom left of the screen, and click L2 or R2 depending on the game to reload |
| L2 | Right Click | Typically used to reload | When using MAME, move the cursor to the bottom left of the screen, and click L2 or R2 depending on the game to reload |
Supermodel (Sega Model 3)
| Supermodel | Hotkeys | Keyboard Keys | Notes |
|---|---|---|---|
| Stop Emulation | Steam or ... + DPad Left |
Esc | - |
| Service/Test Menu | - | 6 | Bind a button to 6 through Steam Input to access the Service Menu |
| Navigate Service/Test Menu | - | 5 | Bind a button to 5 through Steam Input to navigate the Service Menu |
Steam Deck Light Gun Controls
Supermodel also comes with a EmuDeck - Steam Deck Light Gun Controls profile intended to be used with light gun games. To use this profile, apply it manually. For instructions, see How to Select a Steam Input Profile.
| Controls | EmuDeck - Steam Deck Light Gun Controls | General Notes | Emulator Specific Notes |
|---|---|---|---|
| Left Trackpad | Mouse and Right Click on Click | Mouse sensitivity set to 100% | - |
| Right Trackpad | Mouse and Left Click on Click | Mouse sensitivity increased to 200% | - |
| R2 | Left Click | Typically used to shoot | When using MAME, move the cursor to the bottom left of the screen, and click L2 or R2 depending on the game to reload |
| L2 | Right Click | Typically used to reload | When using MAME, move the cursor to the bottom left of the screen, and click L2 or R2 depending on the game to reload |
Sony Hotkeys
PPSSPP (Playstation Portable)
| Hotkey | PPSSPP |
|---|---|
| Quick Menu | Steam + DPad Left |
| Quick Menu | Select + R3 |
| Save State | Select + R1 |
| Load State | Select + L1 |
| Next Save State Slot | Start + R1 |
| Previous Save State Slot | Start + L1 |
| Fast Forward | Select + R2 |
| Rewind | Select + R2 |
| Screenshot | Select + B |
| Stop Emulation | Start + Select |
These hotkeys are for PPSSPP, a standalone Playstation Portable. These hotkeys are not for the PPSSPP RetroArch core. For more information on RetroArch and the PPSSPP RetroArch core hotkeys, visit RetroArch.
Vita3K (Playstation Vita)
N/A
DuckStation (Playstation 1)
Long Press to activate hotkeys on the left trackpad touch menu.
| Hotkey | DuckStation |
|---|---|
| Quick Menu | Select + R3 |
| Toggle Full Screen | Start + L3 |
| Save State | Select + R1 |
| Load State | Select + L1 |
| Next Save State Slot | Start + R1 |
| Previous Save State Slot | Start + L1 |
| Fast Forward | Select + R2 |
| Rewind | Select + L2 |
| Pause/Play | Select + A |
| Screenshot | Select + B |
| Swap Disc | Select + X |
| Reset Emulation | Select + L3 |
| Stop Emulation | Select + Start |
| Toggle PGXP | Select + Y |
| Increase Resolution Scale | Start + DPad Up |
| Decrease Resolution Scale | Start + DPad Down |
| Toggle Software Rendering | Start + DPad Left |
| Toggle Widescreen | Start + DPad Right |
PCSX2 (Playstation 2)
| Hotkey | PCSX2-QT |
|---|---|
| Quick Menu | Select + R3 |
| Toggle Full Screen | Start + L3 |
| Save State | Select + R1 |
| Load State | Select + L1 |
| Next Save State Slot | Start + R1 |
| Previous Save State Slot | Start + L1 |
| Fast Forward | Select + R2 |
| Slow Motion | Select + L2 |
| Pause/Play | Select + A |
| Screenshot | Select + B |
| Reset Emulation | Select + L3 |
| Stop Emulation | Select + Start |
| Increase Upscale Multiplier | Start + DPad Up |
| Decrease Upscale Multiplier | Start + DPad Down |
| Toggle Software Rendering | Start + DPad Left |
| Cycle Aspect Ratio | Start + DPad Right |
RPCS3 (Playstation 3)
N/A
Tools Hotkeys
Cloud Services
These hotkeys are specifically for cloud services, refer to the Cloud Services page for more information.
Cloud Services comes with a Steam Input profile for Hotkeys. Activate the Steam Input profile by clicking the Game Controller icon in Game Mode, change the template to Emudeck - Cloud Services. The hotkeys below can only be used if you have the Steam Input profile active.
By default, the controls are that of a standard gamepad along with:
- L/R Trackpads being mouse input
- R Trackpad click is "Left Mouse Click"
- L Trackpad click is "Right Mouse Click"
- Pressing "Start + Select" will close the current tab in a web browser
- Press and hold L4 (Upper left paddle button) to change button layer to "Web Navigation"
"Web Navigation" action layer (need to hold L4 for these keys to be active):
- Start is "Escape"
- Select is "Tab"
- D pad is "Arrow keys"
- R1 (Right bumper) is "Page Forward"
- L1 (Left bumper) is "Page Back"
- R2 (Right trigger) is "Left mouse click"
- L2 (Left trigger) is "Right mouse click"
- A is "Play/Pause (Space Key)"
- B is "Back (Escape Key)"
- X is "Find in Page (F3)"
- Y is "Refresh (F5)"
- Rotate left joystick to scroll: CW scroll down, CCW scroll up