Vita3K is a Playstation Vita emulator.
Website: https://vita3k.org/
GitHub: https://github.com/Vita3K/Vita3K
Compatibility List: https://vita3k.org/compatibility.html?lang=en
Quickstart Guide: https://vita3k.org/quickstart.html
Vita3K Table of Contents
Getting Started with Vita3K
In order to play a game on Vita3K, you will need to install firmware through the Vita3K UI. In desktop mode, open Vita3K, either in the application menu or through its shortcut in Emulation/tools/launchers/vita3k.sh. In Vita3K, click File, click Install Firmware. Firmware is provided legally by Sony.
Make sure to check out Vita3K's quickstart guide: https://vita3k.org/quickstart.html.
Read the Configuration section to learn more about Vita3K and its folder locations.
To launch your ROMs in Game Mode, first install your ROMs through Vita3K if you are using the .zip or .pkg file formats. For more information, see the File Formats section. Afterwards, you may use Steam ROM Manager and use one of the following parsers to play your PlayStation Vita ROMs:
ES-DESony PlayStation Vita Installed PKGEmulators
Vita3K Configuration
- Type of Emulator: Binary Package
- Config Location:
/home/deck/Applications/Vita3K - Executable Location:
/home/deck/Applications/Vita3K/Vita3K - Storage Location:
Emulation/storage/Vita3K/ux0 - ROM Location:
Emulation/roms/psvita/InstalledGamesInstalledGamesis a symlink toEmulation/storage/Vita3K/uxo/app
- Firmware: Install firmware through Vita3K's GUI. Read the Quickstart Guide for a tutorial
- Saves:
Emulation/storage/Vita3K/ux0/user/00/savedata- Save folders correspond to a game's Title ID. To locate your game's Title ID, open Vita3K, right click a game, and click
Information
- Save folders correspond to a game's Title ID. To locate your game's Title ID, open Vita3K, right click a game, and click
Works With
- Steam ROM Manager
- ES-DE
- Refer to How to Configure Vita3K to Work With ES-DE and Pegasus for instructions
Vita3K Folder Locations
These file locations apply regardless of where you chose to install EmuDeck (to your internal SSD, to your SD Card, or elsewhere). Some emulator configuration files will be located on the internal SSD as listed below.
$HOME refers to your home folder. If you are on a Steam Deck, this folder will be named /home/deck (you will likely not see deck in the file path when navigating using the file manager).
Paths beginning with Emulation/.. correspond to your EmuDeck install location. If you installed on an SD Card, your path may be /run/media/mmcblk0p1/Emulation/roms/... If you installed on your internal SSD, your path may be /home/deck/Emulation/roms/..
Note: Folders with a . (.var, .local, .config, etc.) at the beginning are hidden by default. In Dolphin (file manager), click the hamburger menu in the top right, click Show Hidden Files to see these folders.
$HOME/.config/Vita3K
$HOME/.local/share/Vita3K
$HOME/.cache/Vita3K
Emulation/storage/Vita3K
Vita3K/
├── gro0
├── grw0
├── host0
├── imc0
├── os0
│   ├── kd
│   ├── sm
│   ├── ue
│   └── us
├── pd0
├── sa0
│   └── data
├── sd0
├── tm0
├── ud0
├── uma0
│   └── data
├── ur0
├── ux0
│   ├── app
│   ├── data
│   ├── license
│   ├── temp
│   ├── theme
│   └── user
│       └──00
│           └──savedata
├── vd0
├── vs0
│   ├── app
│   ├── data
│   ├── sys
│   ├── tool
│   └── vsh
└── xmc0
How to Update Vita3K
How to Update Vita3K
- Through the
Update your Emulators & Toolssection on theManage Emulatorspage in theEmuDeckapplication - Manual file replacement of
Vita3K- Refer to How to Swap Out AppImages and Binaries for instructions
- Through Vita3K's built-in updater
- Desktop Mode:
- Search for Vita3K in the
Applications Launcher(Steam Deck icon in the bottom left of the taskbar) and open it, Vita3K will prompt for an update if one is available
- Search for Vita3K in the
- Game Mode:
- Add Vita3K to Steam by using the
Emulatorsparser in Steam ROM Manager. After adding it to Steam, you may open it in Game Mode, Vita3K will prompt for an update if one is available
- Add Vita3K to Steam by using the
- Desktop Mode:
- Through
binupdate.shinEmulation/tools/binupdate, double click to launch
How to Launch Vita3K in Desktop Mode
How to Launch Vita3K in Desktop Mode
- Launch
Vita3K Binaryfrom the Applications Launcher (Steam Deck icon in the bottom left of the taskbar) - Launch the script from
Emulation/tools/launchers,vita3k.sh - Launch the binary in
/home/deck/Applications/Vita3K/Vita3K - Launch the emulator from
Steamafter adding it via theEmulatorsparser inSteam ROM Manager
Vita3K File Formats
.pkgandwork.bin- Install through Vita3K's GUI
.zip- Install through Vita3K's GUI
- Manually decrypted games in the form of a folder
- Place these folders in
Emulation/roms/psvita/InstalledGames
- Place these folders in
.vpk- Install through Vita3K's GUI
Note: Vitamin dumps (VPK) are not officially supported and may not work as expected.
To learn how to dump your games, see https://vita3k.org/quickstart.html.
Vita3K Tips and Tricks
How to Configure Vita3K to Work With ES-DE and Pegasus
Note: This section requires you to install your PlayStation Vita games first through Vita3K. At this time, ES-DE and Pegasus only support launching installed PSVita games.
- In Desktop Mode, open Vita3K
- Right click a game of your choice, and click
Copy app info→Title ID- You may also click
Informationto see theTitle ID - Example 1:
- Example 2:
- You may also click
- In
Emulation/roms/psvita, right click,Create New - Text File - Name it
GAMENAME.psvita- The name of the file is primarily for identifying it in ES-DE and Pegasus and scraping
- Open the text file in Kate or a text editor of your choice and paste the
Title IDfrom Step 1 on a single line- Using
Tales of Heart Ras an example:
- Using
- Save the text file and exit out
- Repeat for each PlayStation Vita ROM
- Your game should now show up in and launch directly from ES-DE and Pegasus

For additional detail, read ES-DE's section on Vita3K: https://gitlab.com/es-de/emulationstation-de/-/blob/master/USERGUIDE.md#sony-playstation-vita
How to Configure Gyro With External Controllers
Supported Games
This list is not comprehensive
- Assassin's Creed: Liberation
- Borderlands 2
- Chronovolt
- Criminal Girls 2: Party Favors
- Gravity Rush
- Killzone Mercenary
- Little Deviants
- Plants vs. Zombies
- Resident Evil: Revelations 2
- Sonic & All-Stars Racing: Transformed
- Super Stardust Delta
- Uncharted Golden Abyss
- VitaQuake
Desktop Mode
- Switch to Desktop Mode
- Exit out of Steam
- You may exit out of Steam a couple of different ways:
- Right click the
Steamicon in your taskbar and clickExit Steam - Open Steam, click the
Steambutton in the top left, clickExit - Open a terminal (Konsole) and enter
killall -9 steam - Do note that clicking the the
Xbutton in the top right of the Steam window will not exit out of Steam
- Right click the
- Your controls will switch to
Lizard Mode. UseL2to right click,R2to left click, and theRight Trackpadto move the mouse - You may also connect an external keyboard and mouse
- You may exit out of Steam a couple of different ways:
- Click the bluetooth icon in the bottom right of your taskbar and connect your controller
- Open Vita3K
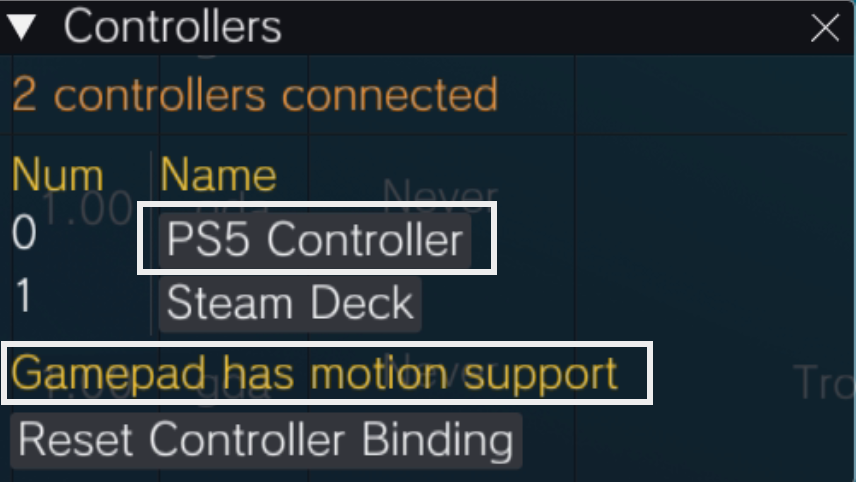
- Click
Controlsat the top, clickControllers - Make sure your external controller is listed here and that you see
Gamepad has motion supportat the bottom of this screen - Close out of the controller screen and Vita3K
- Switch to
Game Mode
Game Mode
- In Game Mode, connect your controller
- Select your PlayStation Vita game
- On the
Playscreen, select theControllericon to the right of the screen - Select your controller tab at the top
- Click the
Gearicon to the right, and clickDisable Steam Input- You may need to restart first for this setting to properly apply
- Your controller's gyro will now work for this selected game, repeat as needed for your other games
Post-Configuration
To restore the default Steam Deck controls:
Once you disconnect your controller, your Steam Deck controls should work again. If you would like your controller to remain connected, you may need to re-enable Steam Input for your controller so you can use the Re-order Controllers feature.
How to Re-Enable Steam Input
- Select your PlayStation Vita game
- On the
Playscreen, select theControllericon to the right of the screen - Select your controller tab at the top
- Click the
Gearicon to the right, and clickEnable Steam Input- You may need to restart first for this setting to properly apply
- The controls will be reverted to Steam Input and the Steam Deck controls will be restored
How to Install Custom Textures
Texture Pack Sources
This list is not exhaustive
- https://old.reddit.com/r/tales/comments/17ogjtr/tales_of_innocence_r_hd_fan_project_english/
- For updates to this texture pack, you will need to join their Discord. For the link, see the top of the GitHub page: https://github.com/lifebottle/Tales-of-Innocence-R
How to Install Custom Textures
- In Desktop Mode, open
/home/deck/.local/share/Vita3K/~/.localis an invisible folder by default, click theHamburgermenu in the top right of the file explorer, clickShow Hidden Files
- Create a
texturesfolder here, casing matters - In the
texturesfolder, create animportfolder, casing matters - Place your downloaded texture pack folder (containing the texture files) directly in the newly created
importfolder- The texture pack folder should match the game's Title ID
- To locate your game's Title ID, open Vita3K, right click a game, and click
Information
- To locate your game's Title ID, open Vita3K, right click a game, and click
- The texture pack folder should match the game's Title ID
- In Desktop Mode, open Vita3K:
- At the top, click
Configuration,Settings,GPU - Check
Import TexturesunderTexture Replacement - Click
Saveand close out of the settings menu- You may also do this on a per game basis:
- Right click the game
- Click
Custom Config,Create,GPU, - Check
Import TexturesunderTexture Replacement - Click
Saveand close out of the settings menu
- You may also do this on a per game basis:
- At the top, click
- Your texture pack will now be applied
How to Install English Patches
English Patch Sources
This list is not exhaustive
- https://github.com/lifebottle/Tales-of-Innocence-R
- https://gbatemp.net/threads/release-trails-in-the-sky-fc-evolution-english-patch.472727/
This section will use the Tales of Innocence R English Patch as an example. Instructions may differ depending on what patch you are using, but generally you will be able to apply the below instructions to any English patch.
- In Desktop Mode, open Vita3K and install your game
- Skip this step if you have already installed your game
- Download the English patch and extract it to a folder of your choice
- For Tales of Innocence R English Patch, download the " toir_patch-DecryptedWithComputer" version from https://github.com/lifebottle/Tales-of-Innocence-R/releases
- On the Steam Deck, open https://www.romhacking.net/hash/ on a web browser of your choice
- If your English patch extracted folder includes a
eboot.xdeltafile:ROM Hack:ClickBrowseand navigate toEmulation/storage/Vita3K/uxo/app/GAMETITLEIDand select theeboot.binfile- To locate your game's Title ID, open Vita3K, right click a game, and click
Information
- To locate your game's Title ID, open Vita3K, right click a game, and click
Patch File: Navigate to your extracted English patch folder from Step 2 and select theeboot.xdeltafile- Click
Apply Patch,romhacking.netwill save your patchedeboot.binto yourGAMETITLEIDfolder- If the website saves your file elsewhere, move it to your
GAMETITLEIDfolder
- If the website saves your file elsewhere, move it to your
- Either delete or rename the original
eboot.binfile and rename the newly patchedeboot (patched).binfile toeboot.bin
- If your English patch extracted folder includes a
toidata_release.xdeltafile:ROM Hack:ClickBrowseand navigate toEmulation/storage/Vita3K/uxo/app/GAMETITLEIDand select thetoidata_release.l7cfile- To locate your game's Title ID, open Vita3K, right click a game, and click
Information
- To locate your game's Title ID, open Vita3K, right click a game, and click
Patch File: Navigate to your extracted English patch folder from Step 2 and select thetoidata_release.xdeltafile- Click
Apply Patch,romhacking.netwill save your patchedtoidata_release.l7cto yourGAMETITLEIDfolder- If the website saves your file elsewhere, move it to your
GAMETITLEIDfolder
- If the website saves your file elsewhere, move it to your
- Either delete or rename the original
toidata_release.l7cfile and rename the newly patchedtoidata_release (patched).l7cfile totoidata_release.l7c
- If your English patch extracted folder includes a
data.psarc.xdeltafile:ROM Hack:ClickBrowseand navigate toEmulation/storage/Vita3K/uxo/app/GAMETITLEID/gamedataand select thedata.psarcfile- To locate your game's Title ID, open Vita3K, right click a game, and click
Information
- To locate your game's Title ID, open Vita3K, right click a game, and click
Patch File: Navigate to your extracted English patch folder from Step 2 and select thedata.psarc.xdeltafile- Click
Apply Patch,romhacking.netwill save your patcheddata.psarcto yourGAMETITLEIDfolder- If the website saves your file elsewhere, move it to your
GAMETITLEIDfolder
- If the website saves your file elsewhere, move it to your
- Either delete or rename the original
data.psarcfile and rename the newly patcheddata (patched).psarcfile todata.psarc
- Your English patch will now be applied
How to Configure Language Settings
UI
- In Desktop Mode, open Vita3K
- At the top, click
Configuration - Click
Settings - Click the
GUItab - To the left of
GUI Language, select your preferred language in the drop-down menu
In-Game
- In Desktop Mode, open Vita3K
- Open the
Settingsapplication, clickStart- The
Settingsapplication will be in your game list. By default, it will look like a toolbag with a green background 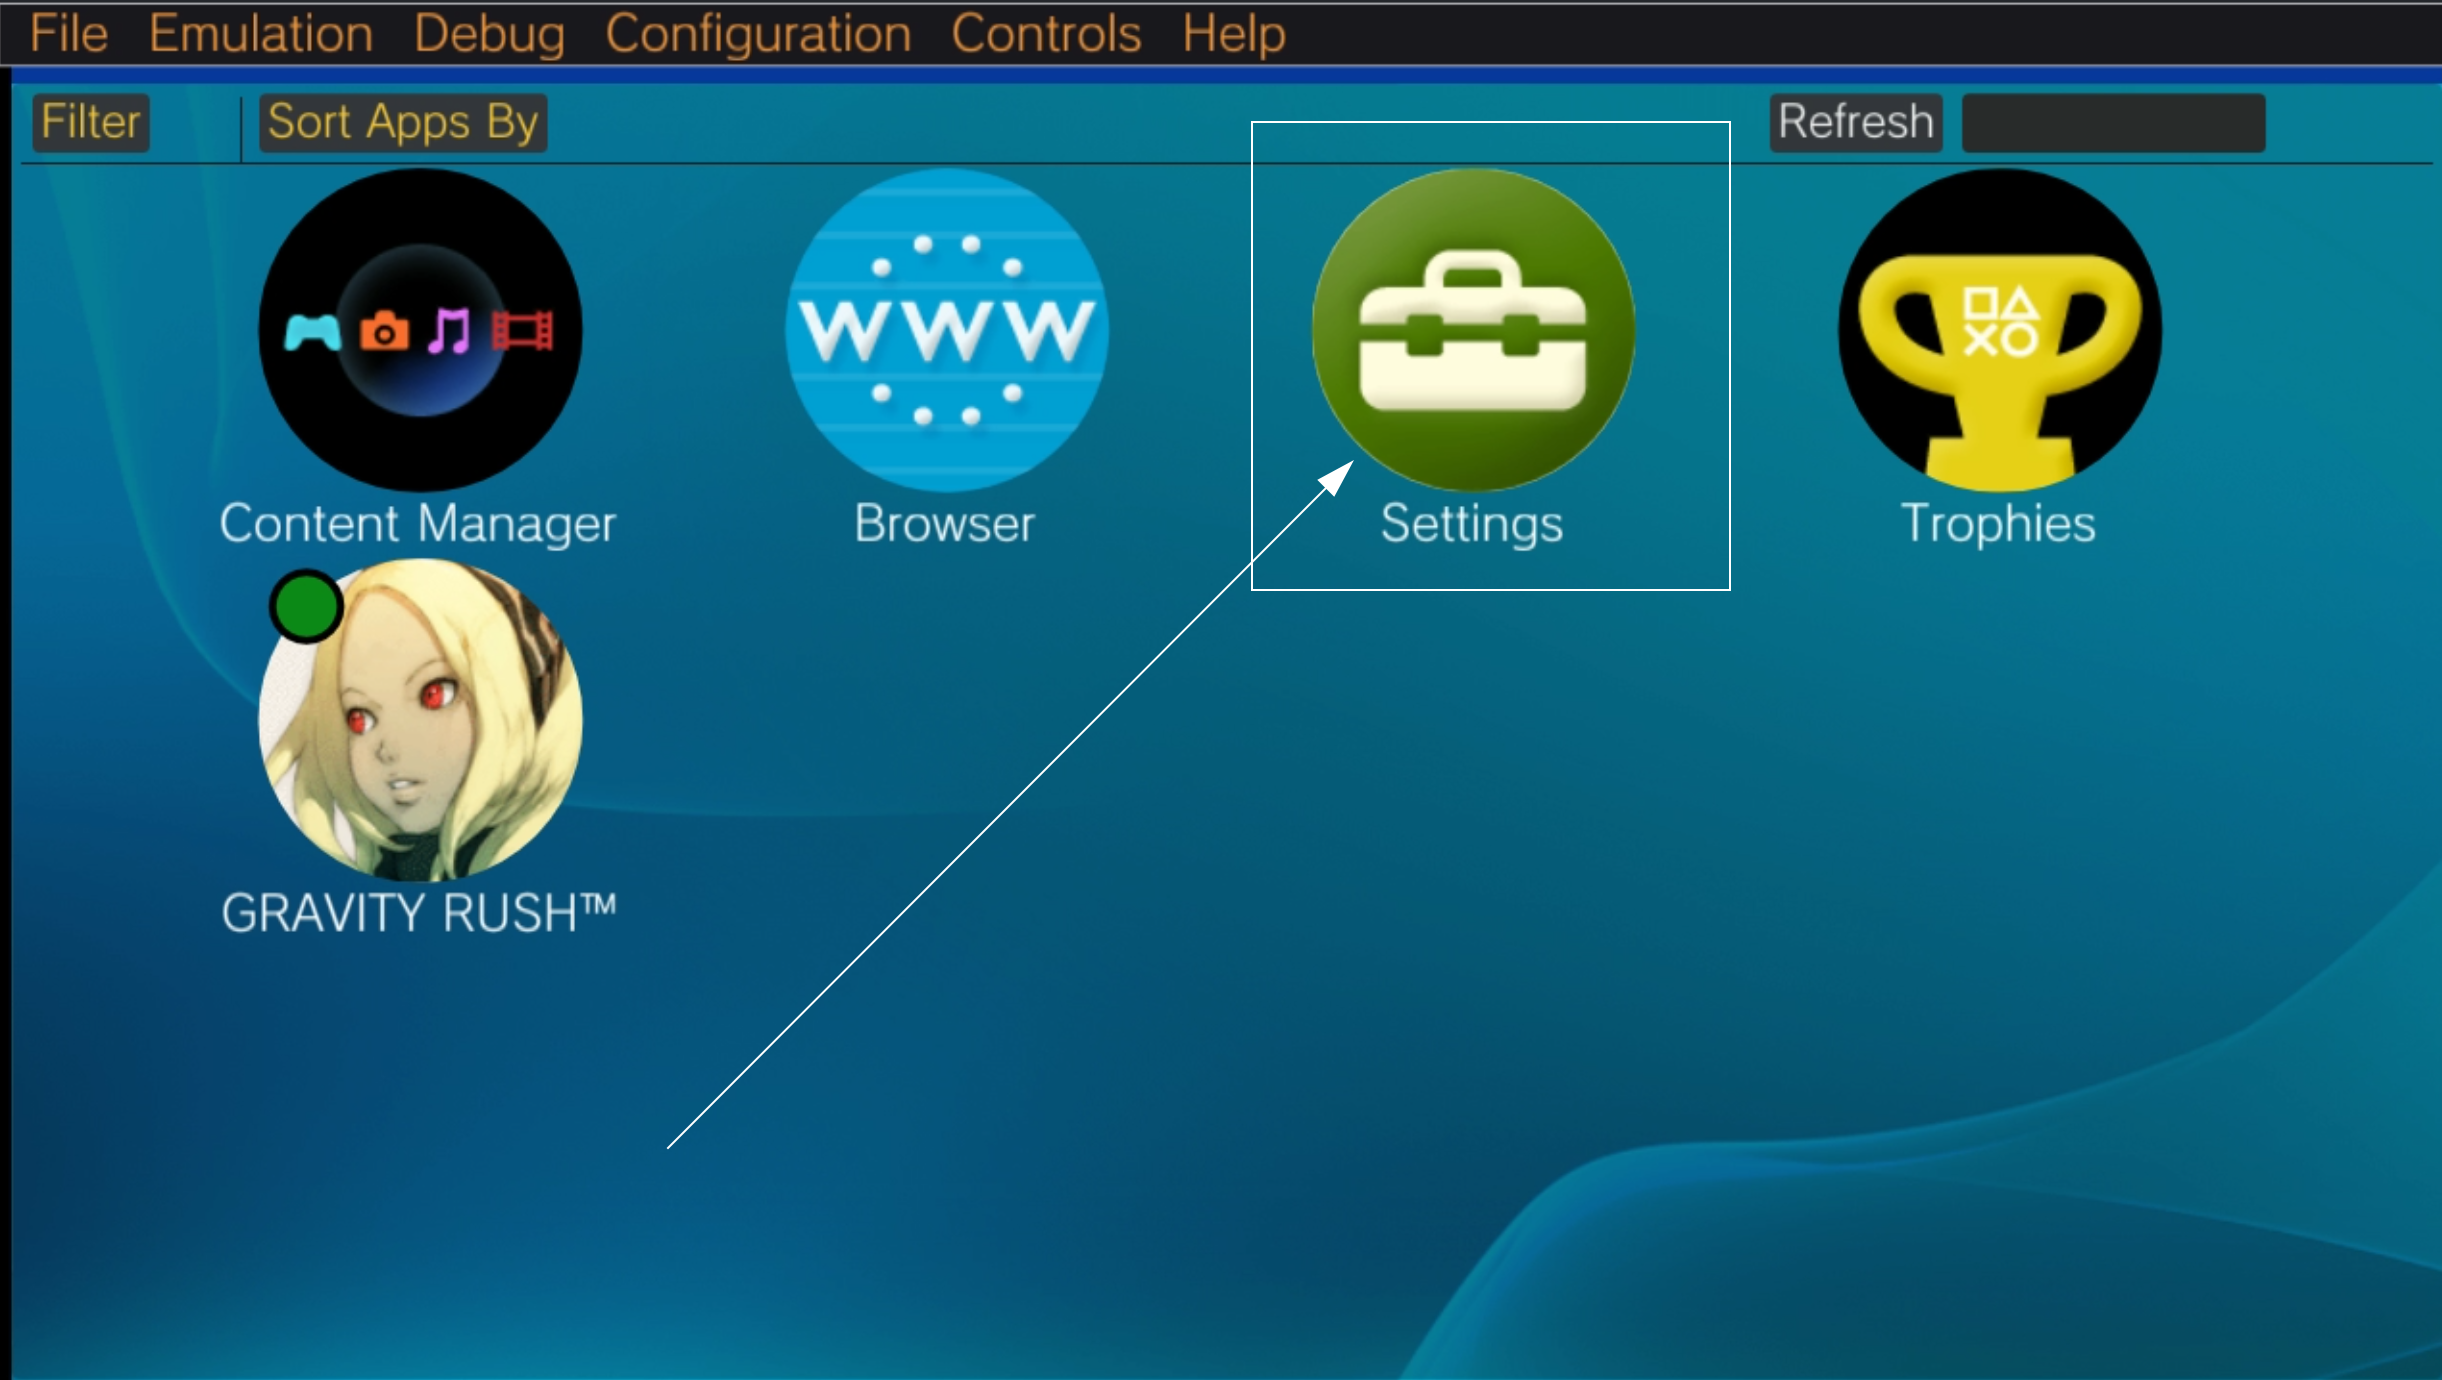
- The
- Click
Language - Click
System Language - Select your preferred language in the drop-down menu