Rosalie's Mupen GUI (RMG) is a Nintendo 64 Emulator.
GitHub: https://github.com/Rosalie241/RMG
This page is for Rosalie's Mupen GUI, a standalone N64 emulator. This page is not for the Mupen64Plus-Next RetroArch core. For more information on RetroArch and the Mupen64Plus-Next RetroArch core, visit the RetroArch Page.
RMG Table of Contents
Getting Started with RMG
RMG is a fairly straight-forward emulator to set up. If you are strictly playing Nintendo 64 ROMs, place your ROMs in Emulation/roms/n64. No additional setup is required. Read the Configuration section to learn more about RMG and its folder locations.
To launch your ROMs in game mode, use Steam ROM Manager and use one of the following parsers to play your N64 ROMs:
EmulationStation-DENintendo 64 - RMGEmulators
RMG Configuration
- Type of Emulator: Flatpak
- Config Location:
/home/deck/.var/app/com.github.Rosalie241.RMG - Nintendo 64 ROM Location:
Emulation/roms/n64- No BIOS are required to play Nintendo 64 games
- Nintendo 64DD ROM Location:
Emulation/roms/n64dd - Nintendo 64DD BIOS Location:
Emulation/bios- Nintendo 64DD BIOS:
64DD_IPL_US.n6464DD_IPL_JP.n6464DD_IPL_DEV.n64- Note: These BIOS are only required if you are playing Nintendo 64DD games. These BIOS are not required for base Nintendo 64 games
- Nintendo 64DD BIOS:
- Saves:
Emulation/saves/RMG/saves - Save States:
Emulation/saves/RMG/states - Storage Location:
Emulation/storage/RMG
Note: ~/.var is an invisible folder by default. In Dolphin (file manager), click the hamburger menu in the top right, click Show Hidden Files to see these folders.
Works With
- Steam ROM Manager
- EmulationStation-DE
RMG Folder Locations
These file locations apply regardless of where you chose to install EmuDeck (to your internal SSD, to your SD Card, or elsewhere). Some emulator configuration files will be located on the internal SSD as listed below.
$HOME refers to your home folder. If you are on a Steam Deck, this folder will be named /home/deck (you will likely not see deck in the file path when navigating using the file manager).
Paths beginning with Emulation/.. correspond to your EmuDeck install location. If you installed on an SD Card, your path may be /run/media/mmcblk0p1/Emulation/roms/... If you installed on your internal SSD, your path may be /home/deck/Emulation/roms/..
Note: Folders with a . (.var, .local, .config, etc.) at the beginning are hidden by default. In Dolphin (file manager), click the hamburger menu in the top right, click Show Hidden Files to see these folders.
$HOME/.var/app/com.github.Rosalie241.RMG
com.github.Rosalie241.RMG
├── cache
├── config
│   ├── kdeglobals
│   ├── pulse
│   │   └── cookie
│   ├── QtProject.conf
│   ├── RMG
│   │   ├── GLideN64.ini
│   │   ├── GLideN64.ini.bak
│   │   ├── mupen64plus.cfg
│   │   └── mupen64plus.cfg.bak
│   └── user-dirs.dirs
└── data
    └── RMG
        ├── Cheats-User
        └── Save
            ├── Game
            └── State
Emulation/storage/RMG
How to Update RMG
How to Update RMG
- Update through
Discover(Shopping bag icon) - Through the
Update your Emulators & Toolssection on theManage Emulatorspage in theEmuDeckapplication
How to Launch RMG in Desktop Mode
How to Launch RMG in Desktop Mode
- Launch
Rosalie's Mupen GUIfrom the Applications Launcher (Steam Deck icon in the bottom left of the taskbar) - Launch the script from
Emulation/tools/launchers,rosaliesmupengui.sh - Launch the emulator from
Steamafter adding it via theEmulatorsparser inSteam ROM Manager
RMG File Formats
- .bin
- .n64
- .ndd
- .u1
- .v64
- .z64
- .zip
RMG Hotkeys
| Hotkey | RMG |
|---|---|
| Toggle Full Screen | Select + R3 |
| Save State | Select + R1 |
| Load State | Select + L1 |
| Next Save State Slot | Start + R1 |
| Previous Save State Slot | Start + L1 |
| 1x Speed/Regular Speed | Select + L2 |
| 2x Speed/Fast Forward | Select + R2 |
| Pause/Play | Select + A |
| Screenshot | Select + B |
| Reset Emulation | Select + L3 |
| Stop Emulation | Select + Start |
| Switch to Memory Pak | Start + DPad Up |
| Remove Pak | Start + Dpad Down |
| Limit FPS | Start + DPad Left |
| Switch to Rumble Pak | Start + DPad Right |
Note:
RMG Tips and Tricks
How to Configure Multiplayer
EmuDeck configures multiplayer out of the box. You do not need to configure the controls. To set up multiplayer, you simply need to enable the additional ports.
Tutorial
- Open Rosalie's Mupen GUI
- Open the
Inputsettings - For each controller you are using for Player 2, 3, and 4, click the respective tab
- You do not need to adjust any settings for Player 1
- Under
Input Device- Player 2:
Steam Virtual Gamepad 1 - Player 3:
Steam Virtual Gamepad 2 - Player 4:
Steam Virtual Gamepad 3
- Player 2:
- Under
Profile- Player 2:
steamdeck2 - Player 3:
steamdeck3 - Player 4:
steamdeck4
- Player 2:
- After you are finished enabling any additional players, click
OKand you may open your game either directly as a shortcut in Steam or through EmulationStation-DE - (Optional) You may need to re-arrange the controller order in Game Mode for your controllers to function as expected. See How to Re-Arrange the Controller Order to learn how
How to Install Custom Textures
Preface
HTS & HTC are cache formats. PNG is the 'source' of the texture packs before it's converted to a cache file.
Before installing a texture pack, you will need to determine if it is HTC, HTS, or PNG. This can usually be confirmed by checking the file extension or reading the attached documentation. Follow the respective section below for installing texture packs.
Keep in Mind
- This section specifically requires the GLideN64 plugin. GLideN64 is the default graphics plugin if you are using EmuDeck settings
- Texture packs are placed in the various subfolders within
Emulation/storage/RMG- This folder contains the following sub-folders:
cachecacheis for HTC and HTS texture packs
HiResTexturesHiResTexturesis for PNG texture packs
- This folder contains the following sub-folders:
Texture Pack Sources
This list is not exhaustive
- https://evilgames.eu/texture-packs.htm
- https://www.n64textures.com/downloads/?lang=en
- https://emulationking.com/category/n64-texturepacks/
How to Install Custom Textures
HTC
- Open the
Emulation/storage/RMG/cachefolder - Place your texture pack file directly into this folder
- Open RMG
- Click
Settingsat the top, selectGraphics - Click the
Texture enhancementtab - Make sure
Use file storage instead of memory cacheis unchecked
HTS
- Open the
Emulation/storage/RMG/cachefolder - Place your texture pack file directly into this folder
- Open RMG
- Click
Settingsat the top, selectGraphics - Click the
Texture enhancementtab - Check
Use file storage instead of memory cache
PNG
This section goes over enabling file storage instead of memory cache in RMG's settings. This is optional, but recommended.
- Open the
Emulation/storage/RMG/HiResTexturesfolder - Place your texture pack folder directly into this folder
- Open RMG
- Click
Settingsat the top, selectGraphics - Click the
Texture enhancementtab - Check
Use file storage instead of memory cache
How to Configure VRU
The VRU (Voice Recognition Unit) was a peripheral for the Nintendo 64 that allowed you to use a microphone in "Hey You, Pikachu!" and "Densha de Go! 64".
Since the Steam Deck comes with an internal built in microphone, you can use the Steam Deck's microphone to utilize VRU in Rosalie's Mupen GUI.
Note: Make sure Rosalie's Mupen GUI is up to date. VRU support was added in v0.4.2, on July 7th, 2023.
How to Set up VRU
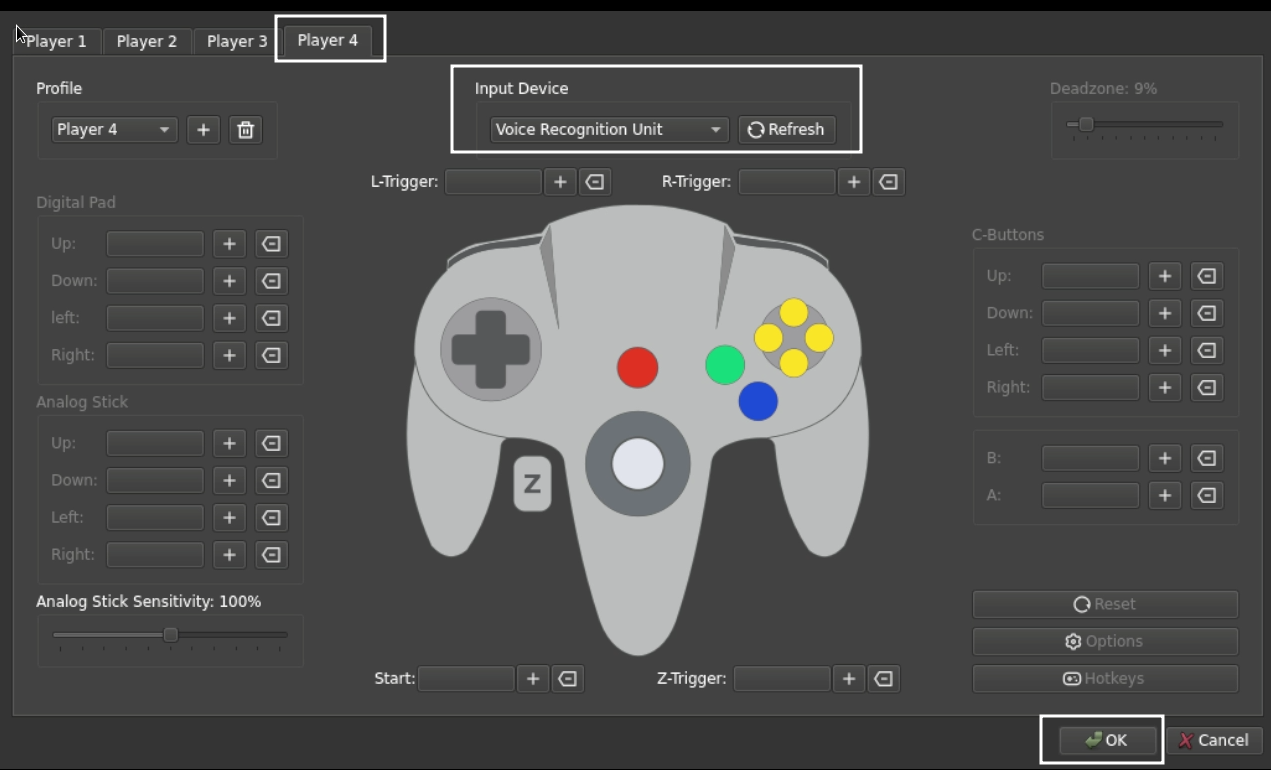
- Open RMG
- Open the
Inputsettings under theSettingstab at the top - Click on
Player 4 - Change the
Input DevicetoVoice Recognition Unit - Click
OKin the bottom right - VRU is now enabled
How to Configure N64DD
The Nintendo 64DD was a floppy disk drive peripheral for the Nintendo 64.
See https://en.wikipedia.org/wiki/64DD#Games for a full list of Nintendo 64DD games.
Nintendo 64DD requires region specific BIOS. Place the respective BIOS from the list below directly in Emulation/bios matching the region of your Nintendo 64DD game.
64DD_IPL_US.n6464DD_IPL_JP.n6464DD_IPL_DEV.n64
Note:
- The BIOS must be named exactly as above. BIOS with any deviations from the above will not work. Make sure you have the proper casing, characters, and spelling.
- BIOS must be placed in
Emulation/bios. If you create a sub-folder, the BIOS will not be picked up and Nintendo 64DD games will not work.
For the following games, place the Nintendo 64DD ROM in Emulation/roms/n64 or Emulation/roms/n64dd, no additional set-up is required. These games are plug and play.
To play your games directly through Rosalie's Mupen GUI, your ROMs must be placed in Emulation/roms/n64. To use Steam ROM Manager or EmulationStation-DE, your ROMs may be either in Emulation/roms/n64 or Emulation/roms/n64dd.
Either parse your Nintendo 64DD games through the Nintendo 64 - RMG parser in Steam ROM Manager or play them directly through EmulationStation-DE.
- Mario Artist: Paint Studio
- Doshin the Giant
- Mario Artist: Talent Studio
- SimCity 64
- Japan Pro Golf Tour 64
- Doshin the Giant: Tinkling Toddler Liberation Front! Assemble!
- Mario Artist: Communication Kit
- Mario Artist: Polygon Studio
Note: Mario Artist will boot but the mouse peripheral is not supported at this time.
For the F-Zero X Expansion Kit, follow the below steps
- Place your base Nintendo 64
F-Zero XROM inEmulation/roms/n64and theF-Zero X Expansion KitN64DD ROM inEmulation/roms/n64dd- The regions for the base ROM and the expansion kit need to match. If you are using the Japanese
F-Zero X Expansion KitROM, you need a JapaneseF-Zero XROM
- The regions for the base ROM and the expansion kit need to match. If you are using the Japanese
- Right click
F-Zero X, clickEdit Game Settings - Click the
Coretab under theGametab - Check
Override Core Settings - Change the
CPU EmulatortoCached Interpreter, close out of the settings menu - Right click the base
F-Zero XROM, clickPlay Game With Diskand select theF-Zero X Expansion KitN64DD ROM inEmulation/roms/n64dd
Optional: How to Add F-Zero X Expansion Kit directly to Steam
- Place your base Nintendo 64
F-Zero XROM inEmulation/roms/n64and theF-Zero X Expansion KitN64DD ROM inEmulation/roms/n64dd - Parse your base
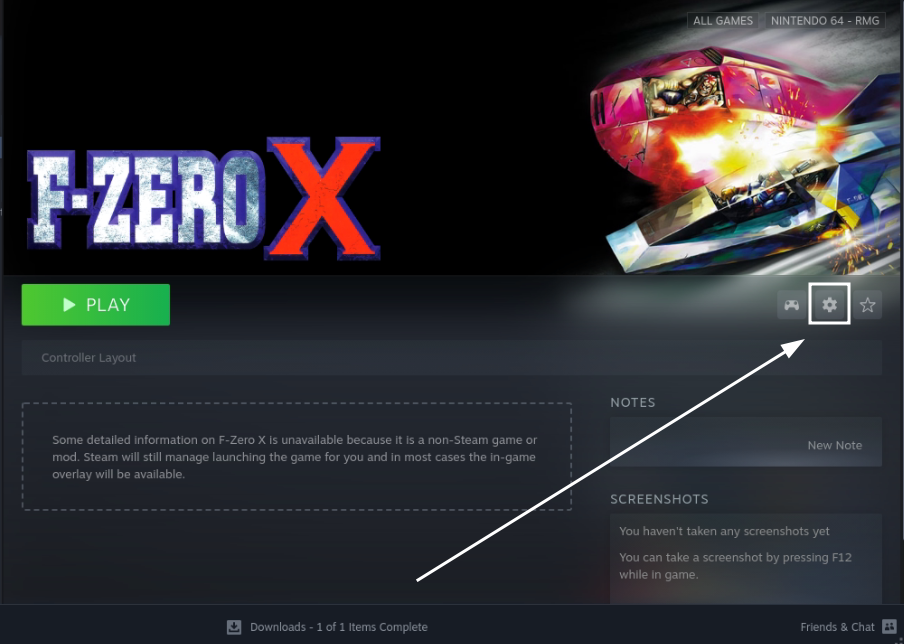
F-Zero XROM through theNintendo 64 - RMGparser in Steam ROM Manager - In Desktop Mode, open Steam, select the
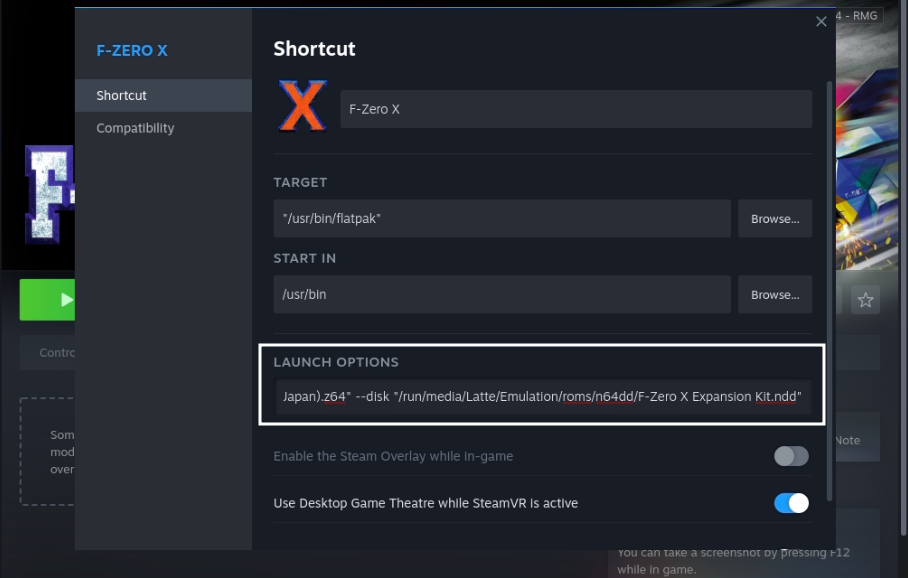
F-Zero XROM, click theGearicon, clickProperties - Scroll to the end of the
Launch Optionsbox and add--disk "/path/to/F-Zero X Expansion Kit"(write the path with the quotes)
How to Use Cheats
Mid-Game
- While in game, use the left Trackpad and select the
Cheatsicon- Steam Input profiles for Nintendo 64 ROMs and EmulationStation-DE are enabled by default. However, if you do not see the Trackpad menu, see How to Select a Steam Input Profile
- Select which cheats you would like to use
Emulator
- Open Rosalie's Mupen GUI
- Right click a game
- Click
Edit cheats- If you would like to add new cheats, it is recommended you do so in Desktop Mode
How to Roll Back RMG to an Older Version
If you do not have access to a mouse and keyboard for the below section, use L2 to right click and R2 to left click. Alternatively, remote into your Steam Deck using one of the methods found in the FAQ, How do I remotely control my Steam Deck?.
- In Desktop Mode, open
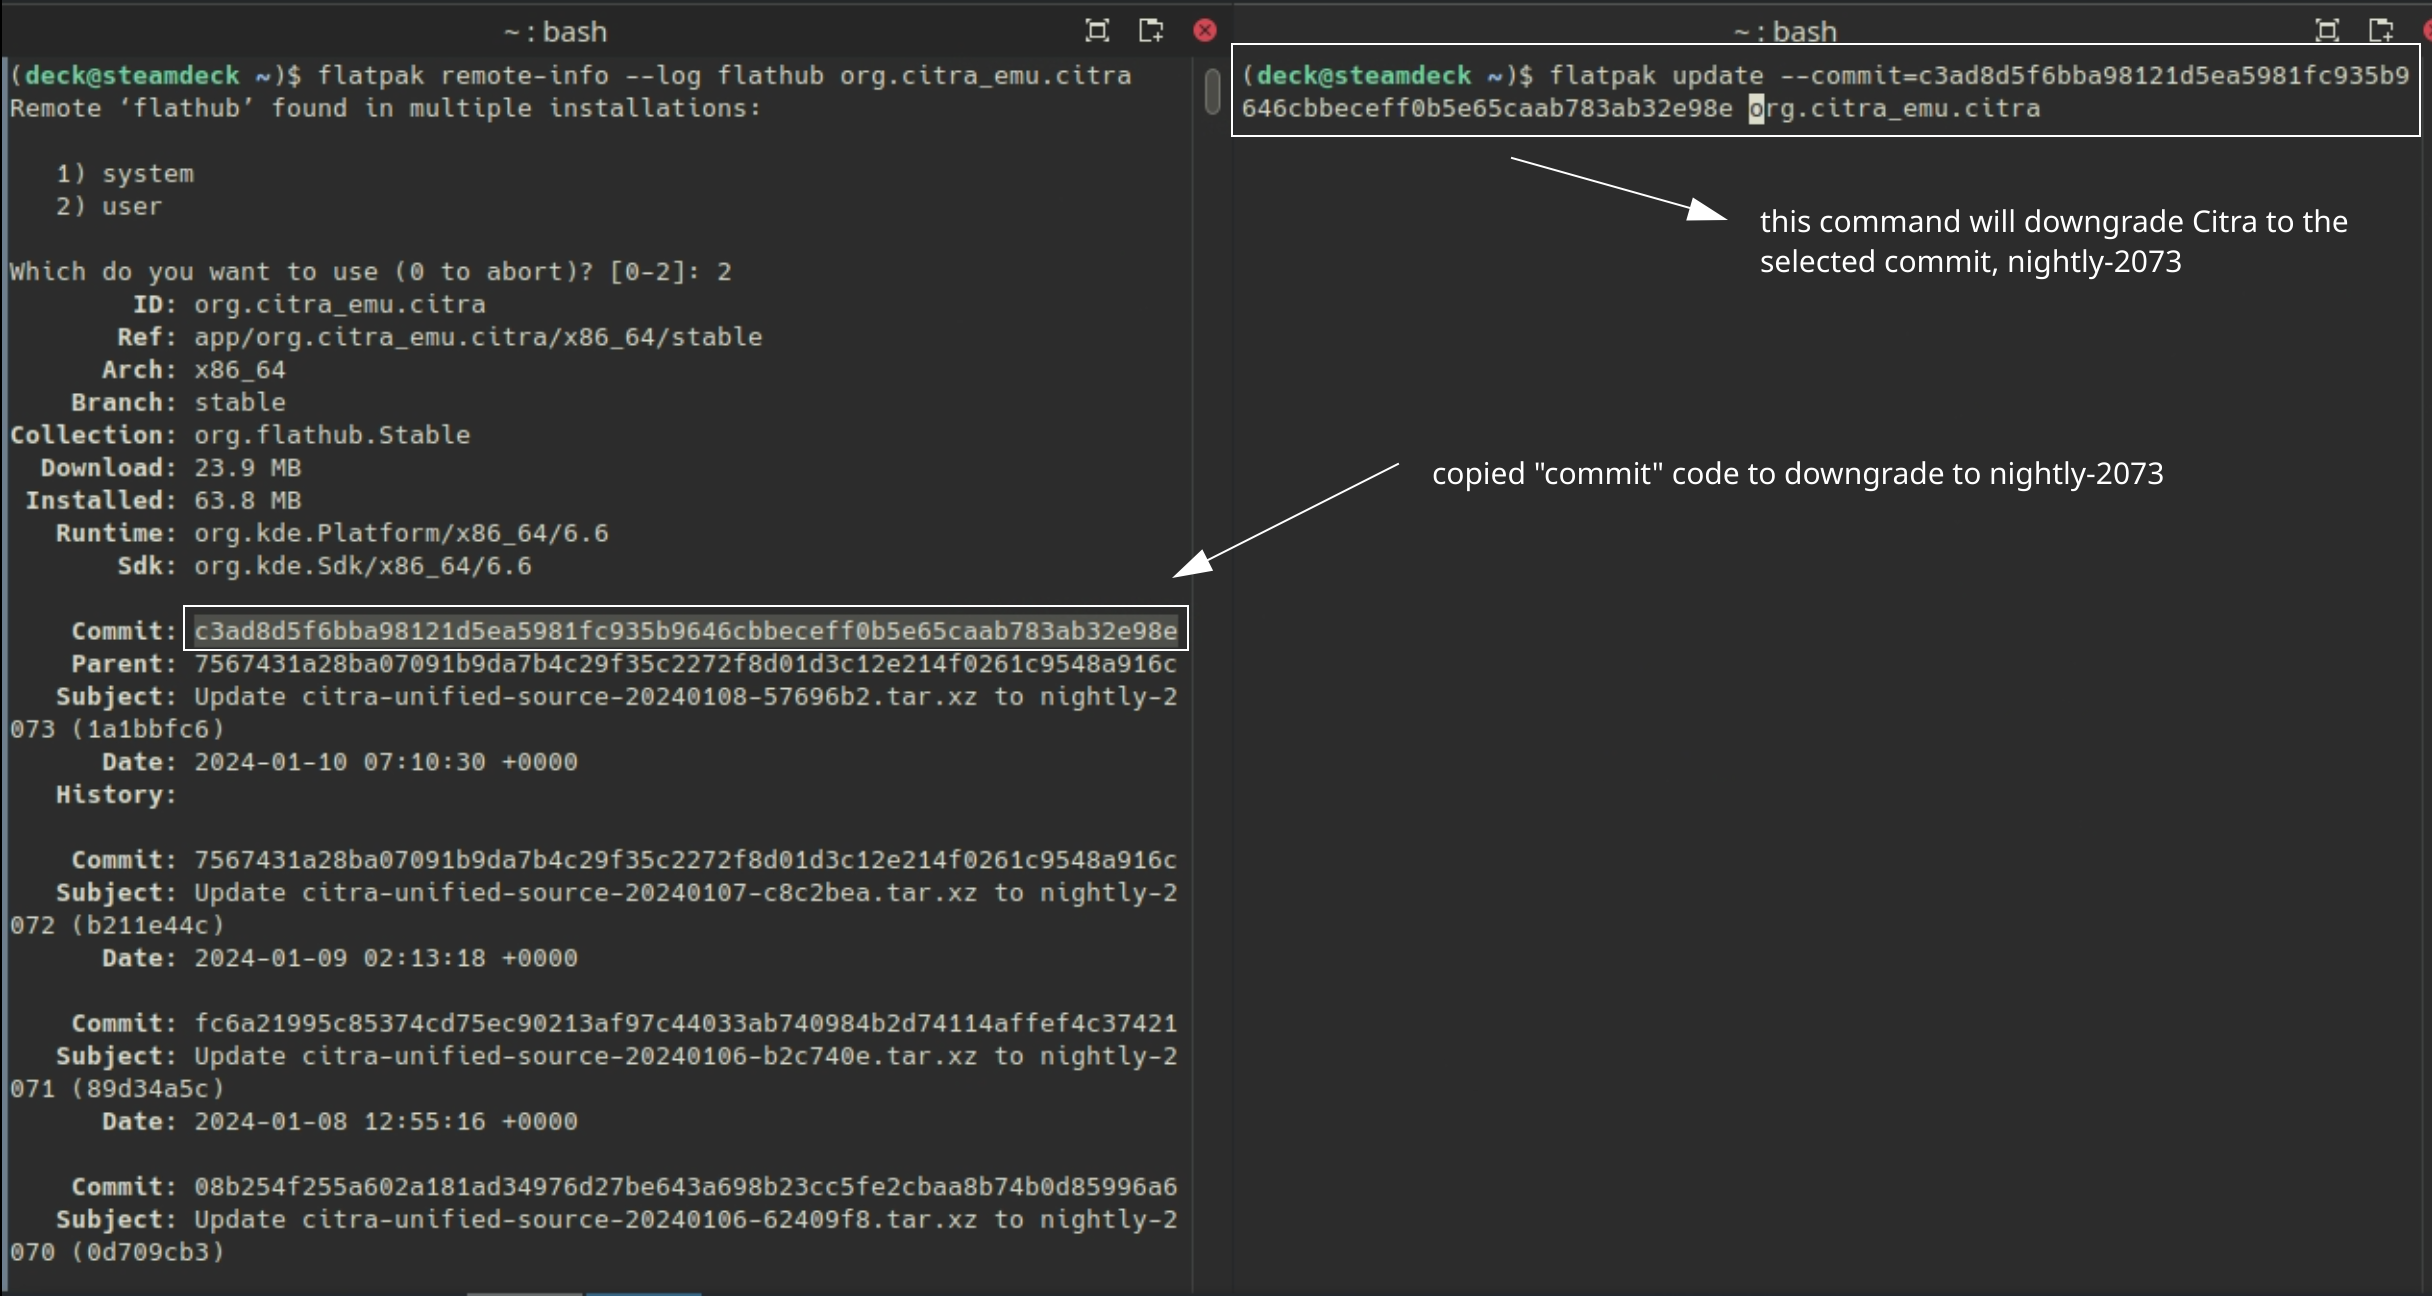
Konsole - To see a list of prior versions of the emulator, type:
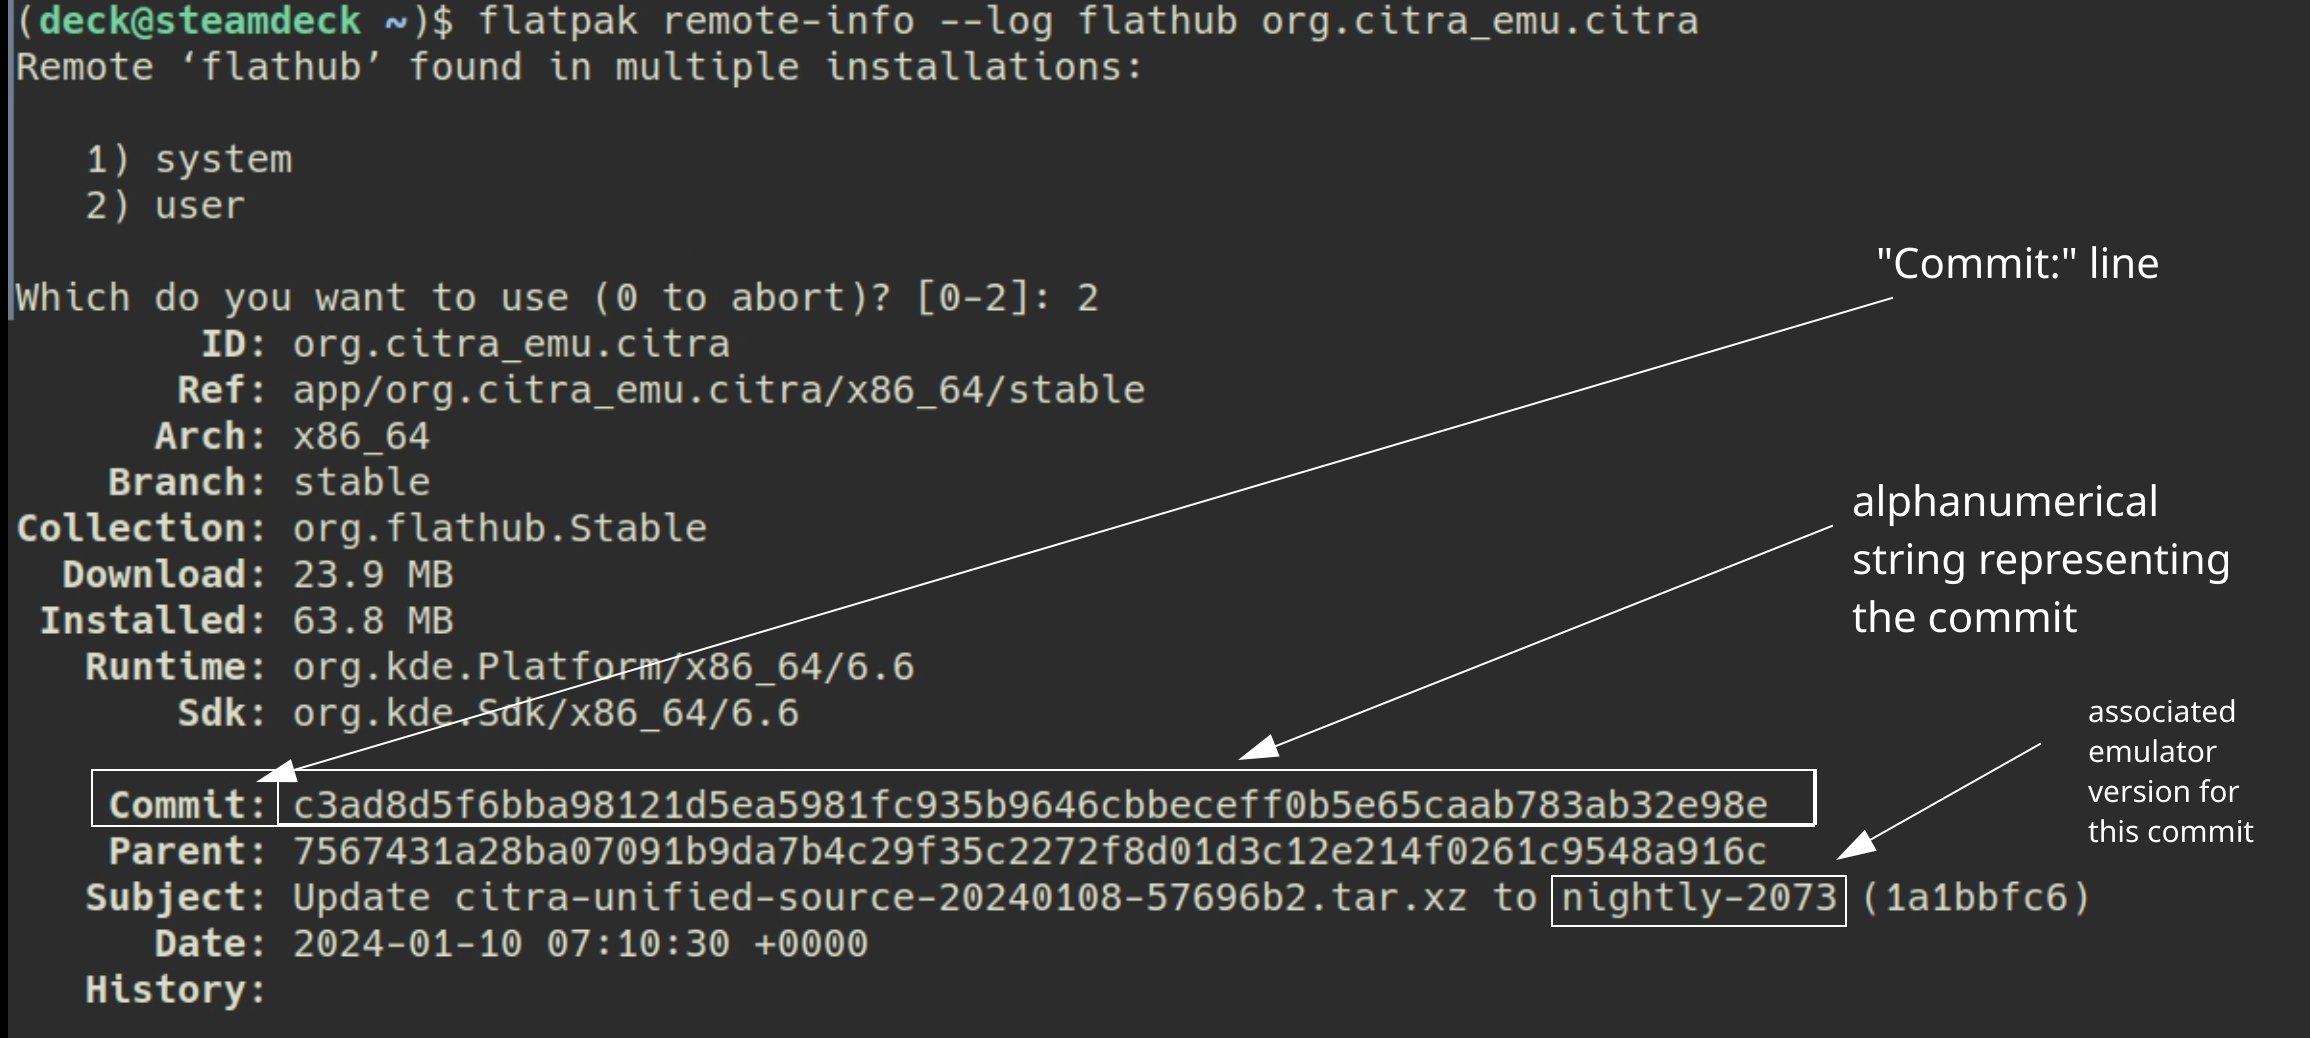
flatpak remote-info --log flathub com.github.Rosalie241.RMG
- If Konsole prompts you to select
systemoruser, enter2to selectuser - Konsole will list a list of previous versions for the flatpak. The important line for each version is the
Commit:line. TheCommit:line will have a long accompanying alphanumeric string (the “commit” code). Copy the string for the version you want to downgrade to. - To downgrade to the version you want:
If the above steps did not work and you are getting an error message along the lines of Flatpak not installed, your Flatpak is likely installed at the system level instead. Select one of the below solutions:
Solution 1: Open the EmuDeck application, click the Manage Emulators page, select the emulator in question, and click Reinstall / Update.
Solution 2: Add sudo in front of the commands written in Step 2 and Step 5. In Step 2, write sudo flatpak remote-info --log flathub com.github.Rosalie241.RMG and in Step 5, write sudo flatpak update --commit=put_commit_code_here com.github.Rosalie241.RMG.
How to Configure Language Settings
In-Game
Some games may not have language options. For a full list of which games have language options, click one of the below links.
- NTSC-U: http://micro-64.com/database/languagesntsc.shtml
- PAL: http://micro-64.com/database/languagespal.shtml
- Launch a game that supports your preferred language
- Depending on the game:
- Select your preferred language on the initial launch of the game
- In the main menu of the game, open the Options menu and select your preferred language


